im so sorry this will come a bit later there was a lot of damage last night
Night 5 GHOST Complex Map
Map Key:


- Door is locked, pathway cannot be used.


- Door is paranormal exclusive, cannot be used on the normal map.


- Door is unlocked.

- Elevator, connects all three floors.


- Staircase or passage to floor above.


- Staircase of passage to floor below.

- Room is always lit by Darklight.

- Hazard, varies by location.

- Dark Moon Shard (Claimed)

- Pixelator, allows transport between two specific rooms.

- Z-Gate - allows living players access to/from the Paranormal Dimension.


- Elementals - Harmless ghosts imparting elemental energy gather here.
FIRST FLOOR - Valley of Darklights
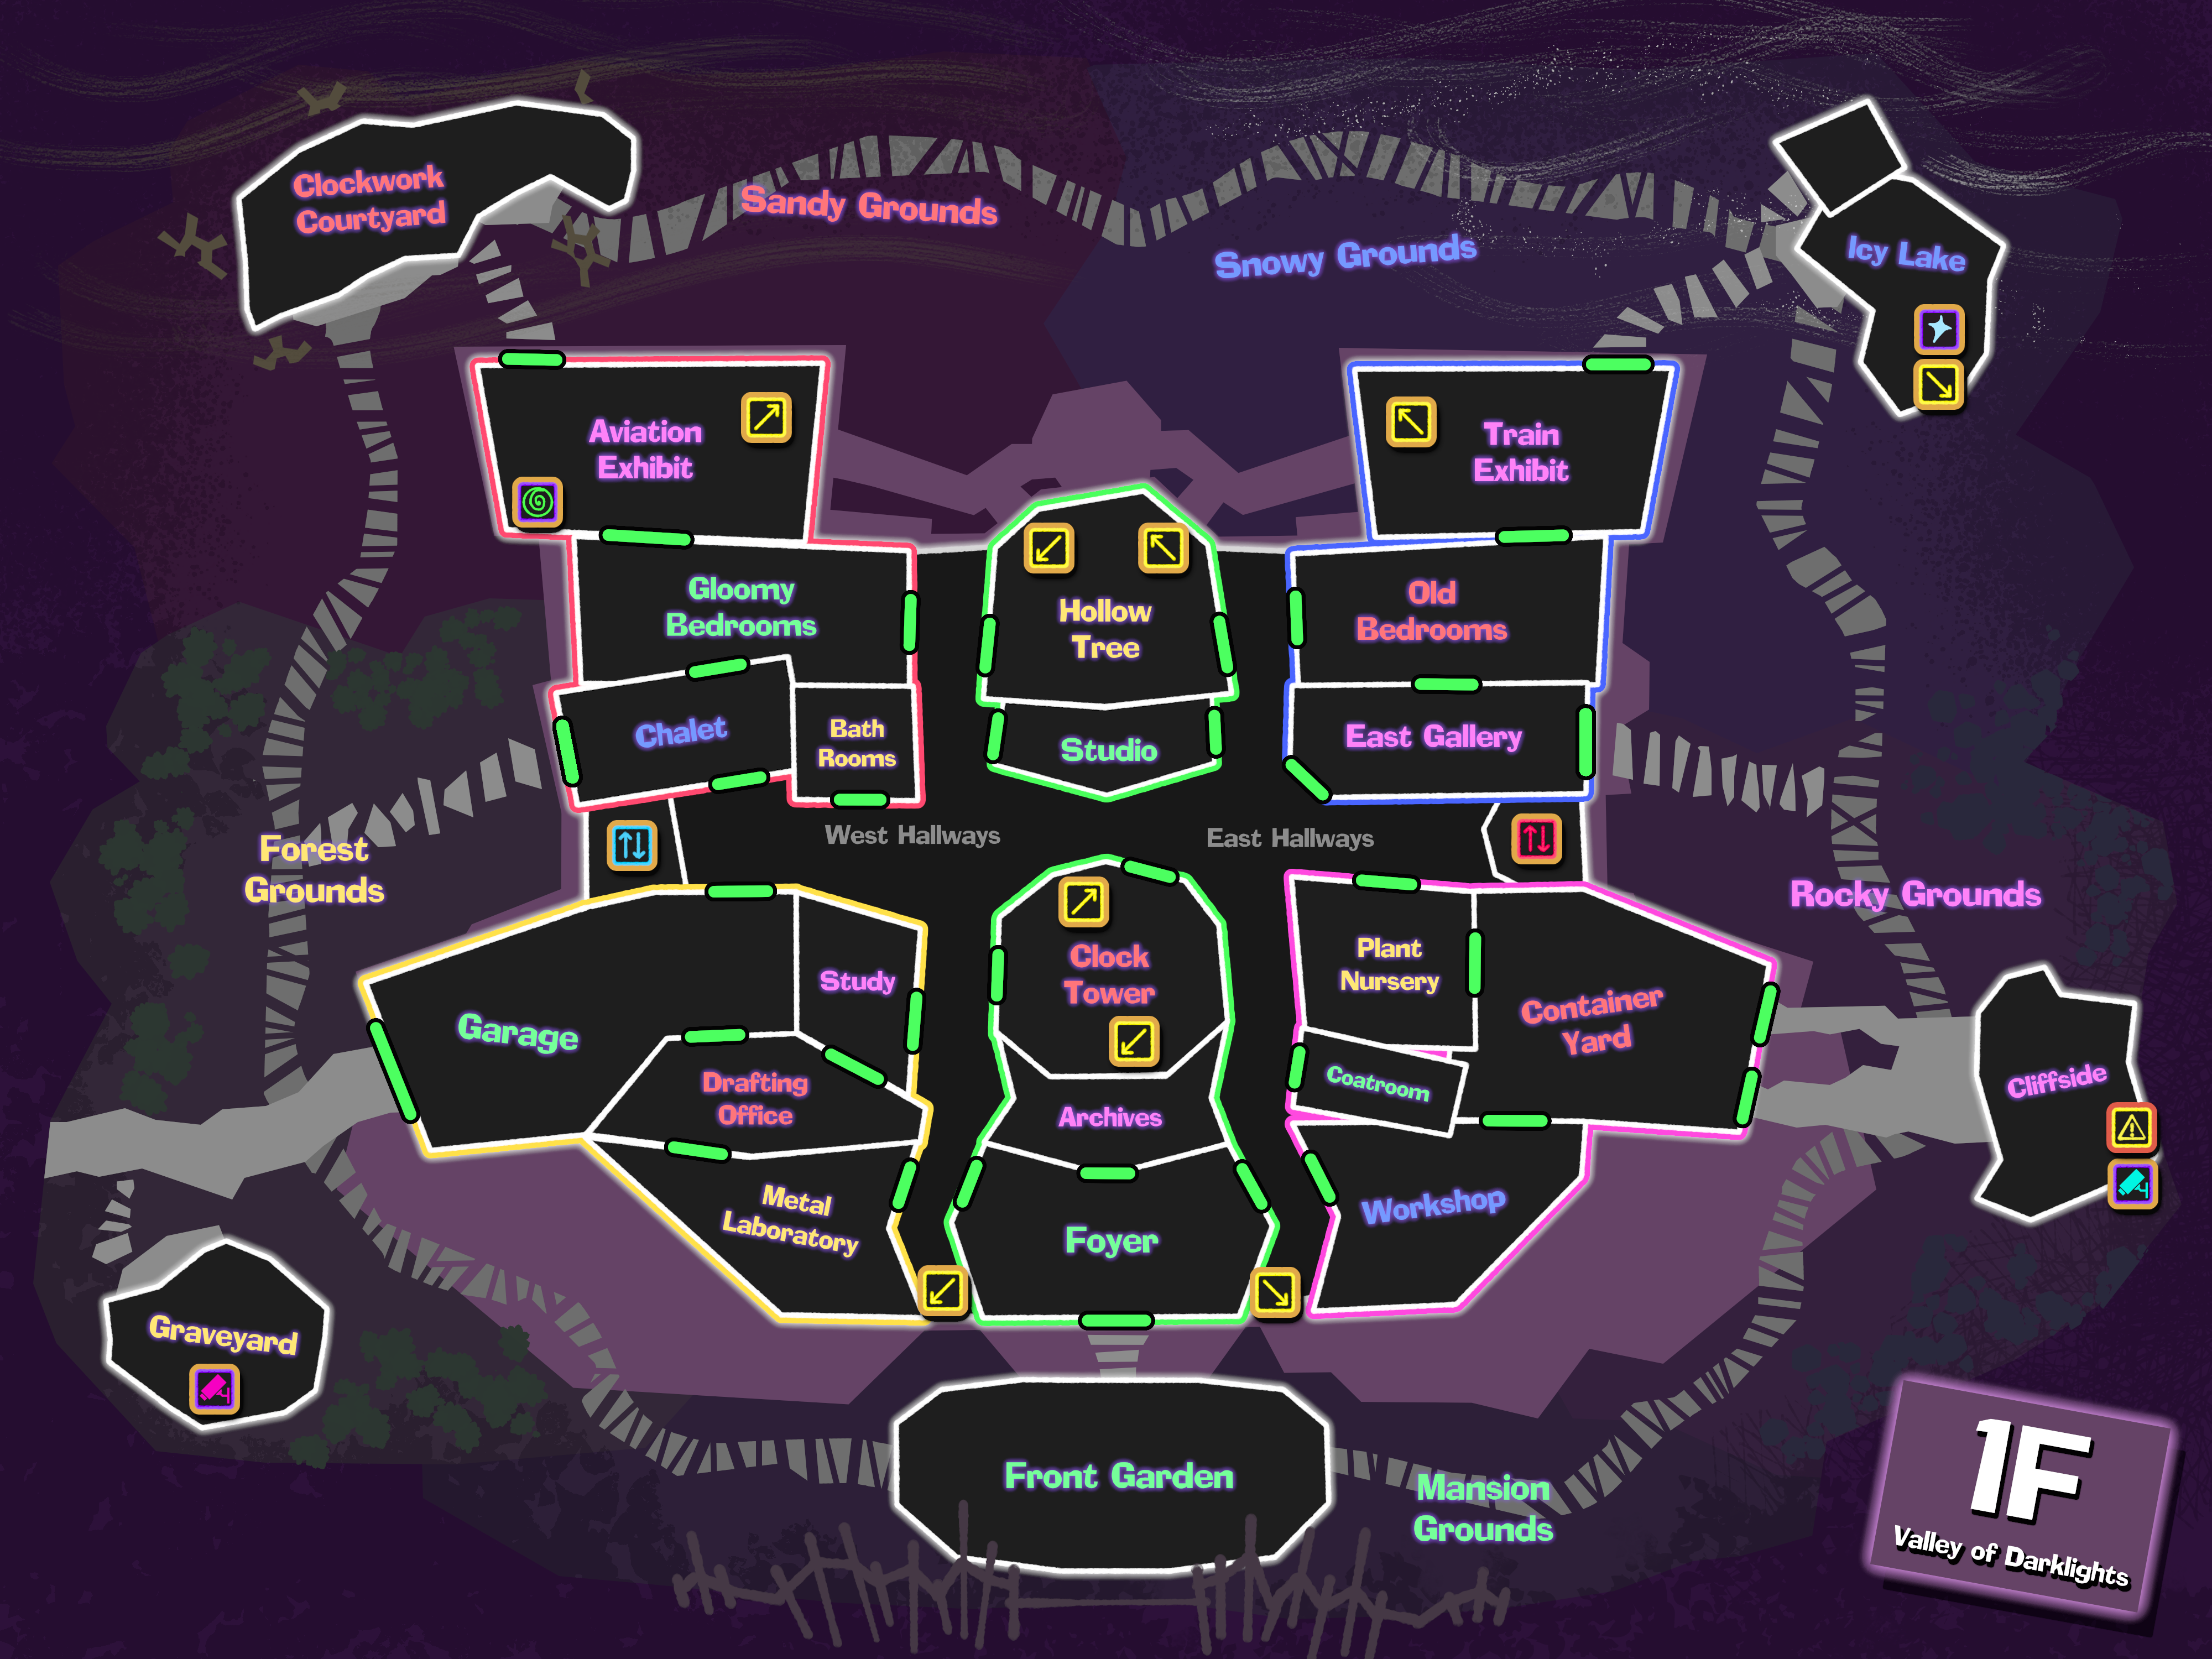
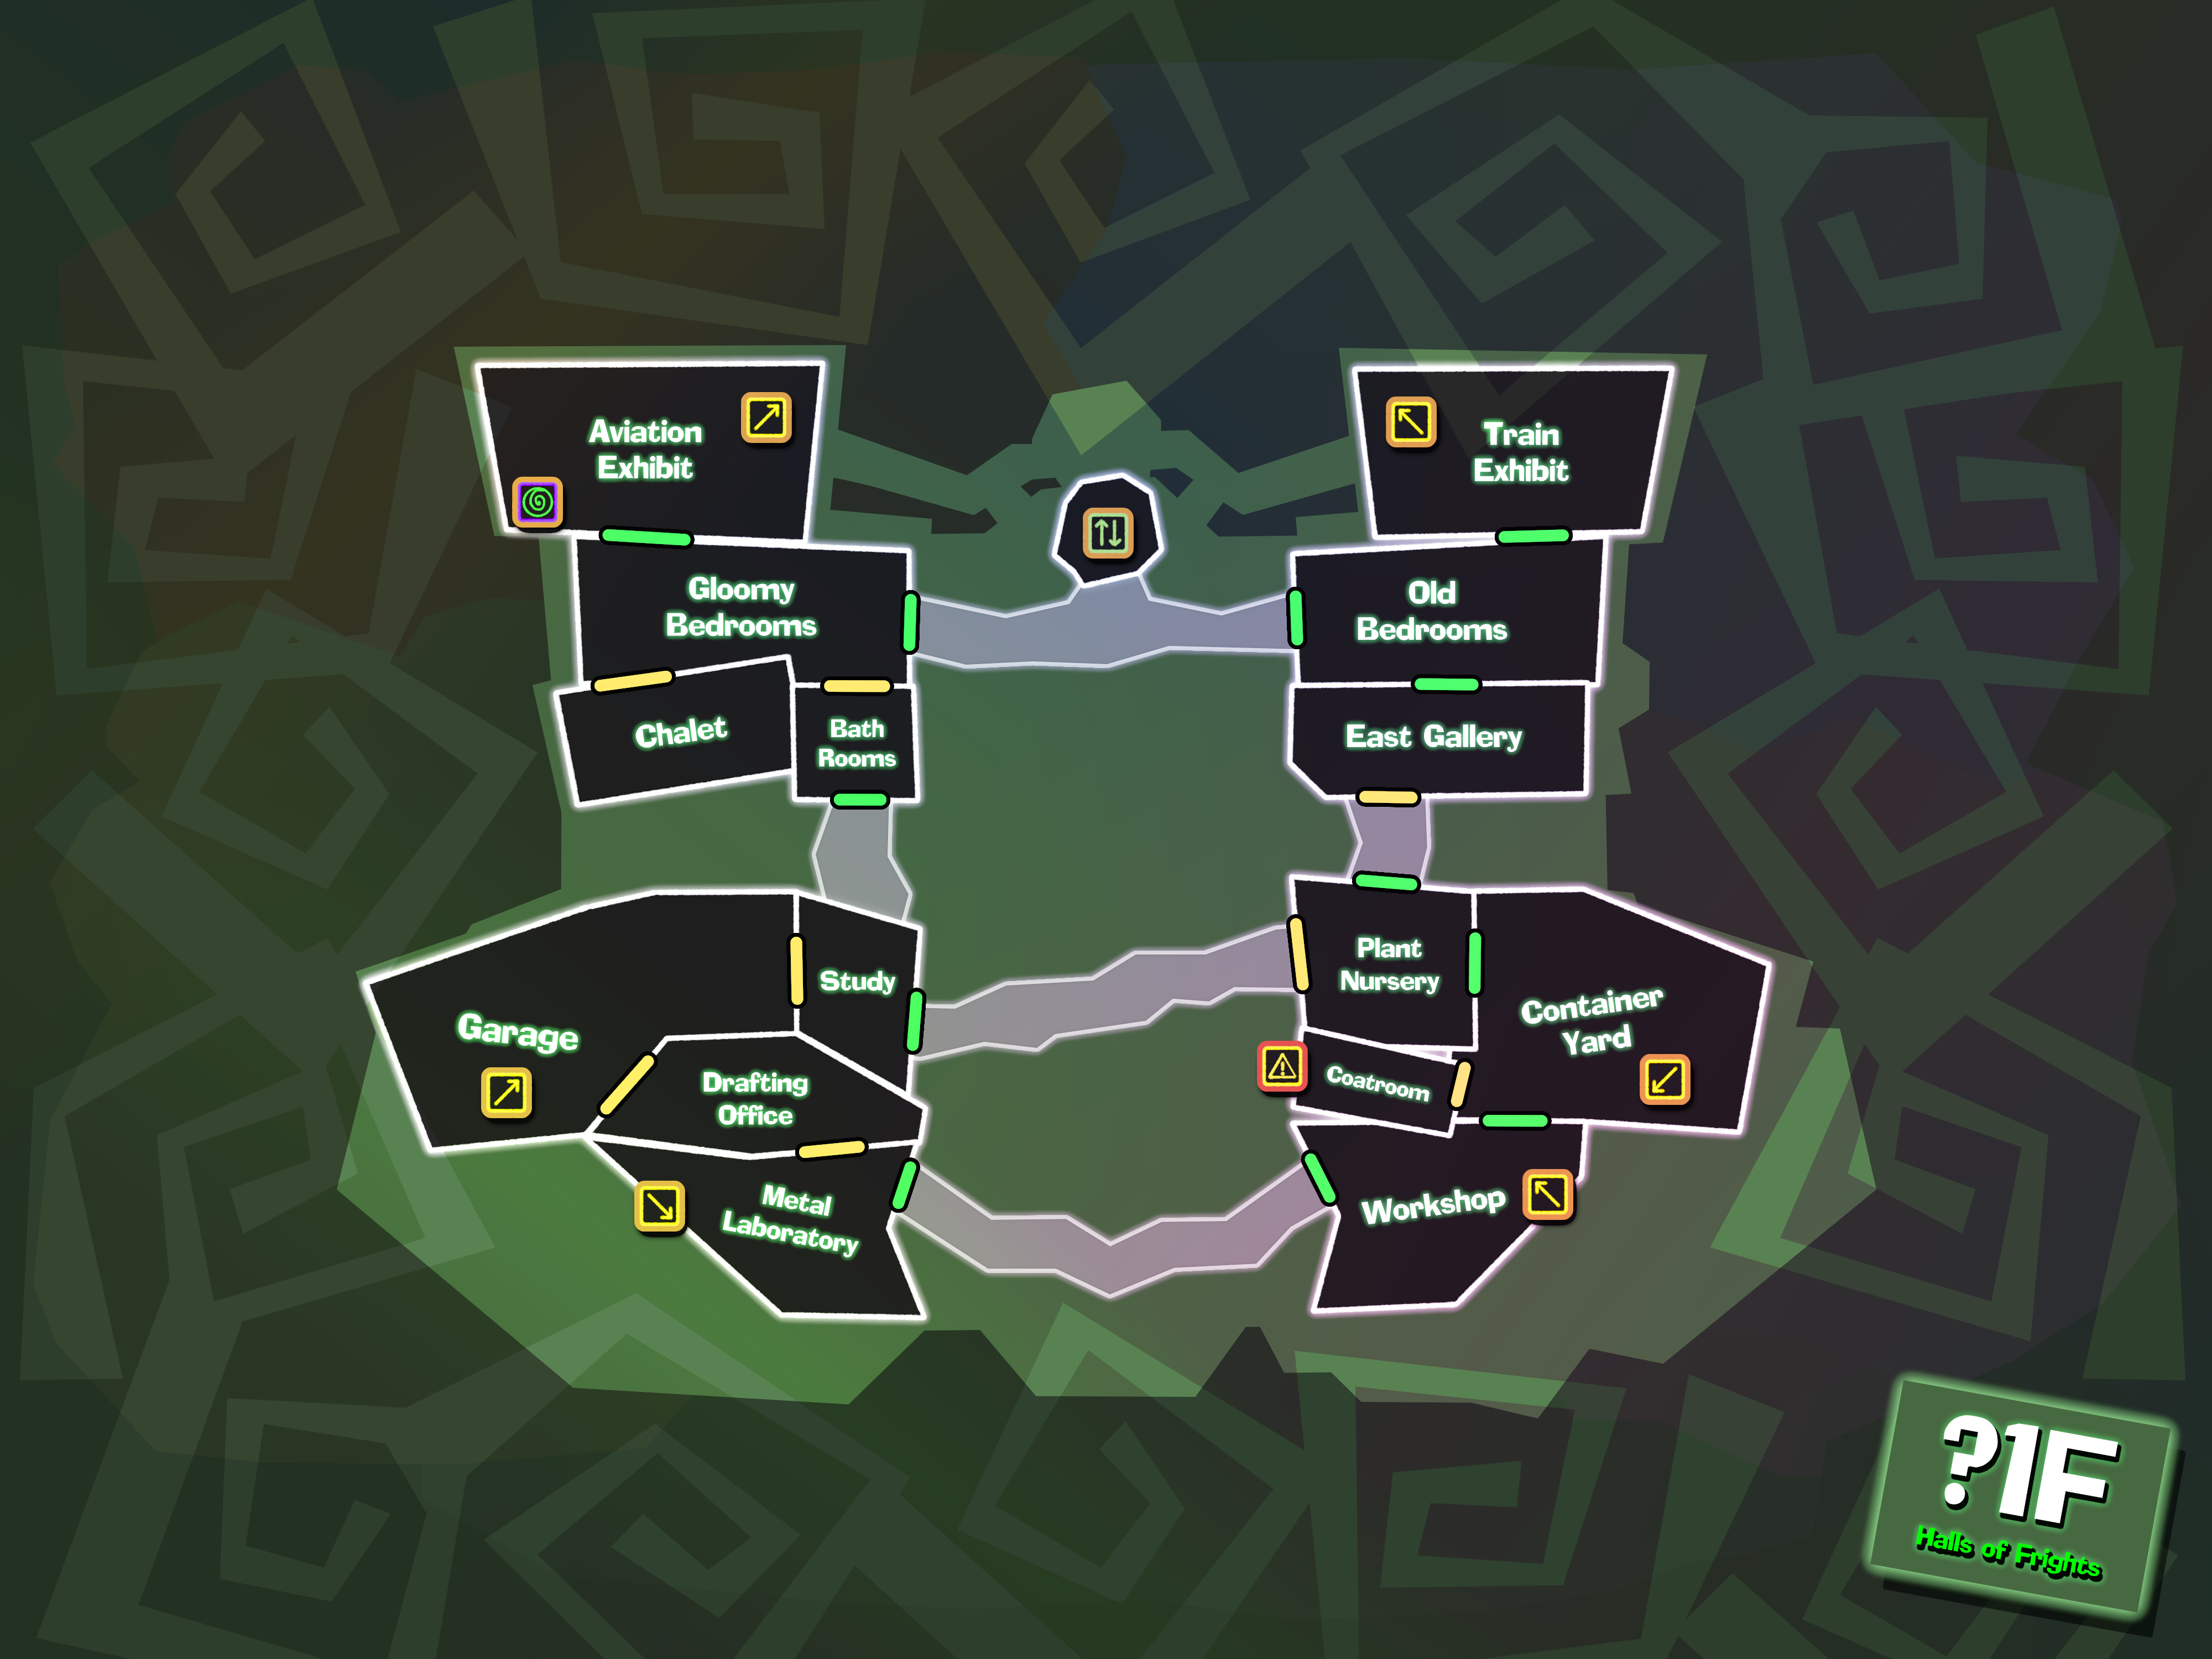 1F Emerald Wing
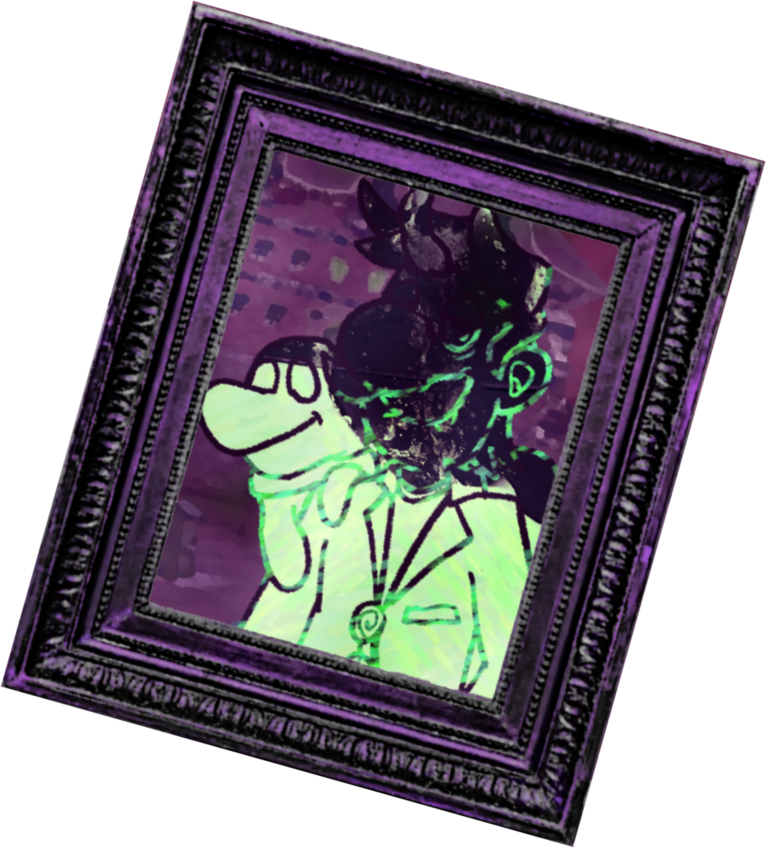
- Foyer: The large central foyer that one enters the Complex through. Besides a grand entrance and chandelier, there's even an aquarium with tropical fish. A huge mess from the great fight on Night 1 remains in the lobby. The chandelier has been smashed. A vault with a rusted-over lock has been uncovered behind a mysterious painting.
- Archives: This room contains several boxes of densely-written documents, and a large computer server plugged into the wall.
 Clock Tower: A huge clock tower that extends through all three floors and the roof of the Complex. Inside the tower is a staircase extending both up and down, and a huge pendulum swinging behind frosted glass. The clock can be seen while standing outside at the front of the Complex. The clock tower has stopped entirely.
- Studio: A small room full of art supplies and blank canvases, as well as a nearly depleted amount of paint
- Hollow Tree: A large tree that extends through the entire Complex. Inside the tree is a beanstalk, which shoots through the center of the tree. You'll need to climb it to get higher or lower.
1F Topaz Wing
- Study: A room full of books on the four exhibits in the back of the Complex. The Laptop remains missing.
- Garage: Contains a single car parked in the middle of the garage, a large garage door exiting to the outside, and various car tools lying around the interior. The car is outside, and exploded. NO fuel or motor oil remains in here.
- Metal Laboratory: A high-end laboratory with all sorts of high-end technological equipment lying around in various stages of repair and examination. [Gaddget Roles have a special affinity for this room.]
- Drafting Office: An office for drafting designs, full of blueprints and other writing supplies.
 Shaft: A three-floor mining elevator now integrated into the main Complex.
1F Amethyst Wing
- Plant Nursery: A room full of exotic plants that require special growth conditions. It's been carefully arranged to provide said plants with all the right conditions they could want, but someone has wrecked most of the plants beyond saving.
- Container Yard: A large room full of various containers, with unknown contents. A big garage-style door leads outside, and handtrucks are available for moving them. The forklift is now a wreckage at the bottom of the cliffside.
- Coatroom: A burnt mess of a room that once held clothes and costumes.
- Workshop: A fancy workshop with plenty of tools and supplies, as well as a large workbench.
- Cargo Lift: A moving cargo platform that now serves as an elevator for the three floors of the Complex.
1F Ruby Wing
- Gloomy Bedrooms: A large communal dorm room that sleeps nine. It's decorated in a fancy mansion style.
- Chalet: A comfortable resting area, with a rocking chair, a fancy fireplace, and a big couch. The fireplace is currently lit.
- Bathroom: A rather upscale bathroom, with all the essentials - toilet, sink, bathtub, and least of all, soap.
 Aviation Exhibit: A big museum room about the history of aviation. A couple full-scale airplanes are on display. A back exit leads to the outside. The Z Gate has been activated. The exhibit is in shambles.
1F Sapphire Wing
- Old Bedrooms: A large communal dorm room that sleeps nine. It's decorated in a warm bunkhouse style.
- East Gallery: A fancy art gallery, this one devoted entirely to sculptures and physical displays. Mostly everything's been smashed to bits.
- Train Exhibit: A big museum room about the history of railroads. The train has been derailed for good.
Five Grounds: The outer grounds of the mansion. The same forces that created the G.H.O.S.T. Complex have left the land it sits on a patchwork of types - one part well-managed lawn, one part overgrown forest, one part desert sands, one part frozen turf, and one part barren rock.
- Front Garden: The main feature of the Mansion Grounds. A large, well-manicured garden with plenty of plants and a fancy fountain as the centerpiece. The fountain has been damaged slightly, and a golden grappling hook labeled AURUMDESIRE is here.
- Graveyard: The main feature of the Forest Grounds. A fully-loaded graveyard with plenty of gravestones, as well as a large mausoleum in the back. The mausoleum has a Pixilator, which connects to the Crypt.
- Clockworks Court: The main feature of the Sandy Grounds. A fenced approach to the Complex with plenty of clockwork pieces buried in the sand, some of them still turning. The gear mechanism has been solved, and the clock tower was struck with the "key".
- Ice Lake: The main feature of the Snowy Grounds The lake has been converted to a pile of frozen papery mush, with a tunnel leading to an unsealed hatch. A long ice slide leads from here to Under the Ice. A small fishing hut is adjacent to the now not-lake. An abandoned, frozen-over water pump serves as a spawning ground for Ice Elemental spirits.
- Cliffside: The main feature of the Rocky Grounds. The side of the outside sharply drops here rather than sloping down, with plenty of pointy, spiky rocks at the bottom. Spiked into the cliffside is a Pixilator, which connects to the Solarium.Lot of wreckage down there.
SECOND FLOOR - Abridged Heights
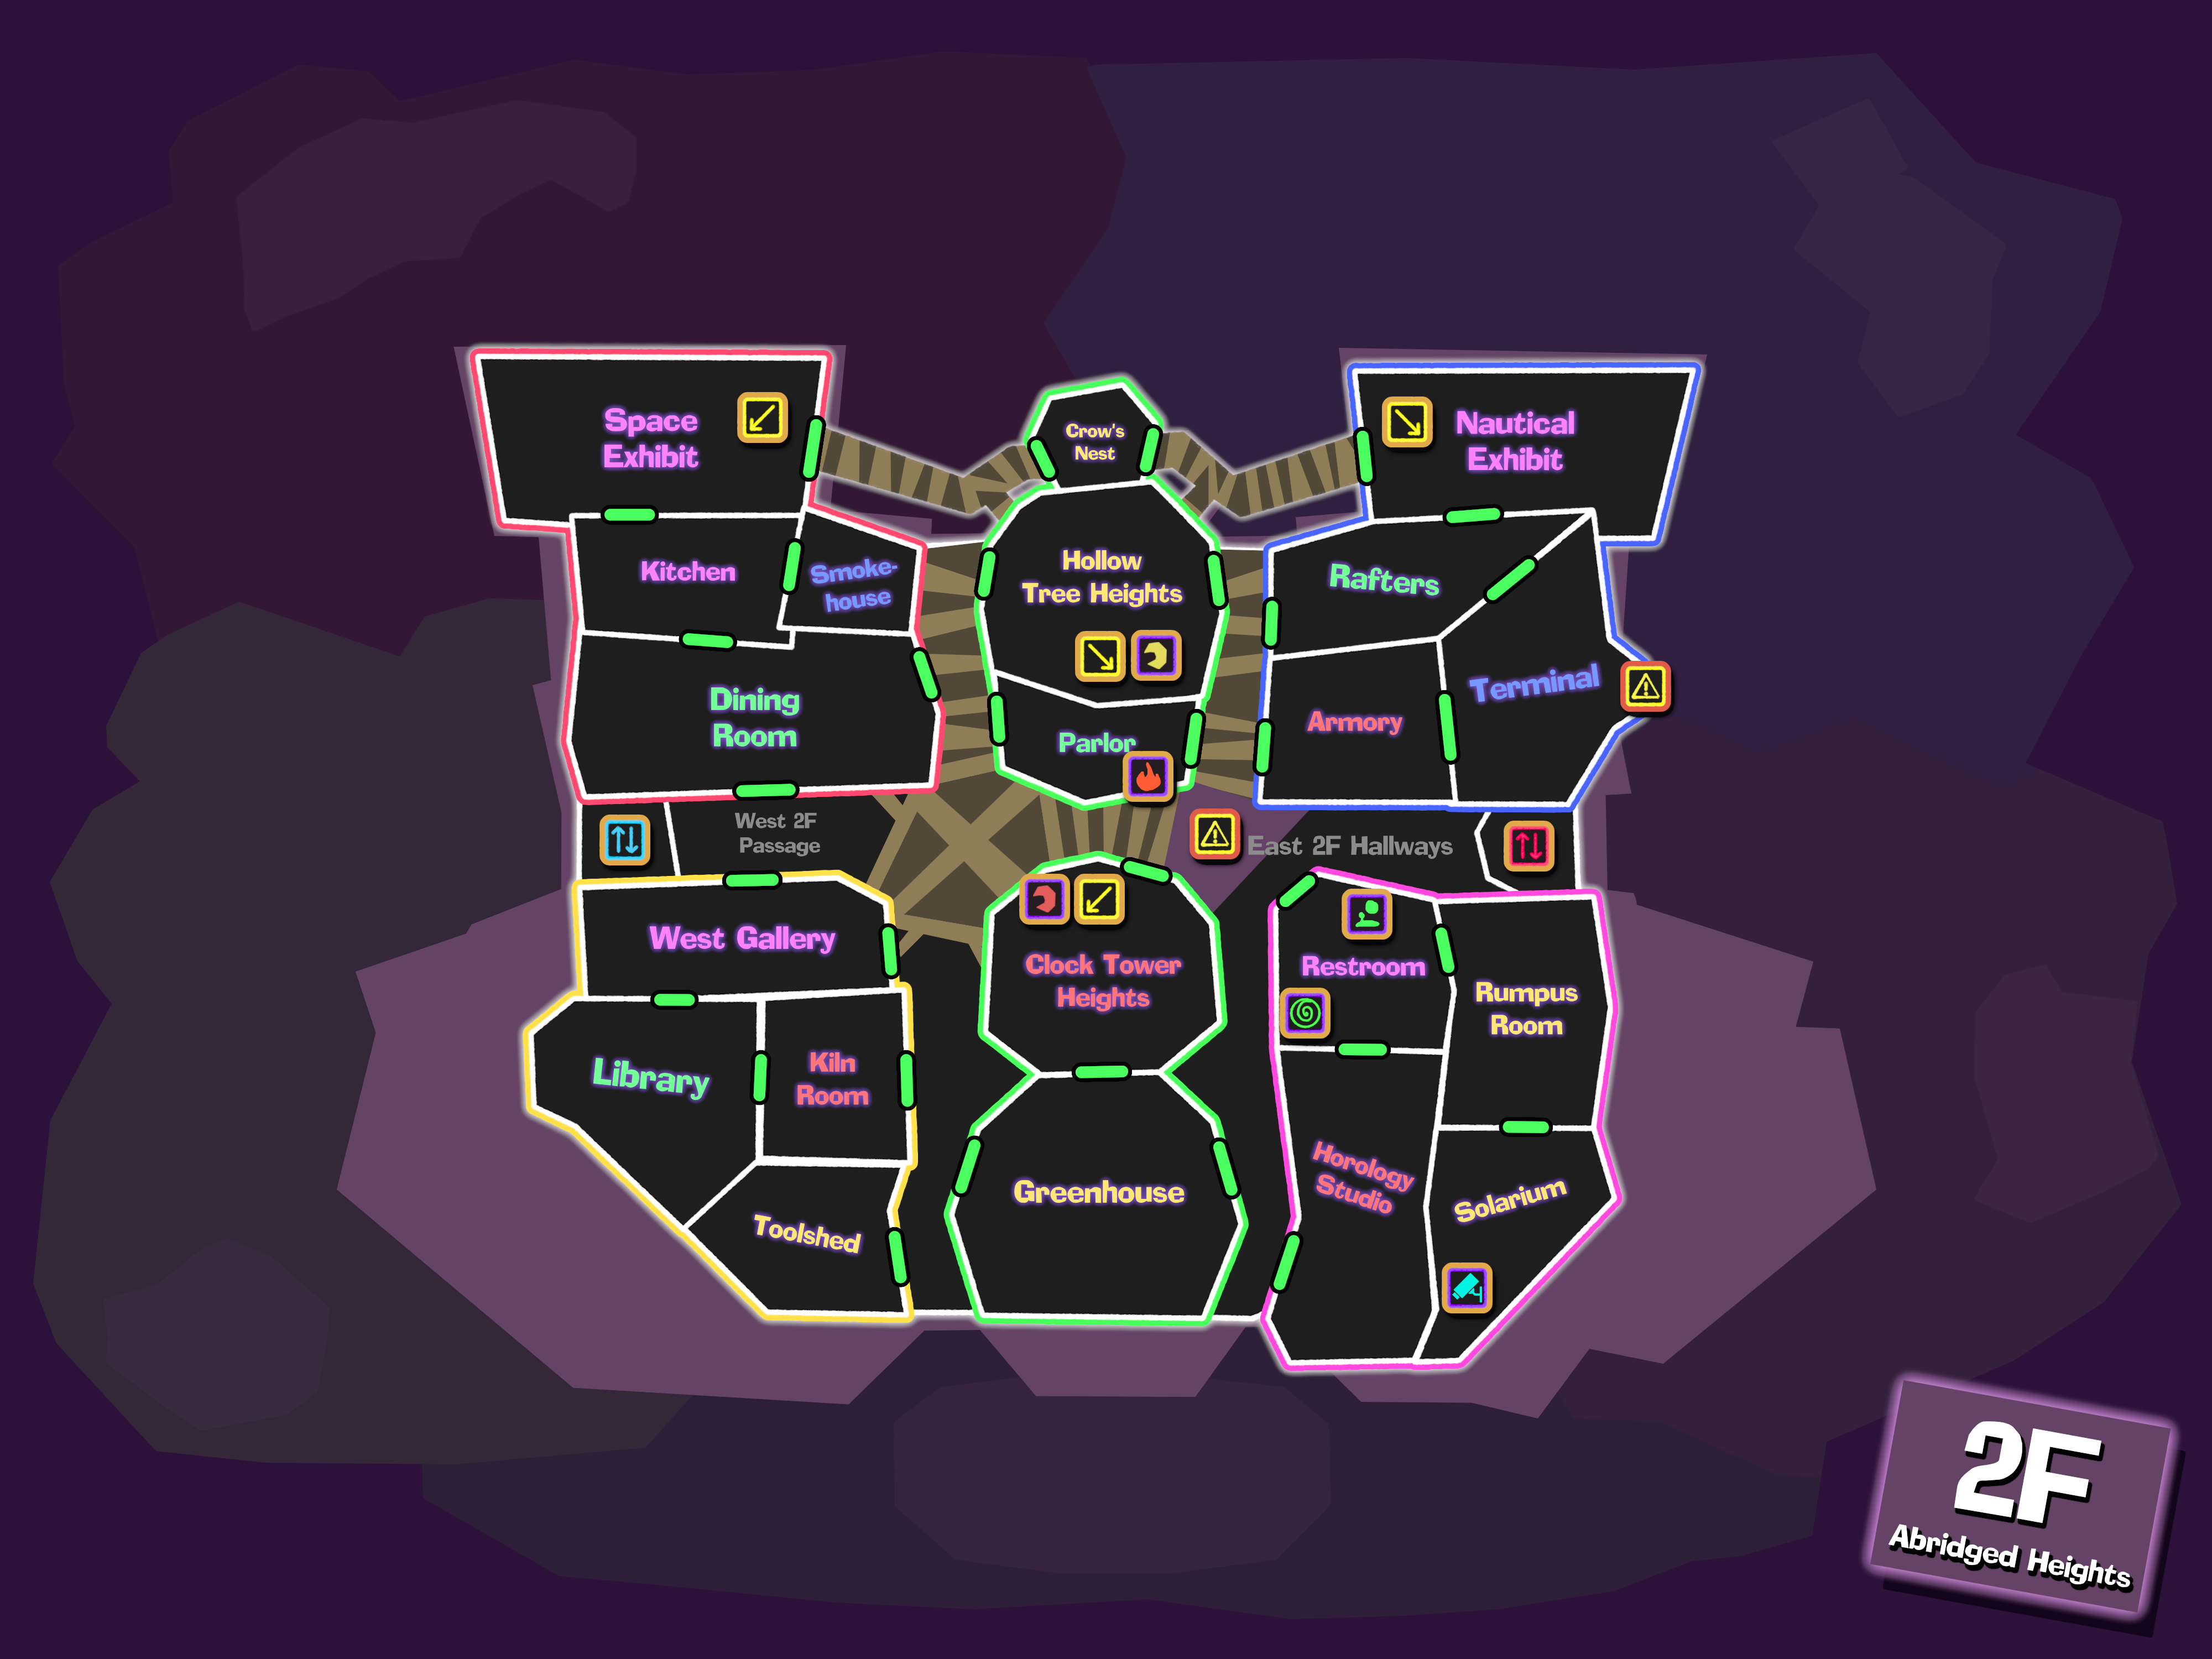
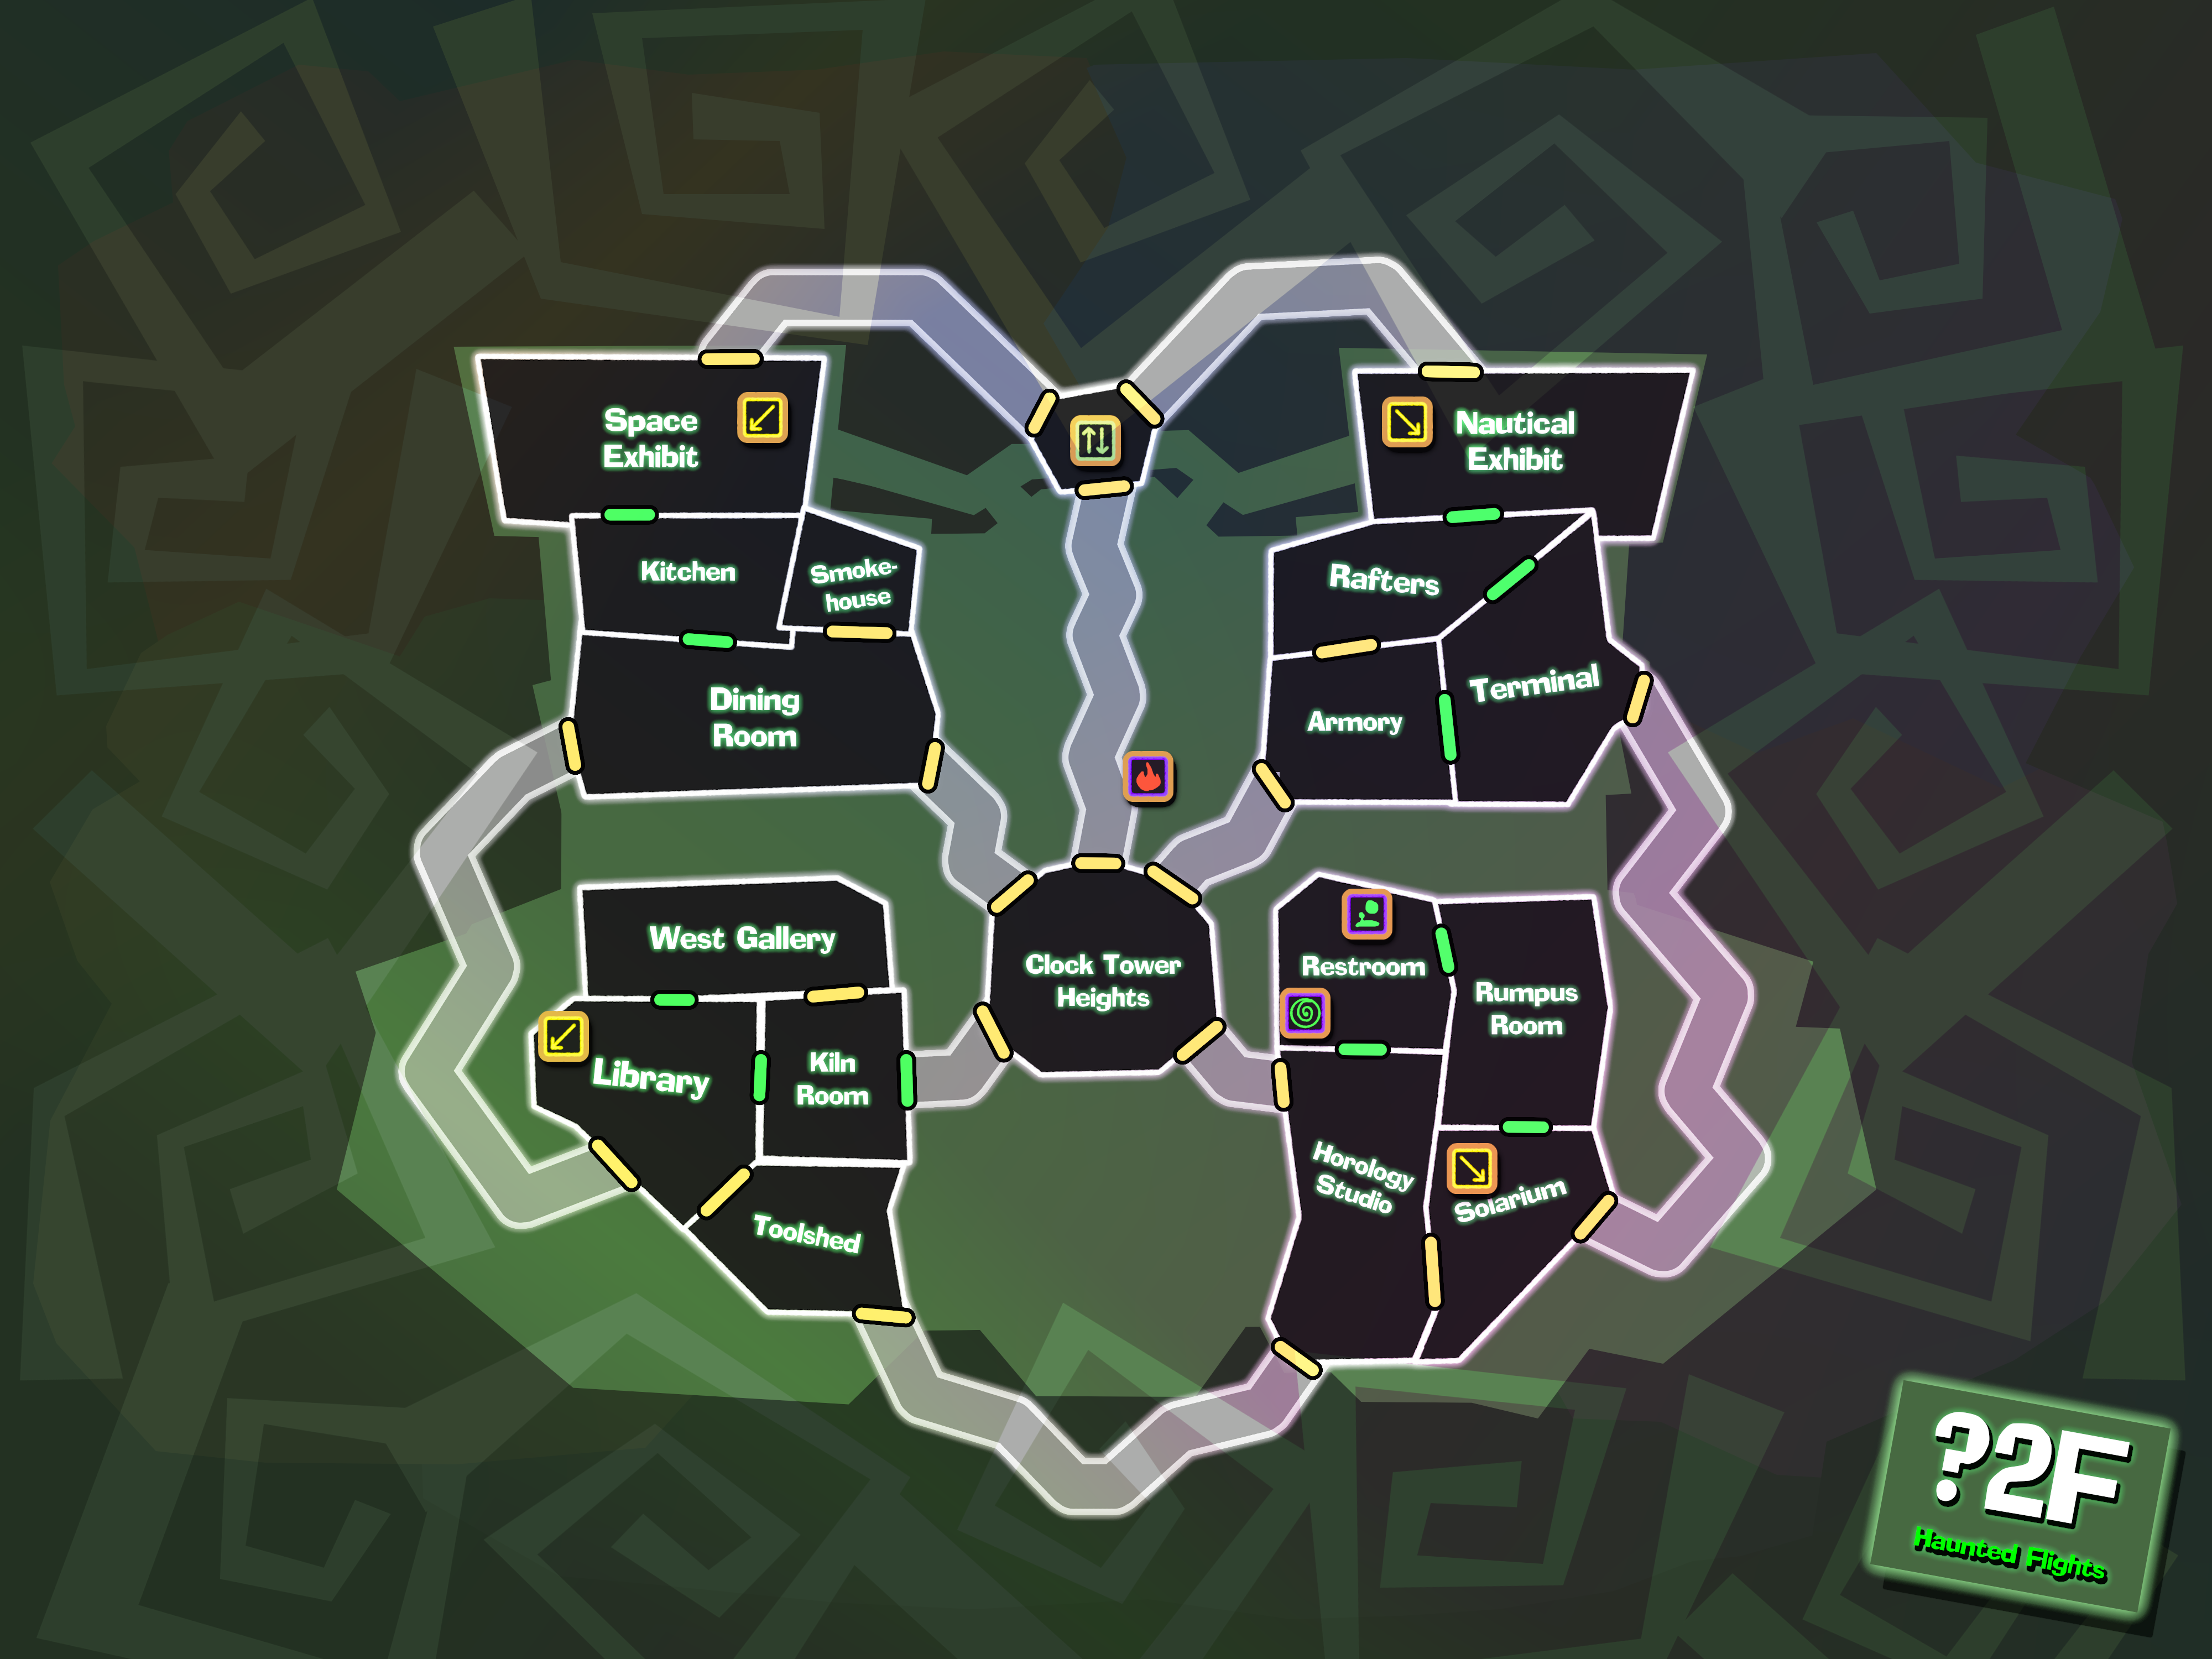 2F Emerald Wing
- Greenhouse: A well-stocked glass-roofed room with plenty of conventional plants. Automated systems manage their care, but someone has dug up most of the plants rather brutally.
 Clock Tower Heights: A huge clock tower that extends through all three floors and the roof of the Complex. Inside the tower is a staircase extending both up and down, and a huge pendulum stands still behind frosted glass. The clock can be seen while standing outside at the front of the Complex. You can ascend here to the Belfry, where there's plenty of bats and dust.
- Parlor: A nice sitting room for lounging around. A phonograph with several records has been moved elsewhere. There's a couple chairs, a grandfather clock, and a lit fireplace as well. The fire is ghostly and eternal, and Fire Elementals make their home here.
- Hollow Tree Heights: A large tree that extends through the entire Complex. Inside the tree is a beanstalk, which shoots through the center of the tree. You'll need to climb it to get higher or lower. The beanstalk terminates at the Tree Tops, where you find a small treehouse filled with old furniture.
- Crow's Nest: A thin, rickety bridge that spans the exhibits of the second floor. It's only wide enough for one person to cross at a time. The east bridge has been torched, and is still usable, but could break easily with a good enough impact.
2F Topaz Wing
- West Gallery: A fancy art gallery, this one devoted entirely to empty walls and burned paintings and spider gunk.
- Library: A library well stocked with many, many books, along with a huge globe of the world and a grand piano, which has been smashed.
- Kiln Room: A room with a large firing kiln, though it's not big enough to fit a person inside. There's also plenty of clay and modeling supplies.
- Toolshed: The ??? room has been revealed and unlocked. A large toolshed with all sorts of gardening tools and supplies to maintain the many plants within the Complex.
- Shaft: A three-floor mining elevator now integrated into the main Complex.
2F Amethyst Wing
- Rumpus Room: A playroom with a whole lot of dolls, as well as an oversized dollhouse and huge teddy bear.
- Solarium: A room with huge glass windows to sit and view the outside with, along with some nice plants to add atmosphere. The still life paintings of plants are here, along with an activated Pixilator, which connects to the Cliffside.
- Horology Studio: A bedroom once used by a clockmaker. In testament to that, the room has a bed and many broken clocks in various stages of repair.
- Restroom: A utilitarian restroom with several stalls for privacy. The Z-Gate toilet has been activated.
- Cargo Lift: A moving cargo platform that now serves as an elevator for the three floors of the Complex.
2F Ruby Wing
- Dining Room: A massive table dominates this dining room, enough to seat everyone in the G.H.O.S.T Complex. There's plenty of chairs and some beautiful centerpieces.
- Kitchen: What used to be a functional kitchen has thoroughly flooded. All ovens and stovetops are unusable. Officially the most dangerous room in the facility. It seems the slimy beast has escaped the dumbwaiter.
- Smokehouse: A small room equipped to smoke meat for long-term effect. A flue in the ceiling ensures it won't fill up with smoke.
- Space Exhibit: An exhibit on the history of space travel. A fully functional spacesuit and non-functional model rocket are the centerpieces here, along with a large planetarium.
2F Sapphire Wing
- Armory: Several fancy suits of armor from various countries have been placed on display here... along with all their weapons.
- Terminal: A room with several computer screens showing various aspects of the mansion, as well as a set of high wires that you can ride down to the exterior first floor. You can't ride them back up, though! Not using the wires to descend would be ill-advised.
- Rafters: An attic-style storage room. Plenty of junk lies abandoned and unsorted here.
- Nautical Exhibit: Half of this room is shaped like a large dock, with the rest designed to look like the inside of a ship. The whole room talks about the history of sea travel, and plenty of nautical objects are contained within crates.
BASEMENT - Mining Sites
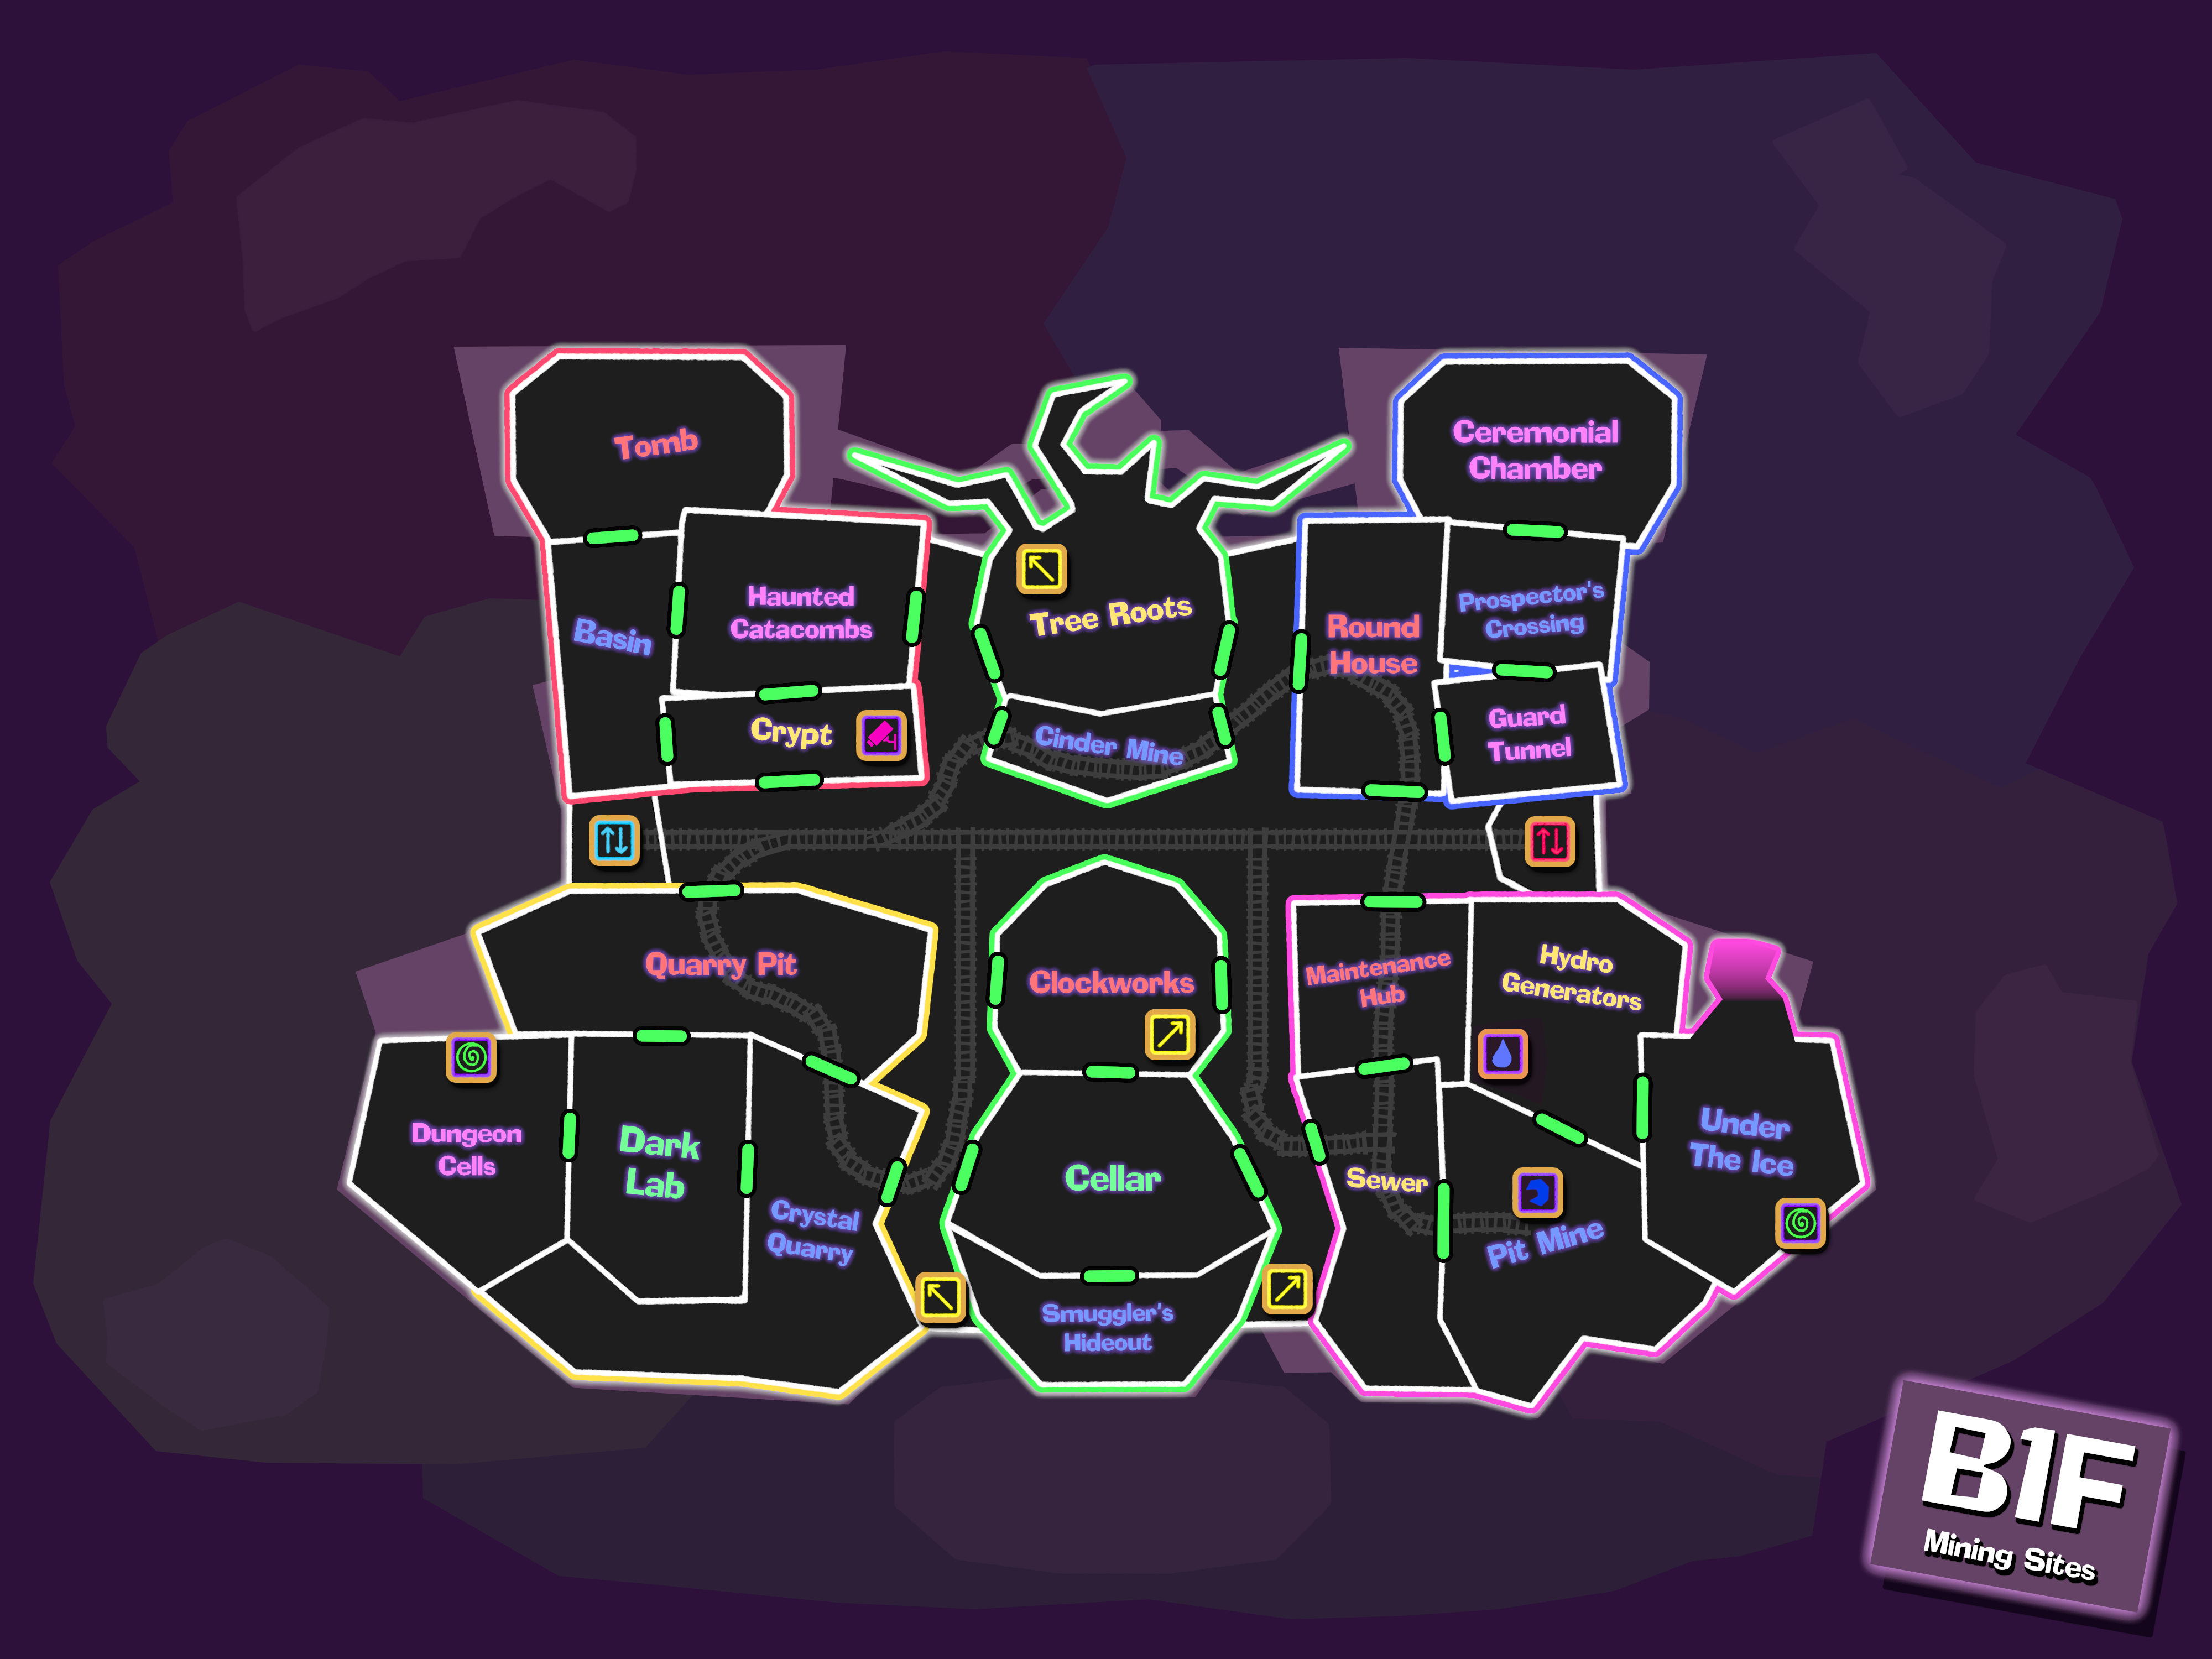
 B1F Emerald Wing
- Clockworks: The central machinery that powers the Clock Tower and keeps it on time. The gears are behind a strong transparent barrier, though a lock is visible at one side.
- Cellar: A large storage cellar tucked away in the basement. All sorts of nonperishable food supplies can be found down here.
- Smuggler's Hideout: A small room with plenty of treasure, currently frozen inside blocks of ice. All of the fanciest treasure chests have been raided.
- Cinder Mine: A room with surprisingly hot rock exposed in several places. Heatproof gear hangs by one of the entrances.
- Tree Roots: The roots of the Hollow Tree. The staircase ends here, and the roots have invaded the floor of the room. A smashed one-of-a-kind faberge clock lays tossed to one side, and a hole has been dug in the center of the room.
B1F Topaz Wing
- Quarry Pit: A deep pit that was once an active quarry. Now it's just a big hole in the ground, though you can circle around it via the outside.
- Darkness Laboratory: A humming laboratory with dim lightning. Odd devices sit around the room, and strange globs of energy are visible within sealed containers. [Ghost Roles have a special affinity for this room.]
- Crystal Quarry: A large room with several small crystals placed around a single huge one in the center. The huge crystal is opaque.
- Dungeon Cells: Multiple cages made of brick, mortar, and cast iron bars span the walls, with chains and moss aplenty laying around. A Z-Gate sits in one of the dungeon cells, and a spiky plant with multiple eye shaped red flowers is blossoming in another. On the furthest wall, locked behind a cell of its own... A lone, faded portrait. The apparent person within is unrecognizable.
- Shaft: A three-floor mining elevator now integrated into the main Complex.
B1F Amethyst Wing
- Sewer: A room with water channels in two directions - one flows into a storage tank for the building to use, and the other moves wastewater out of the Complex.
- Maintenance Hub: A room that holds a handcart, as well as various supplies for maintenance such as hammers, nails, or janitorial supplies.
- Pit Mine: A room filled with coal and coal veins, as well as minecarts full of coal. One of the minecarts has been pushed through a high pressurized pit to produce a hidden Dark Moon Shard, which has been claimed.
- Hydro Generators: The power room for the entire Complex. A series of powerful hydroelectric generators use water connected to the Sewer's tanks and create electric power for the building. A reservoir where Water Elementals reside is present.
- Cargo Lift: A moving cargo platform that now serves as an elevator for the three floors of the Complex.
- Under the Ice - A secret bunker entered via a long ice slide from under the Icy Lake. Contains emergency survival supplies, long term rations, and firearms. The Z-Gate has been powered, allowing access to the Paranormal Dimension from this room. A dead slimy carcass that reeks of fish is here. The puzzle solving RPG has been shot.
B1F Ruby Wing
- Crypt: An underground crypt. Some sealed coffins lie in state within the room. All of the coffins have been opened. One of the skulls has a Pixilator, which connects to the mausoleum in the Graveyard.
- Basin: A room with a completely frozen floor. The ice here is polished to a mirror finish.
- Haunted Catacombs: A maze-like room with more passages than should be possible. It's very easy to get lost here.
- Tomb: An ancient tomb of unknown make. A single massive sarcophagus sits in the middle of the room, with mysterious markings all over the walls. The door of the sarcophagus has been gnawed at.
B1F Sapphire Wing
- Roundhouse: The central hub of the minecart tracks that run throughout the Basement. Several minecarts can be found here, as well as various minecart and track controls.
- Guard Tunnel: A linear tunnel flanked by suits of armor on both sides. Approaching them causes them to automatically force you back.
- Prospector's Crossing: A small, frozen room. The ice that covers the entire middle of the room looks... concerningly precarious.
- Ceremonial Chamber: A huge throne sits in the center of this room, radiating power and authority. A banner with an unknown symbol hangs on the wall behind it.
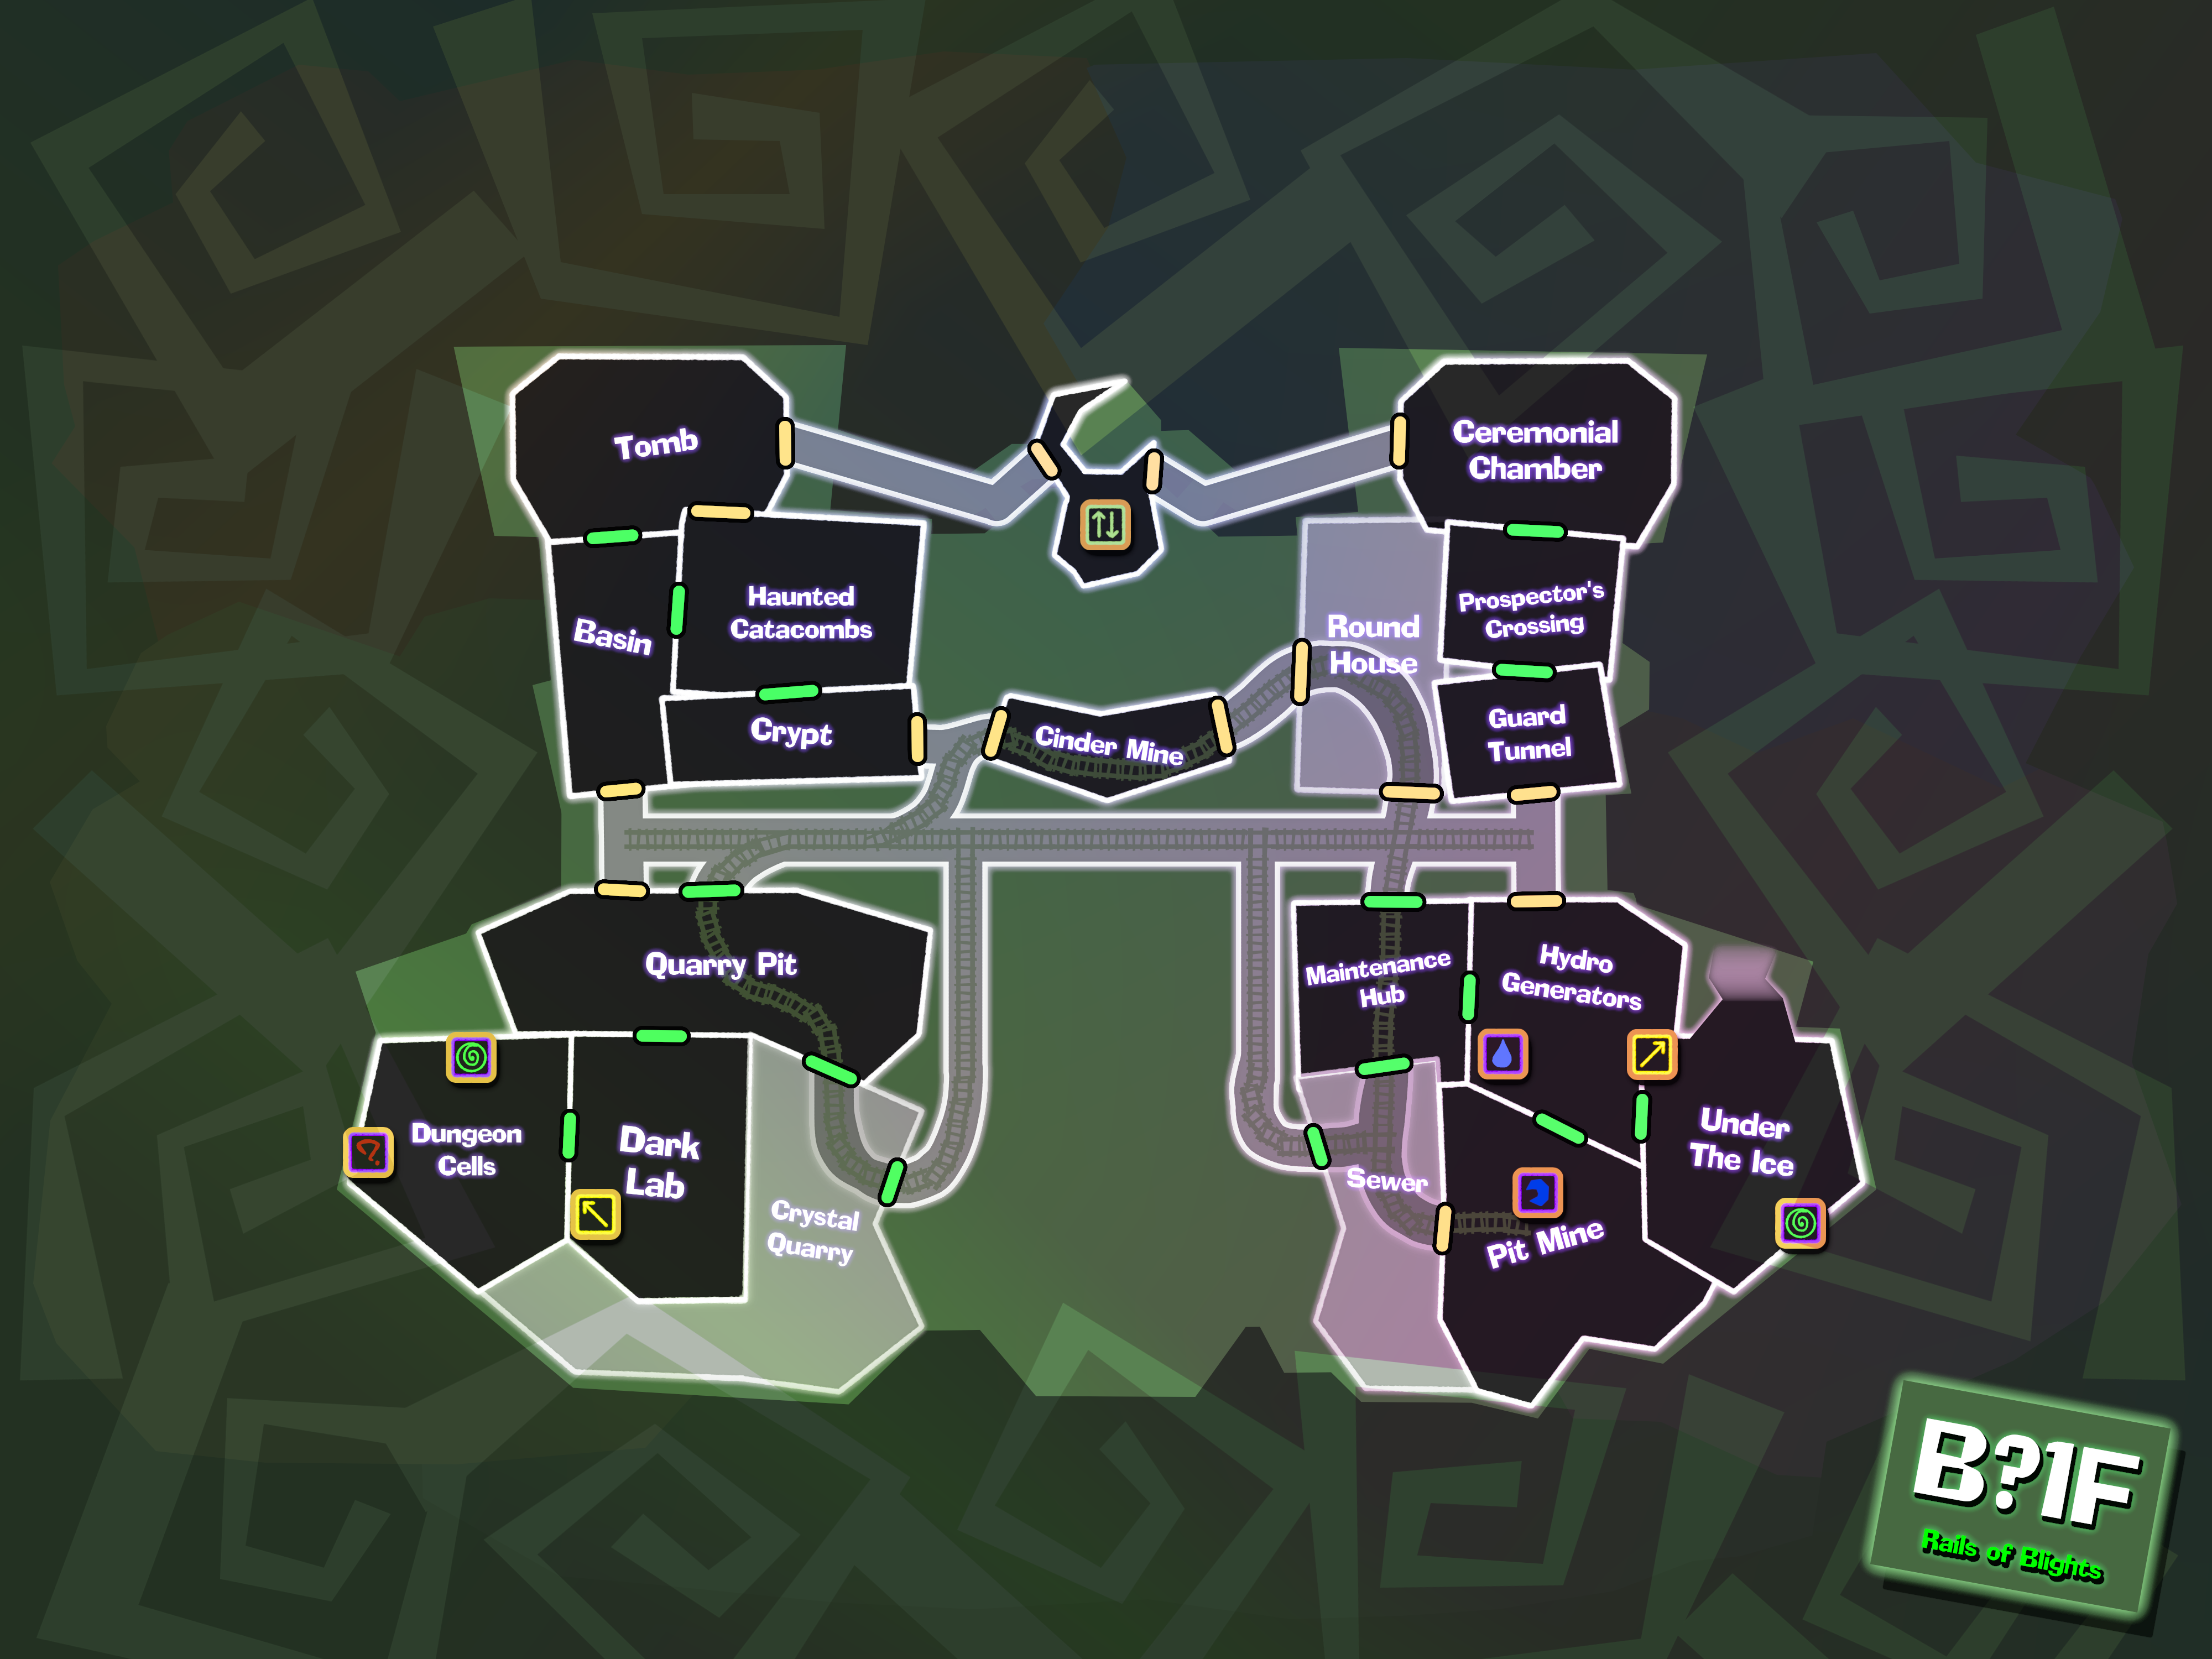
Click each image to toggle it to its Paranormal Dimension counterpart.










 Ultimate Elemental Exorcist