Awards Killing Game 2x2: Moon of Hope (Game Thread) - Grand Finale: Shoot The Moon

Are any of the paintings I got of the three "Solanacae Sisters?" If so, bring them up the beanstalk to the cottage
You do note that the three paintings match the Solanacae sister's stage names. When you bring the paintings into the cottage, the two that aren't the nightshade, Belladonna, fade to black. Ink drips off the paintings, revealing two messages.

- HER VOICE IS FATAL
- HER DANCE IS ENSNARING
 
Screenshot 2026-08-10 at 8.55.23 AM.png

The slime had some kind of fire status. Its dowsed now (I think), and the bunker is probably safe save for the water, but I'm not so sure about the slide. You should probably be aware of any damage it incurred. Wouldn't want any of you to get hurt because you jumped in belly first and expected full sheets of ice.

Check the ice(?) slide between Icy Lake and Under the Ice. Since that's close to Under the Ice, might as well check there too.
 
Check the ice(?) slide between Icy Lake and Under the Ice. Since that's close to Under the Ice, might as well check there too.
You examine the Icy Lake and Under the Ice. Both reek of salted fish, and the slide is much less smooth. A colossal, gelatinous mass of once-living, flaming pickled fish-jelly now lays dead towards one side of the room, beneath the decorative wall mounted fish head that was already here.

The creature's been struck multiple times and frozen solid in chunks. The last few embers of its troubled existence are crackling. Mona quietly adds that Gadd should really remember not to store his experiments in the fridge ever again.

The crystals around the room have been somewhat shattered by the fight, scattering sparkling dust around the place. A large Treasure Chest sits opened. BELOWZERO is here, and it seems the final tape recorder was never played, because the host has a brain in the shape of the dead fish slime mass with the same current functionality. You press the button, and it seems its a bit of wait for the tape to crackle to life from paranormal static. This result will come shortly.

Finally, you note the RPG still remains hanging from the decorative fish head. Looking at it closer, it has one charge, labelled with a note in white marker that says "Point At Any Puzzle For Alternate Solution".
 
lyranewneutral_na9lkg.png


Oh, right - before I forget... Kyeheheh, I'm sure it's been well-established by now that I tracked Lulu around the complex last night and snatched away her shard. You can call that a bit of experimentation on my part - I wanted to see if the shard's resurrective capabilities were everything they were cracked up to be, and obviously you saw the results unfold right in front of you. Thanos has returned to the land of the living, and I couldn't be happier!

Not that I care about that big purple lunk, but it means that my experiment worked! Results like this are why I remain a valued and important contributor to the Bureau's research. No hard feelings - which is why I'm gonna Vote: Lulu to take this next shard. I can't have two, after all, and I think she deserves a reward for her efforts in my scheme.

lyraevil.bak_skhalk.png


...And I don't want Ghouligrab having it.
 
Drawing-39.sketchpad.png

Alright, its been a day. You freed me, I paid you back, we didn't solve that mystery. All nice and even. Been... I'm going to go with "interesting". I really should be going about now...

Oh. I'm fading. Fading. I'm not really free am I? Killing Games are never fair. I wish you good luck in getting out of this. And if any of you do, please go and get me out too. Would really appreciate it.
 
Seems my free for all idea didn't catch on so I'll stay consistent and Vote:Ghouligrab for being the one to solve the puzzle
 
Votes for the Dark Moon Shard are locked!
 
vigil_intense_neutral.png


...The RePossessors. Morally bankrupt, tax-collecting laypeople who wish to bankrupt Gadd and stop his operations at the Complex, subsuming his immense wealth and collection of objects through any means necessary.

tanner_neutral_talk.png


Gadd's spent years trying to evade these guys... haha nice.

mona_ghost_shocked.png


He even gave me safety protocols related to unannounced visitors at his doorstep...

vigil_intense_neutral.png


Coral... how were you invited in, undetected?

kb_smug.png


May have slipped one of them an invite for fun after I put Gadd on ice. Y'know, for a bit of chaos and destruction. Corals been chatting me up every night, so I chose well!

Fiend!

Not my businessmen, not my circus, as they say. While this hoard of treasure Gadd was sitting on gets covered in dust, I'm gonna split the difference and demolish this building when I get my hands on those shards. There's this... feeling... that something's holding me back here. My power. My sick moves. Maybe I've grown too sentimental, so I'm gonna beat it out of this building one way or another.

kb_tongue.png


But it seems one of their recruits has already done a fine job already!! The auditor herself hired a very useful lackey slash contractor. Ain't that right, Atmey?

vigil_intense_neutral.png


The demon summoner himself was in on it? ...I have many grudges to consider, tonight.

kb_smug.png


The more damage you guys caused, the more people dropped dead, the more they collected insurance payouts, and now it seems they've made enough moolah to bribe me to let them out of this game. They wanted you to die! It gave them more cash.

There were even some "priceless" artifacts Gadd had laying around, like that painting lover boy over there tried to bury. Completely worthless now, of course.

They're gonna try and get away tonight, and I'll let them, but I'll sweeten the deal for the rest of you since we're nearing the end now. Details below.


tanner_neutral_talk.png


...below where, boss?​


It is now Night 5. You have 72 hours to submit Night 5's actions. Some map descriptions will be updated with new information in pink, please refer to the Updated Rooms below.

Tonight's incentive: If you do not attempt, you will die at the end of the night.

Tonight's Wraiths are... a green, absinthe-flavored @Lash and @Power Flotzo! Their powers are detailed below. Mona will also gain these powers for the night.


CODE: ABSINTHE said:
Code: ABSINTHE
As a Slime Wraith, you possess a fragment of the elemental demonic spirit P████a's power, granting you minor resonance with the element of Slime.


Abilities - Slime Wraith EX
  • You can produce small balls of sticky green slime on command, these can be thrown, and explode on blunt contact, releasing a burst of elemental slime which absorbs and neutralizes other elements.
  • Once per night, you can imbue yourself with a momentary burst of sticky defense, allowing you to stick to walls and become immovable.
  • You can only move in the Paranormal Dimension. You can have objects move with you in the Paranormal Dimension so long as you maintain contact with them. Please toggle the floor maps in the OP of this thread for more information.
  • You can turn invisible to mortals on command, but this invisibility is limited to a few minutes at a time. You will always be visible to other entities in the Paranormal Dimension, and under Darklight.
  • You cannot kill. You may accomplice with a living player. Only one accomplice may exist per case.
  • You are weak to all standard ghost weaknesses in this universe, and a combined attack from all three elements: Fire, Water, and Ice.


Night 5 Game Status


All Z-Gates have been uncovered. Living players can access the Paranormal Dimension by entering through Z-Gates.
All Pixilators have been uncovered. Living players can warp between two linked rooms using the Pixilator cameras. Be mindful of their positioning.
Three Dark Moon Shards have been uncovered. Anyone who possesses a dark moon shard in their inventory at the end of the night will be granted its power. Wraiths will be revived if they have a dark moon shard in their hands by sunrise, and that shard has previously not been used to revive a wraith.
The Shard of Old Strength has been awarded to @Waluigi Time following yesterday's vote. Only two Dark Moon Shards remain!

While in the Paranormal Dimension, Living players have the following traits:


  • Can only move in the Paranormal Dimension.
  • Can move objects with them in the Paranormal Dimension (i.e. through walls), so long as they maintain contact.
  • Are completely invisible, except under darklight, and to other players in the Paranormal Dimension.


The RePossession Commences!​

@Revin and @Roserade have met their win condition, and will attempt to exit the game tonight via the RePossessicopter, which will only appear in the second half of the night, accessed via the Complex Roof, from either the Hollow Tree Heights or the Clock Tower Heights.

If one of them dies, their killer(s) can choose to leave the game after successfully getting away with their murder the next day. These deaths can occur in addition to the night's normal kill.

im so sorry this will come a bit later there was a lot of damage last night

Available NPCs:
  • Vigil - The Valley groundskeeper who watches over the Complex's residents, living and non. An expert mortician and gardener all the same, his primary residence is the Graveyard. Where there's smoke, there's fire, and his lantern can often be spotted from the Complex's misshapen windows, wandering the distant valley grounds at night. Has powers related to accurate autopsies and accurate testimony.
  • Mona Warnewicke - Gadd's trusted Elemental Expert, and a renowned clutz, who elected to take on the Chief Safety Officer role after it was left abandoned for many years. Her handbook is full of seemingly endless safety regulations. Will happily provide guidance on safe work and elemental reactions to anyone who asks, which is usually no one. Has powers related to elemental magic, and methods of death.
  • Tanner Tosca - The general assistant for Gadd, a spectral figure who was in the Complex even before Gadd was. Exhausted but unwilling to disrupt his jobs, Tanner can always be found where Gadd needs some help, except for when he's decided to lurk in the basement to escape yet another asinine request. Has powers related to accomplicing and partnership.
  • King Blocky Boo I - The big bad, free again at last. An amnesiac cubical demonic spirit, he is the archrival of Professor Gadd Zooks, having finally broken free of his prison. Has powers related to murder and performing successful kills.

Bond Powers

  • All - Bronze Frame - Strangers to Acquaintances - No NPC will agree to be an accomplice at this portrait level.
  • All - Silver Frame - Acquaintances to Friends - All NPCs will discuss more detailed or expansive topics relating to their past and the Complex itself.
  • All - Gold Frame - Friends to Besties - All NPCs can now accompany you for short periods of time in your night actions.
  • Vigil- Bronze Frame - Mortician I - Upon request, Vigil will conduct a more thorough examination of the body than a player, and offer additional insight.
  • Vigil - Silver Frame - Distant Watcher EX - Vigil will be able to detect the movements of wraiths in the mansion despite being outside. He will briefly testify about what he notices Wraiths, Demonic Spirits, or anyone in the paranormal dimension, doing, but can't discern any forms unless he's certain who they are.
  • Vigil - Gold Frame - Evening Bell EX - Vigil will more accurately recount the time he heard the bell tolling and the victim died, whether it was before the middle of the night or after. He will only do this after all players have testified.
  • Mona - Bronze Frame - Trace Elements I - Upon request, Mona will indicate whether or not a fire, flood, or frozen object was created/affected by Elemental Magic, as well as a likely (but not guaranteed) source.
  • Mona - Silver Frame - Crash Test Dummy III - As someone who's died and lived and died again, many times, Mona can be asked to possess a body, or a suitable stand-in for a body, and perform KG physics experiments from a first person perspective. She'll then give an assessment on whether it would match the victim's experience and current state, and suggest certain experimental adjustments that a host could not. This power can be used repeatedly, but its effectiveness lessens with each use.
  • Mona - Gold Frame - Barrier From the Crucible EX - Mona can be commissioned to create an elemental wellspring which will shelter elementals of Ice, Fire or Water in any place on the map. Players have to agree on a location during the day, and elementals will be obtainable from that location starting from the very next night. She will only make one of each elemental wellspring.
  • Mona - Crystal Frame - Trace Elements EX - Mona will be able to determine more accurately where the source of Elemental Magic originated, including Slime elementals.
  • Tanner Tosca - Bronze Frame - Camaraderie I - Upon request, Tanner will give an upfront indication as to whether he feels there's an accomplice affecting the case. There can only be one accomplice per case. Accomplices will be debuffed if their associated killer is caught.
  • Tanner Tosca - Silver Frame - Cherished Assistant III - Tanner can act as a back-up to an NPC's rolepower by performing a less powerful version of it to double blind confirm the power's result, or use it again on another situation. He will only do this once per phase. He can use this power on eliminated NPCs, should any exist.
  • Tanner Tosca - Gold Frame - Ghostly Camaraderie EX - Tanner will now assist any wraith with their night actions, including helping them perform a kill attempt as an accomplice.
  • King Blocky Boo I - Bronze Frame - Two by Two by Two EX - Starts Awards Killing Game 2x2. Oh no... there is no disabling this power either.
  • King Blocky Boo I - Silver Frame - Heel Tag-Team EX - Anyone who murders can request KBB's assistance on any night. This applies permanently going forward. He will not assist in attempts ("Get your own hands dirty, kids!") and will not hide his assistance. He won't assist if he feels you're trying to trick him.
  • King Blocky Boo I - Gold Frame - Complex Restoration EX - KBB is relishing in the damage you're doing to the Complex and Gadd's experiment as a whole, so much that he's willing to grant you a second round of destruction. A majority of players can agree on a single room for KBB to use his paranormal powers on, which will revert it and all objects inside to their state at the start of the game, undamaged. This will not return any items taken from the room previously.
  • Empty Portrait - Bronze Frame - The Chorus of Silence - You can each pick a single instrument you are a master in, and play it with no difficulties.
  • Empty Portrait - Silver Frame - The Armory of Bareness - You can each pick a weapon you are a master in, and wield it with no difficulties.
 
Last edited:
Earlier...

Luke Atmey, as one final action before the day ends, takes the RPG from Under the Ice, points it at the seemingly featureless metal wall towards the west of the Dark Lab, and fires. With a click, and a flash, the rocket launches and collides with the wall head on, exploding it into shrapnel and blasting a hole into a new room.

Within, the Dungeon Cells beckon. Multiple cages made of brick, mortar, and cast iron bars span the walls, with chains and moss aplenty laying around. A Z-Gate sits in one of the dungeon cells, and a spiky plant with multiple eye shaped red flowers is blossoming in another. On the furthest wall, locked behind a cell of its own...

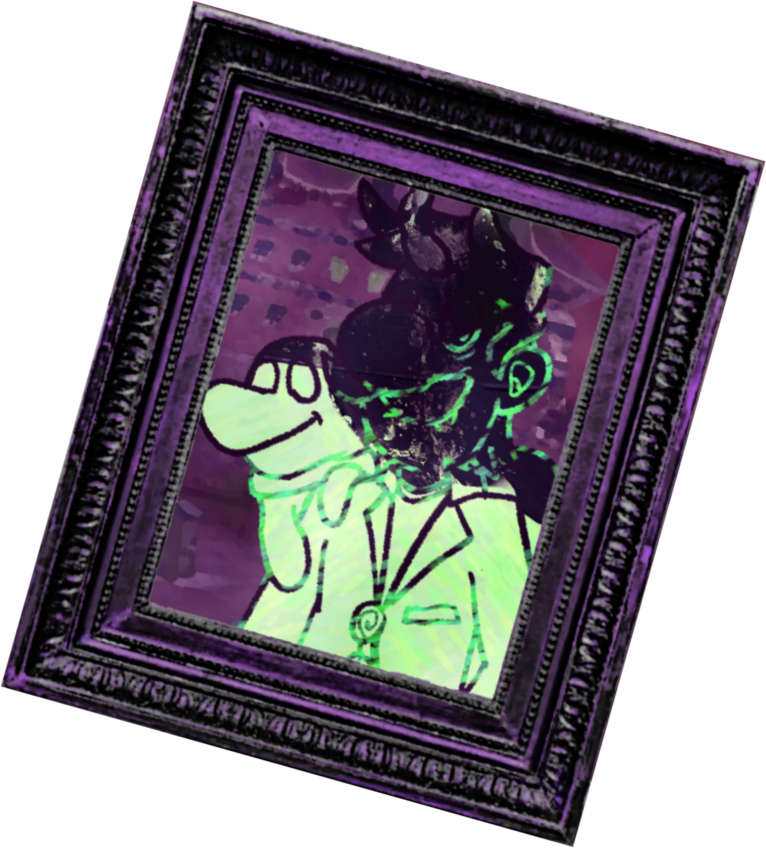
portrait_final.png


A lone, faded portrait. The apparent person within is unrecognizable.​
​
​

Chad picks up the "If I Vanish" tape recorder from a previous night, and plays it.

Should the confrontation with that blocky menace go south, I trust in all of the test subjects to reunite the Dark Moon shards, and put a stop to him. He is not the great demonic spirit he thinks he is. For I, too, am but an amalgamation of two separate, sometimes opposed halves. A coward, and a crazed scientist. He is a financial fraud, and a weak demonic king. Someone might double blind confirm my suspicions, if they're smart enough to uncover his weaknesses.

For that reason, my disjointed spirit may be considered unique enough to be shuffled according to the Code Zero protocol. I have no idea where I may end up. Find me, if you wish to put a stop to the madness that may ensue. Leave me to die, if you're resentful of my cowardice that put you all in this situation. The Portrificationizer holds the key.

Tanner is in charge until I return. I trust in his strength to lead, in times of crisis.


kb_think.png


...well clear out of here. Besides that weird weed growing in the corner, I'm not sure what that idiot scientist was thinking hanging up a blank painting like that. And, that recording was prior to me whupping his ass. He couldn't handle my strength, his spirit and body vanished for good, and you all payed the price.

Literally! I think each one of you was insured for 5,000,000g. I was never good with numbers.

kb_tongue.png


Lets get on with the real show, shall we? Lupin's grand execution! Tanner, my good man?


tanner_surprised_talk.png


...wait, Gadd said what!?
​

With a shocked expression as he was swinging his scythe towards Lupin, Tanner misses, and Lupin starts running for his life... briefly, until King Boo summons an empty canvas in his way. He slams right into it.

As Lupin III falls through the portrait, he's already bracing himself. It's not the first bad landing he's had to handle! He touches down hard, finding himself in... of all places, the Louvre. "Back in action, huh?" Whistling, he starts to walk around, looking for a couple nice pickups. He's not planning to go for the most famous one, knowing he'd never be able to move it on the market, but then he sees her.

The Mona Lisa... but slightly different. Now the Mona Warwicke Lisa, Lupin runs up to the painting, looking around and seeing nobody but himself at the moment. "Well, who says you weren't a work of art?" He looks left, then looks right. Up, and down. No hidden tricks, no alarms, not that he can see, until he removes the painting from the wall. The second he does, the Mona Warwicke Lisa begins to scream in Lupin's hands, the thief stumbling backwards in confusion and surprise. He drops the painting, only to turn around and see police filing into the museum. In front of them, "Luke Atmey" points at him, yelling that that's him! That's the thief and the killer!

Deciding to not let this stop him, Lupin springs into action, immediately starting to flee from the scene. Though the cops try to close in around him, he begins hurling his calling cards around. One cop is frozen, another one is burnt, a third is soaked to the brim... with the power of his cards, Lupin is able to force his way through into the depths of the museum, only for the power to suddenly go out. Unable to see where he's going, Lupin keeps running, and smashes right into a statue of an eye. The eye statue looks back at him, and he hears someone yelling where he is.
The next thing he knows, he's been handcuffed. "I finally got you, Lupin!" Zenigata says, pulling Lupin to his feet. Well, that's not a big deal. Not the first time he's been in this kind of a situation. Zenigata looks at the calling cards, and mutters. "Huh... these are new. Heh. They stick to people, huh? Wonder how they'd look on you?" Before Lupin can protest, Zenigata sticks a calling card on him, and a second. And then a third, to which they both hear the telltale jingle of a Forbidden Action. The poison strikes down Lupin, leaving a shocked Zenigata to call in a sudden suspect death.

In reality, Lupin collapses, his soul sealed into the portrait.

Mona looks away, distraught.


Lupin the Third was executed! His role was CODE: YAKIGORI, the Ultimate Elemental Exorcist!

Code: YAKIGORI
🩻 Ultimate Elemental Exorcist
A wanderer from a land of the mysterious, the land of love triangles, or the land of thirds... whatever suitable explanation fits your apparent obsession with elemental magic that comes in groups of threes. That's why you're here. "3" forms the basis of your Ghost Power, and secret career as an elemental exorcist-slash-shrine-maiden. At the GHOST Complex, and in the land of ghosts, there are only three elements, the Tria Paranorma: the elements of Fire, Ice, and Water.

Abilities - Ultimate Elemental Exorcist
  • You're capable of inscribing special talismans that embody the three elements, and can buff, stun or banish ghosts with enough in your possession.
  • Choose the form your talismans take, either paper, wood, or some other medium and appearance you arrange with the hosts. You start with three talismans of your choice, and can craft up to three each night. You can only have a maximum of nine (three-by-three) talismans at once.
  • Other players can use your talismans if you give them away, but you're the only one capable of crafting them. Talisman types are as follows.
    • Fire: The talisman will ignite a short while after being placed, akin to a match flame.
    • Fire Resistance: While held, the talisman will give a player heat resistance, and immunity to being set on fire or exploded for one night.
    • Water: When placed, the talisman will immediately leak water, waterlogging the object its placed on. This can keep plants hydrated, destroy electronics, or fill small containers with water.
    • Water Resistance: The talisman will give a player immunity to being suffocated, drowned, or poisoned for that night.
    • Ice: The talisman will freeze a short while after being placed, which will also turn the object or surface its attached to ice cold.
    • Ice Resistance: The talisman will give cold resistance, and immunity to being frozen or knocked out "cold" for one night.
  • Ghostly interactions:
    • You can seal Wraiths or Demonic Ghosts by using three talismans of their weakness (Fire > Ice > Water > Fire). This will knock them out temporarily and delay their night slightly. You can use nine talismans of the same elemental type to banish them entirely, ending their night then and there.
    • Applying a talisman of each element to anything invisible will force it to be permanently visible, even outside of darklight. This will neutralise all of the applied talismans powers.
    • Conversely, you can buff wraiths by sticking three talismans corresponding to their element on their body. This will buff their wraith power for that night.
    • To assist with ensuring you have enough talismans to buff, or banish, a ghost, during a wraith voting phase, you can personally select the powerset a wraith will obtain the next night, from Fire, Ice, or Water. You may only do this once.
  • Weaknesses: Aside from your forbidden action below, crafting talismans can't occur in a pinch, requires a period of focus, and you must source materials suited to your talisman's type. Paper talismans require paper, wooden talismans require wood, etc. Losing your concentration while crafting talismans may result in you failing to craft your desired amount.
  • Forbidden Action: If someone sticks three talismans on your body, regardless of type, you will die. To play by the talisman means to die by the talisman, and the rule of threes spells your personal end.

Lupin the Third chose to make his talismans appear as calling cards.

For Case 4 - Lunary Cliffs, you were...

Incorrect!

CASE 4 - END​
 
Last edited:
im so sorry this will come a bit later there was a lot of damage last night
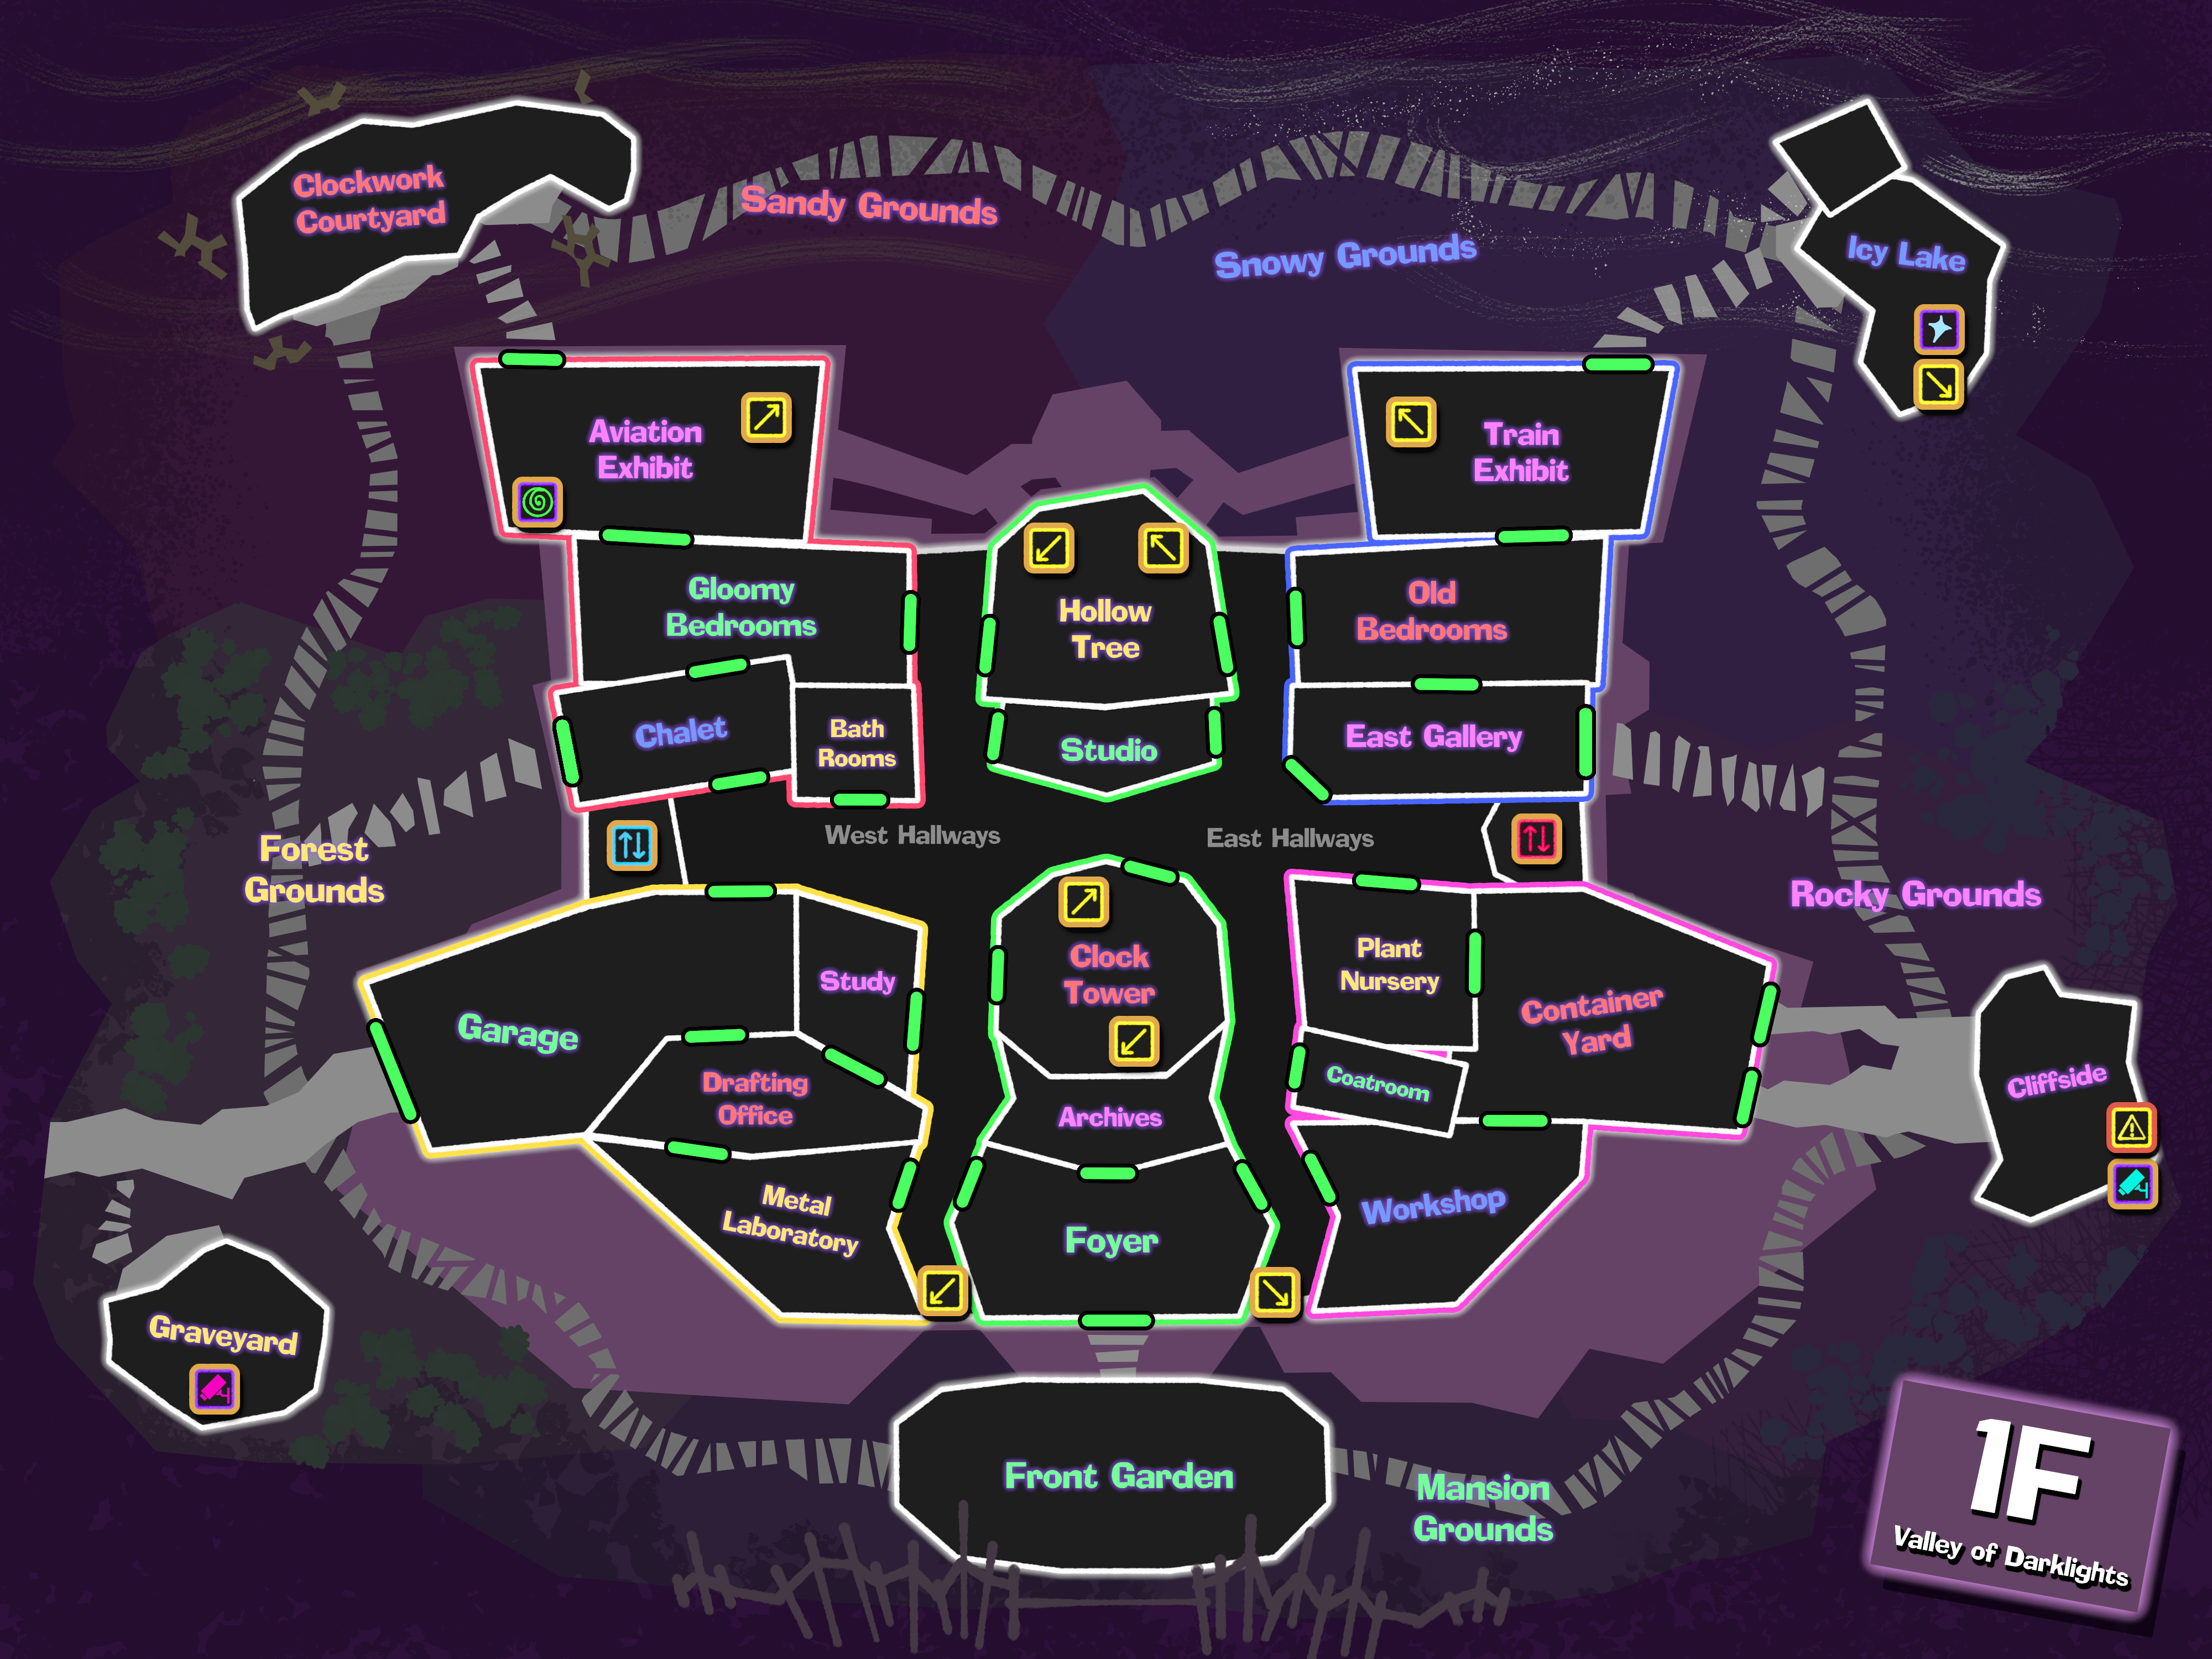
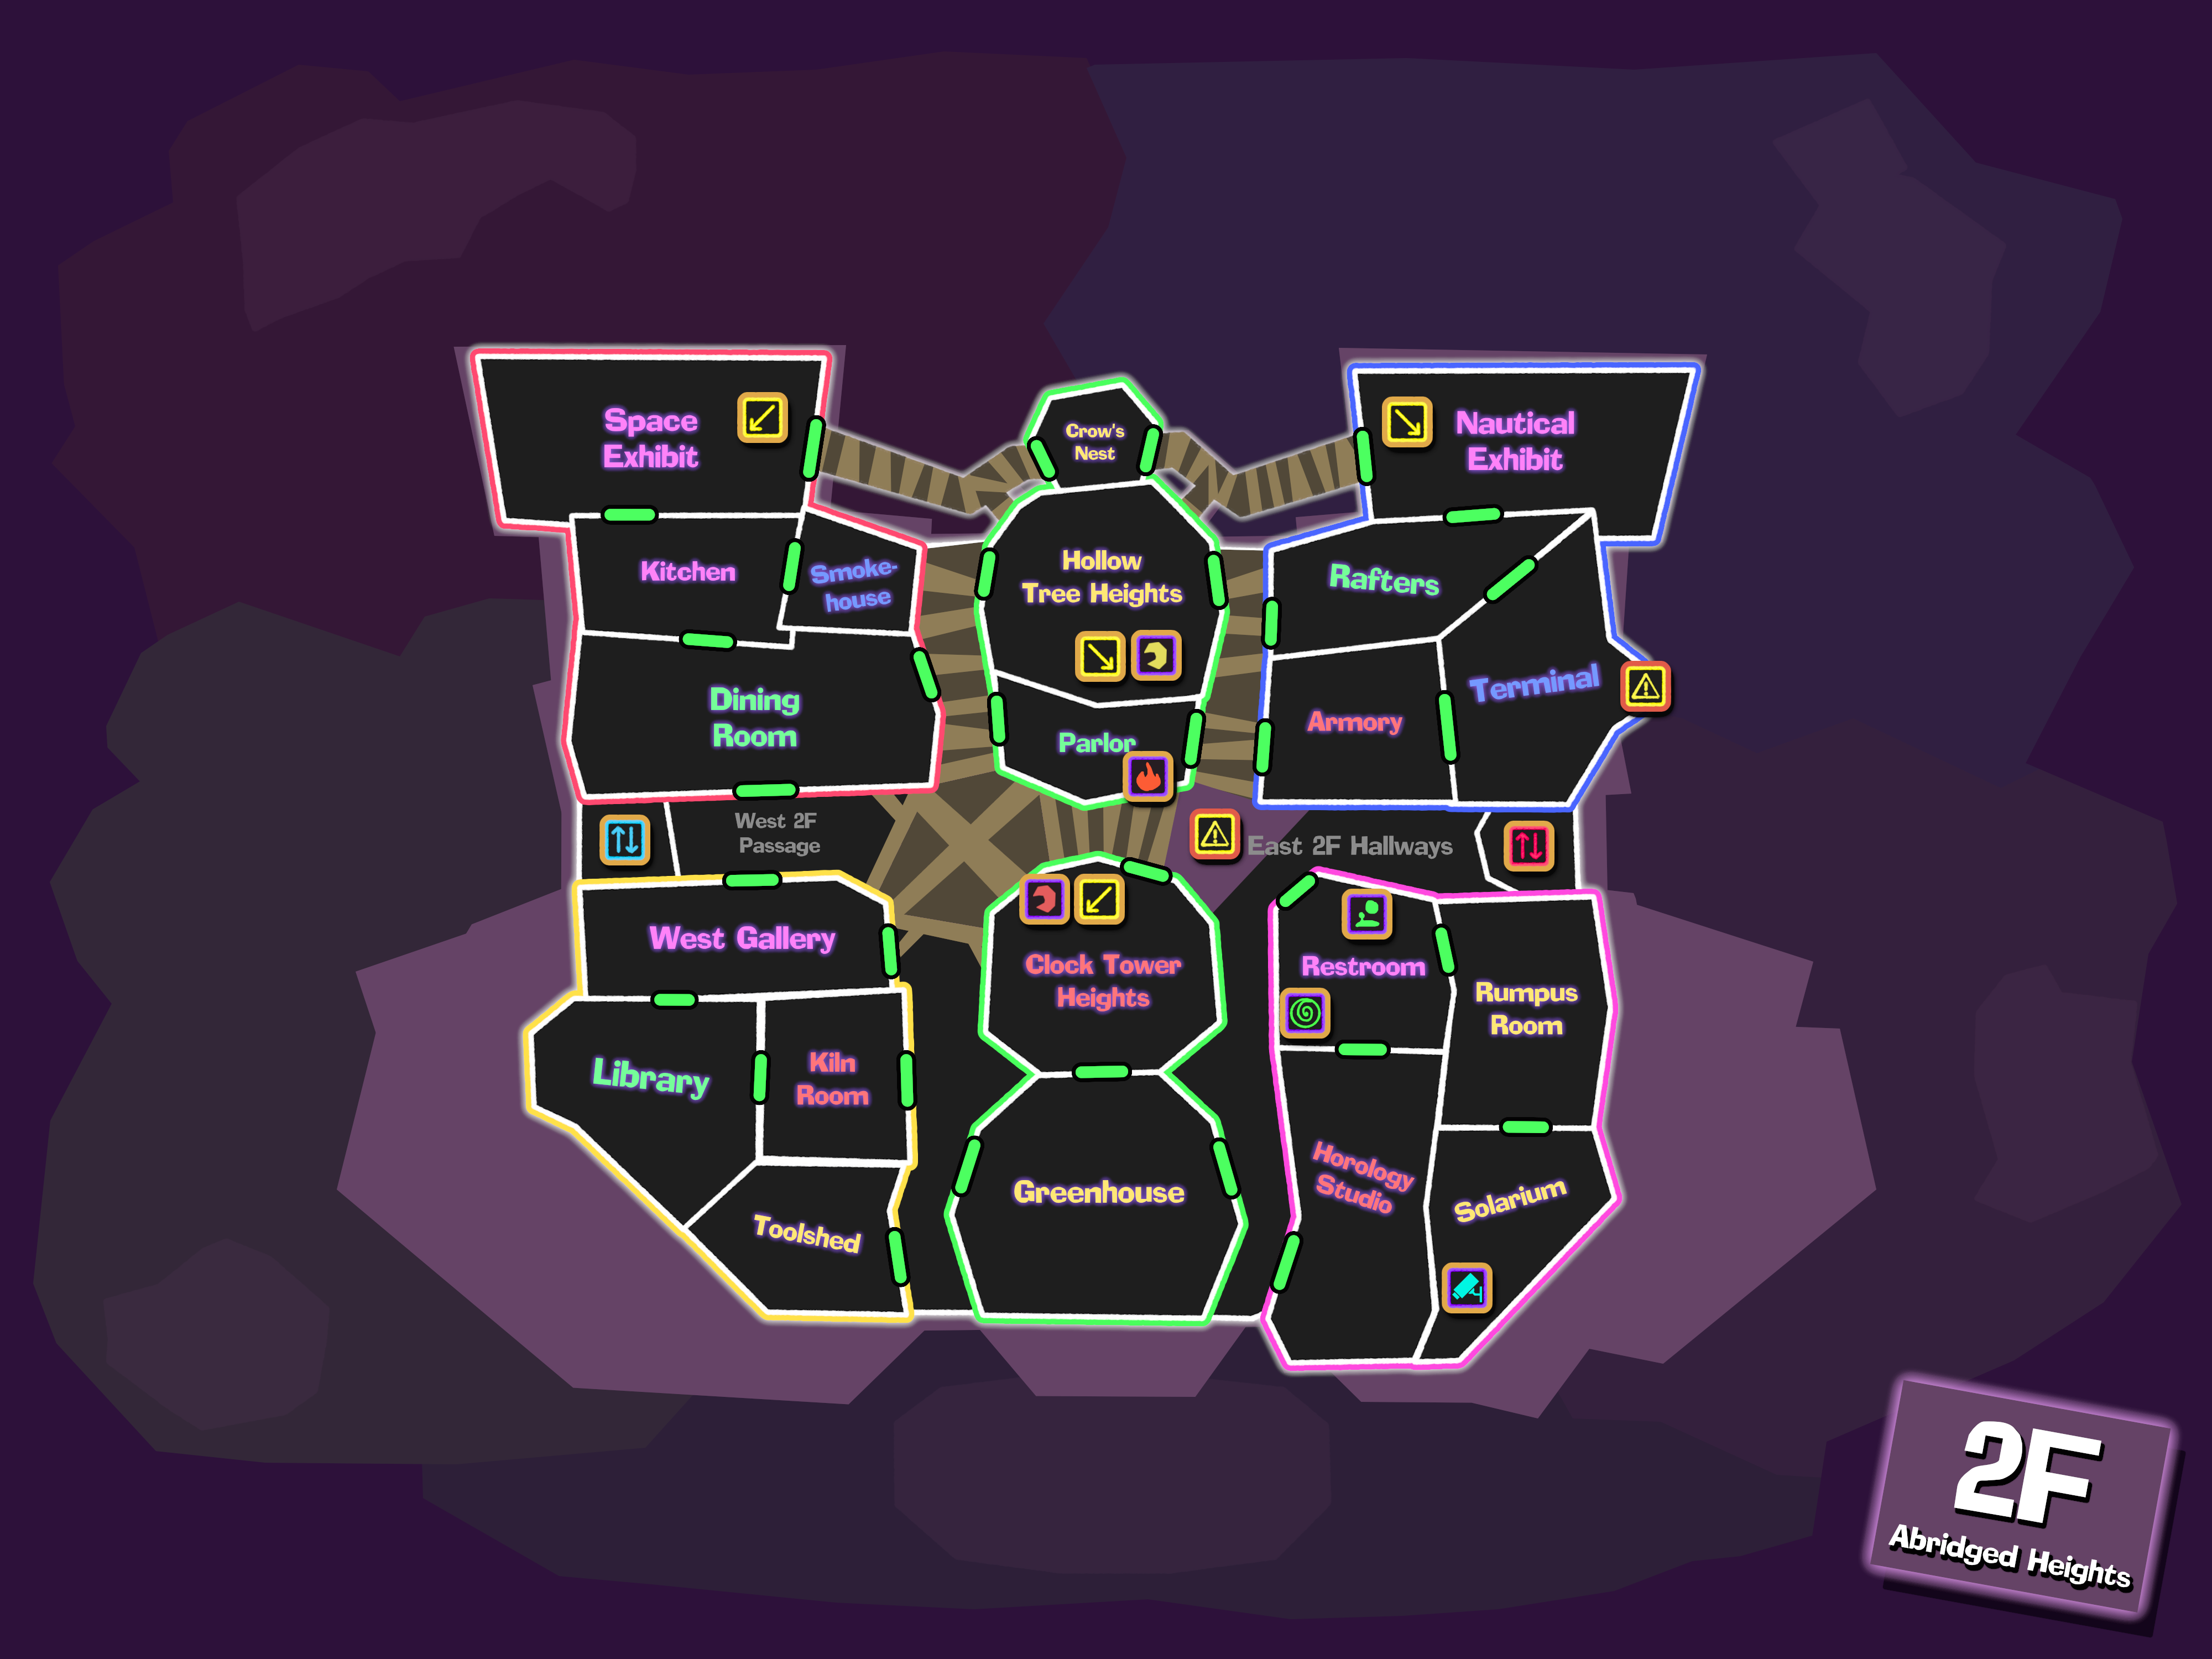
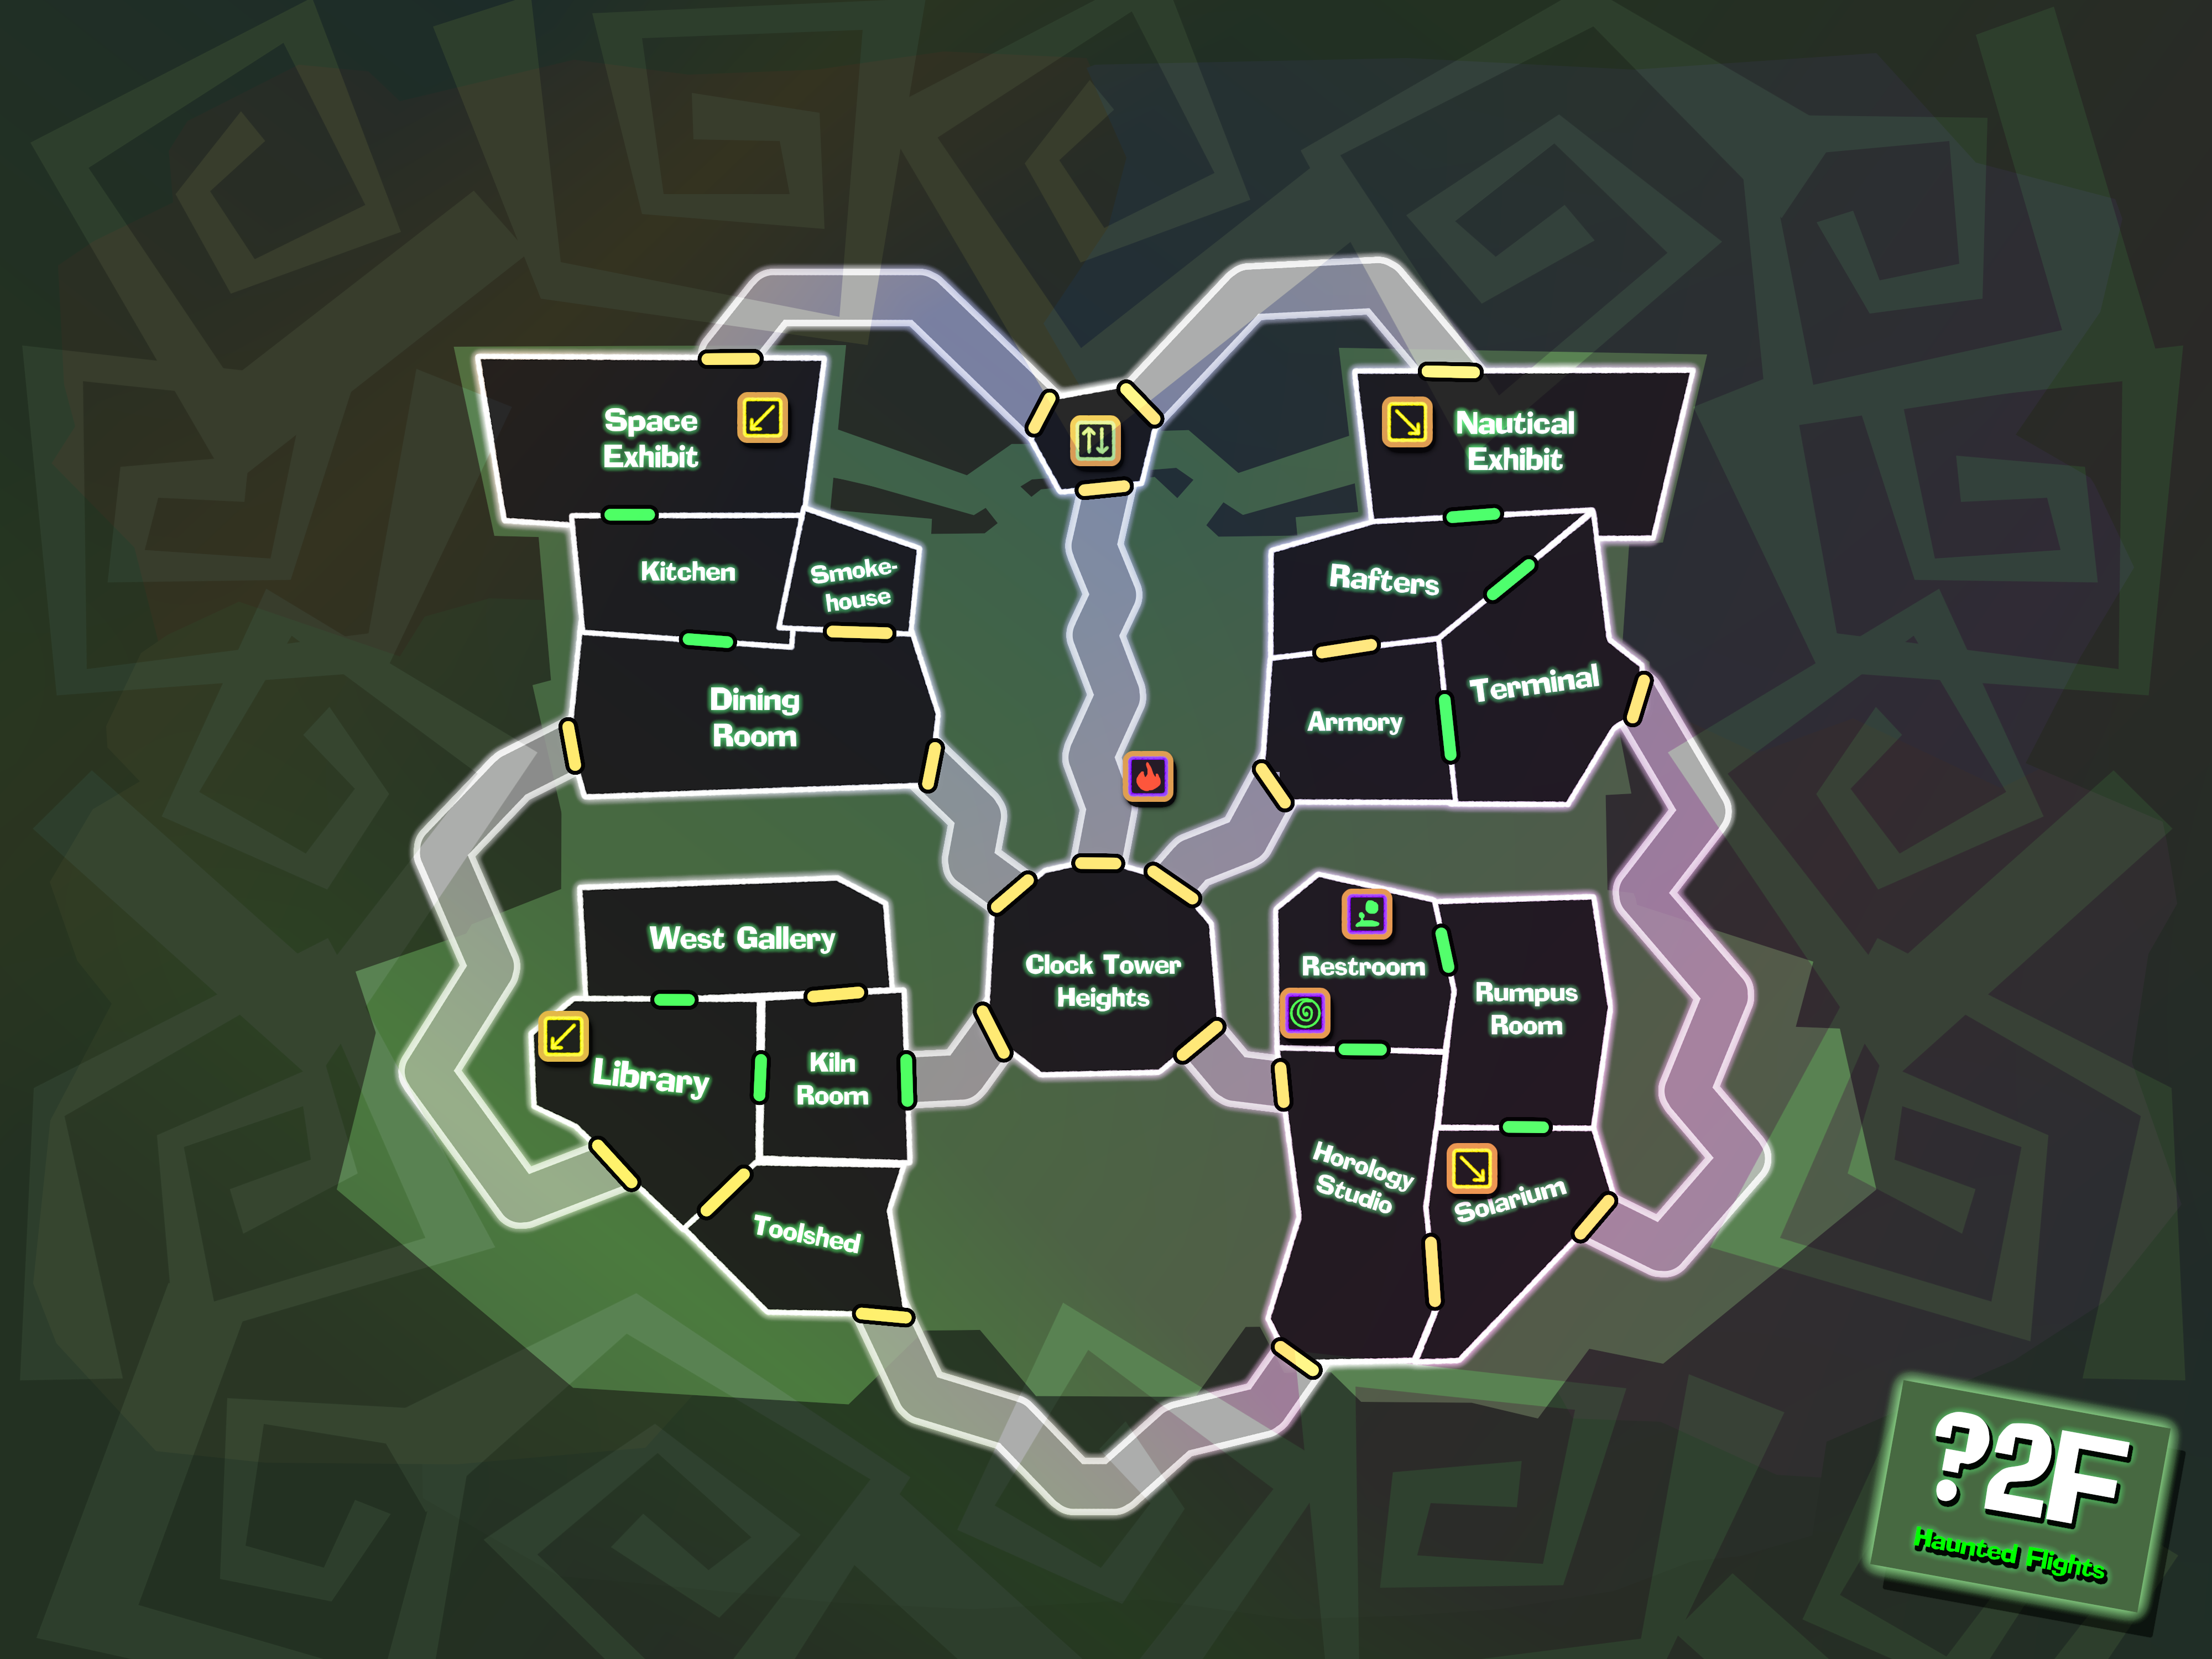
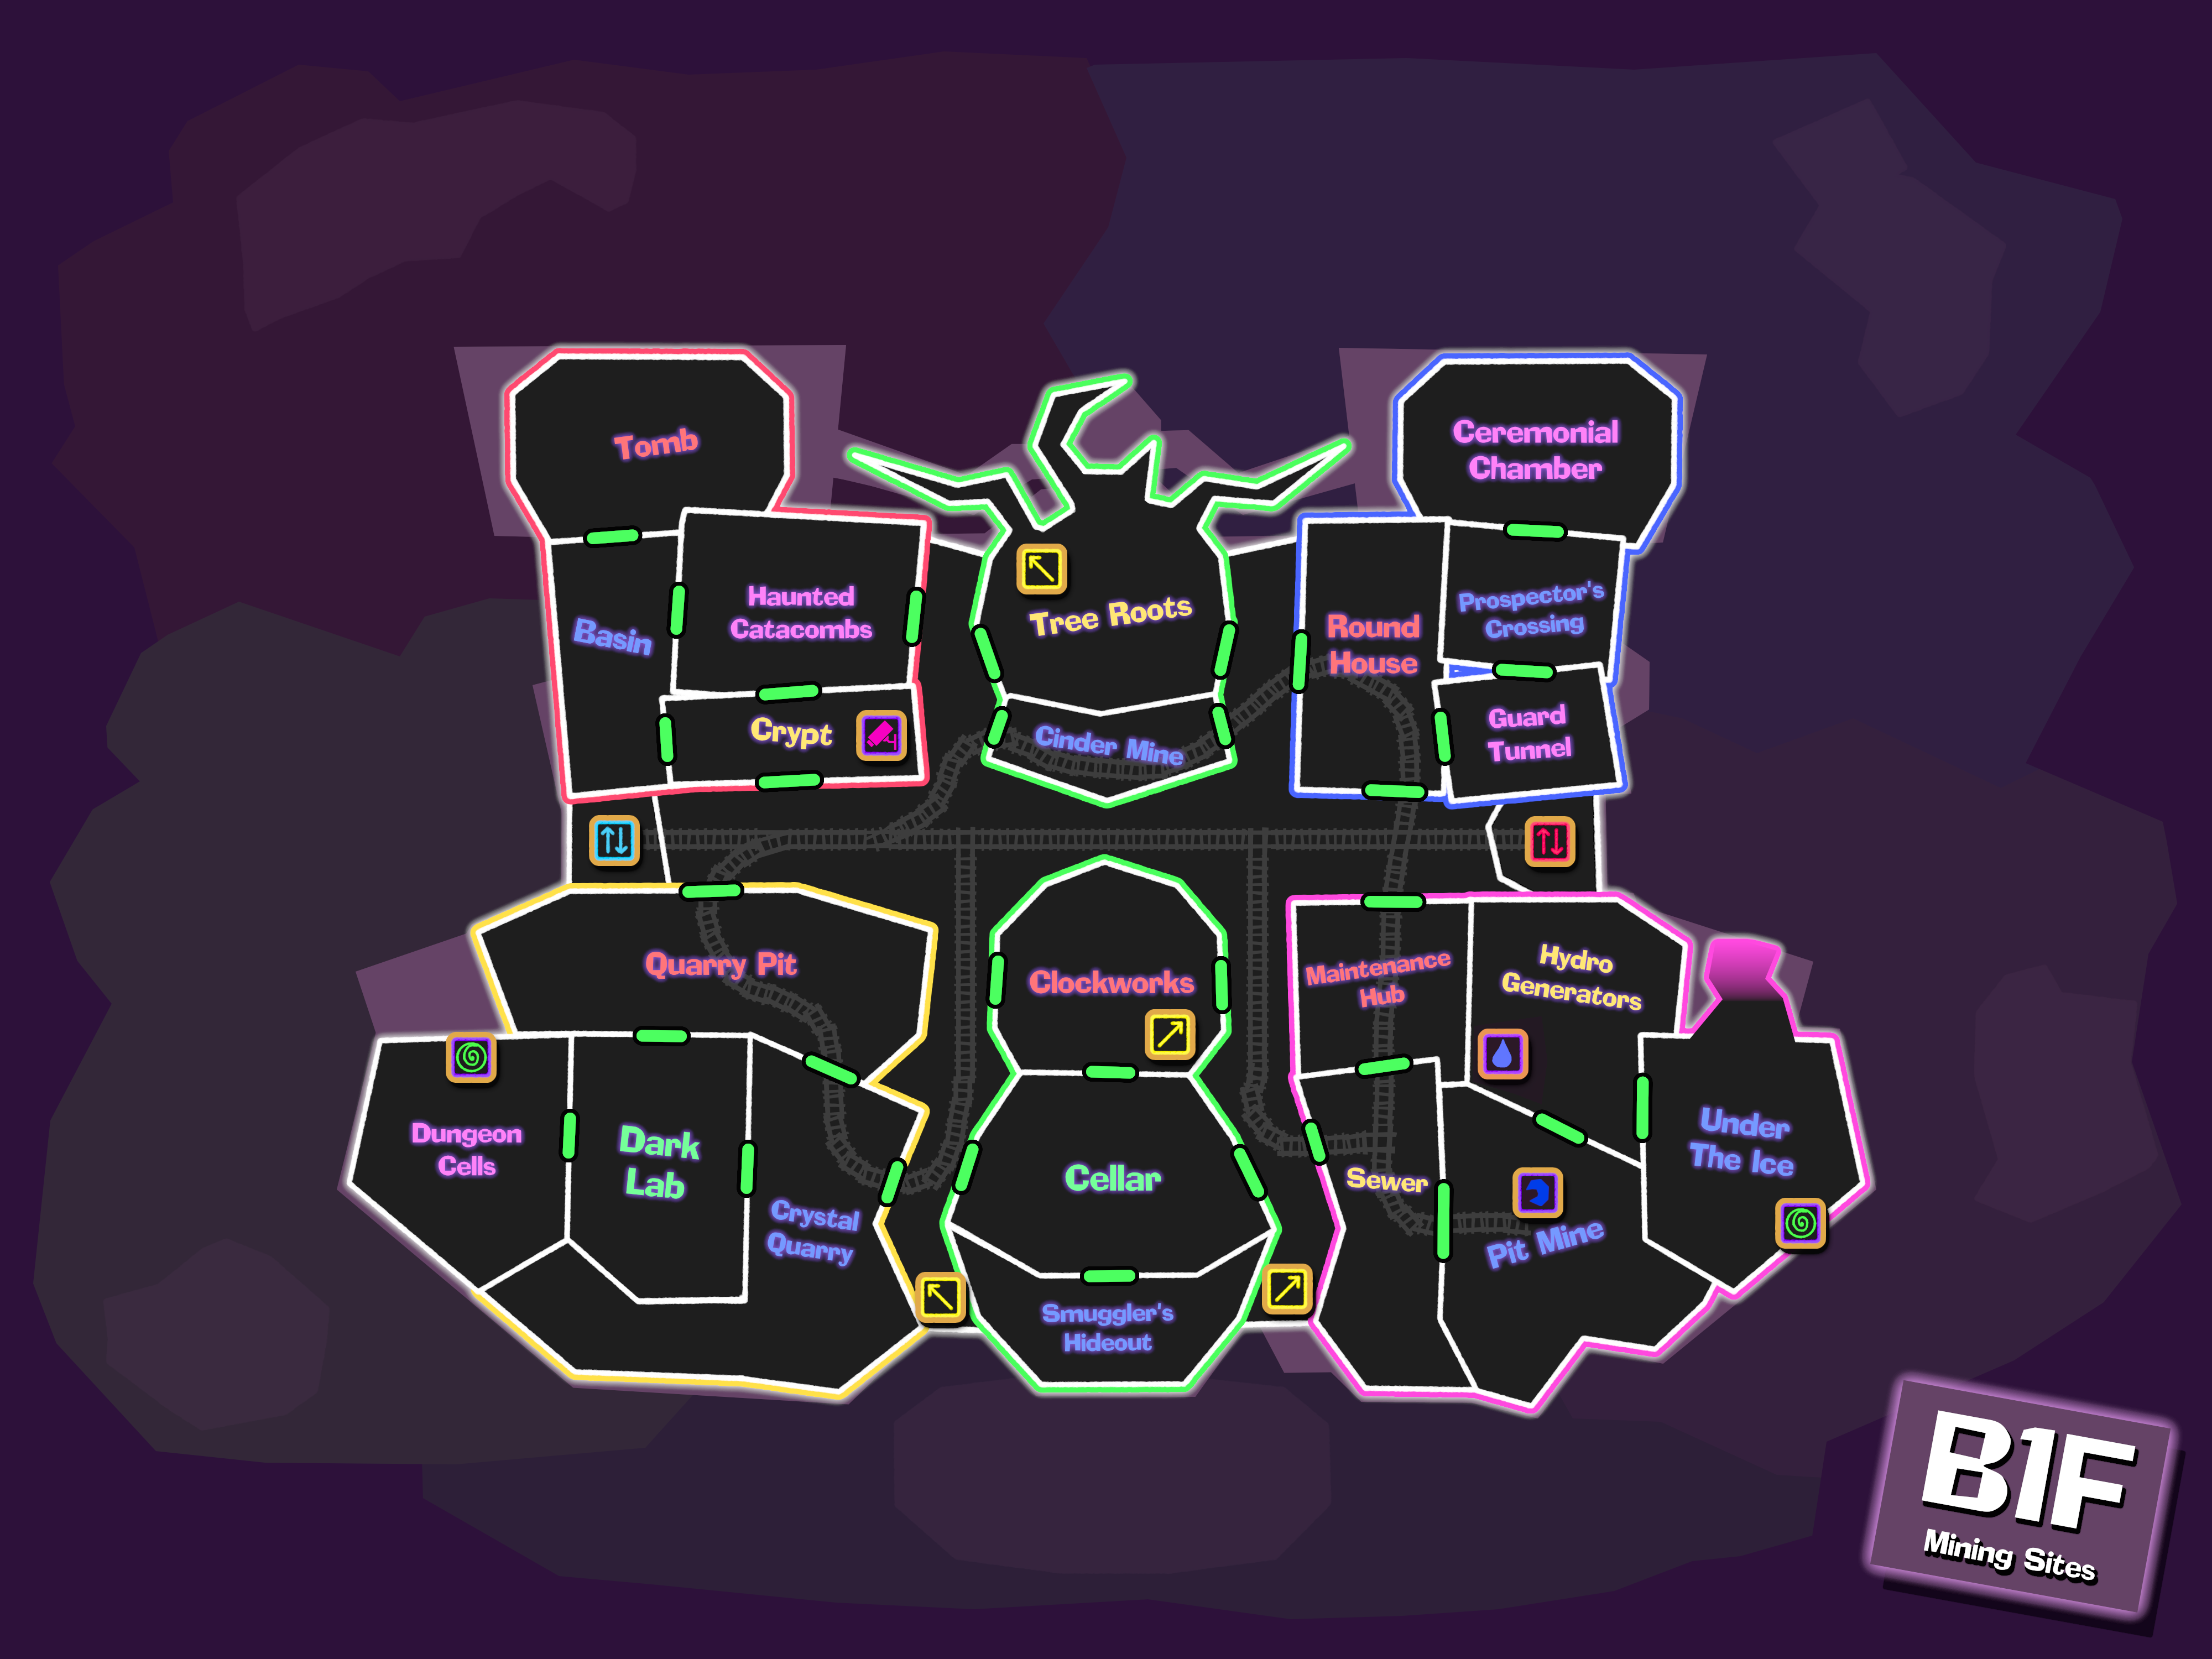
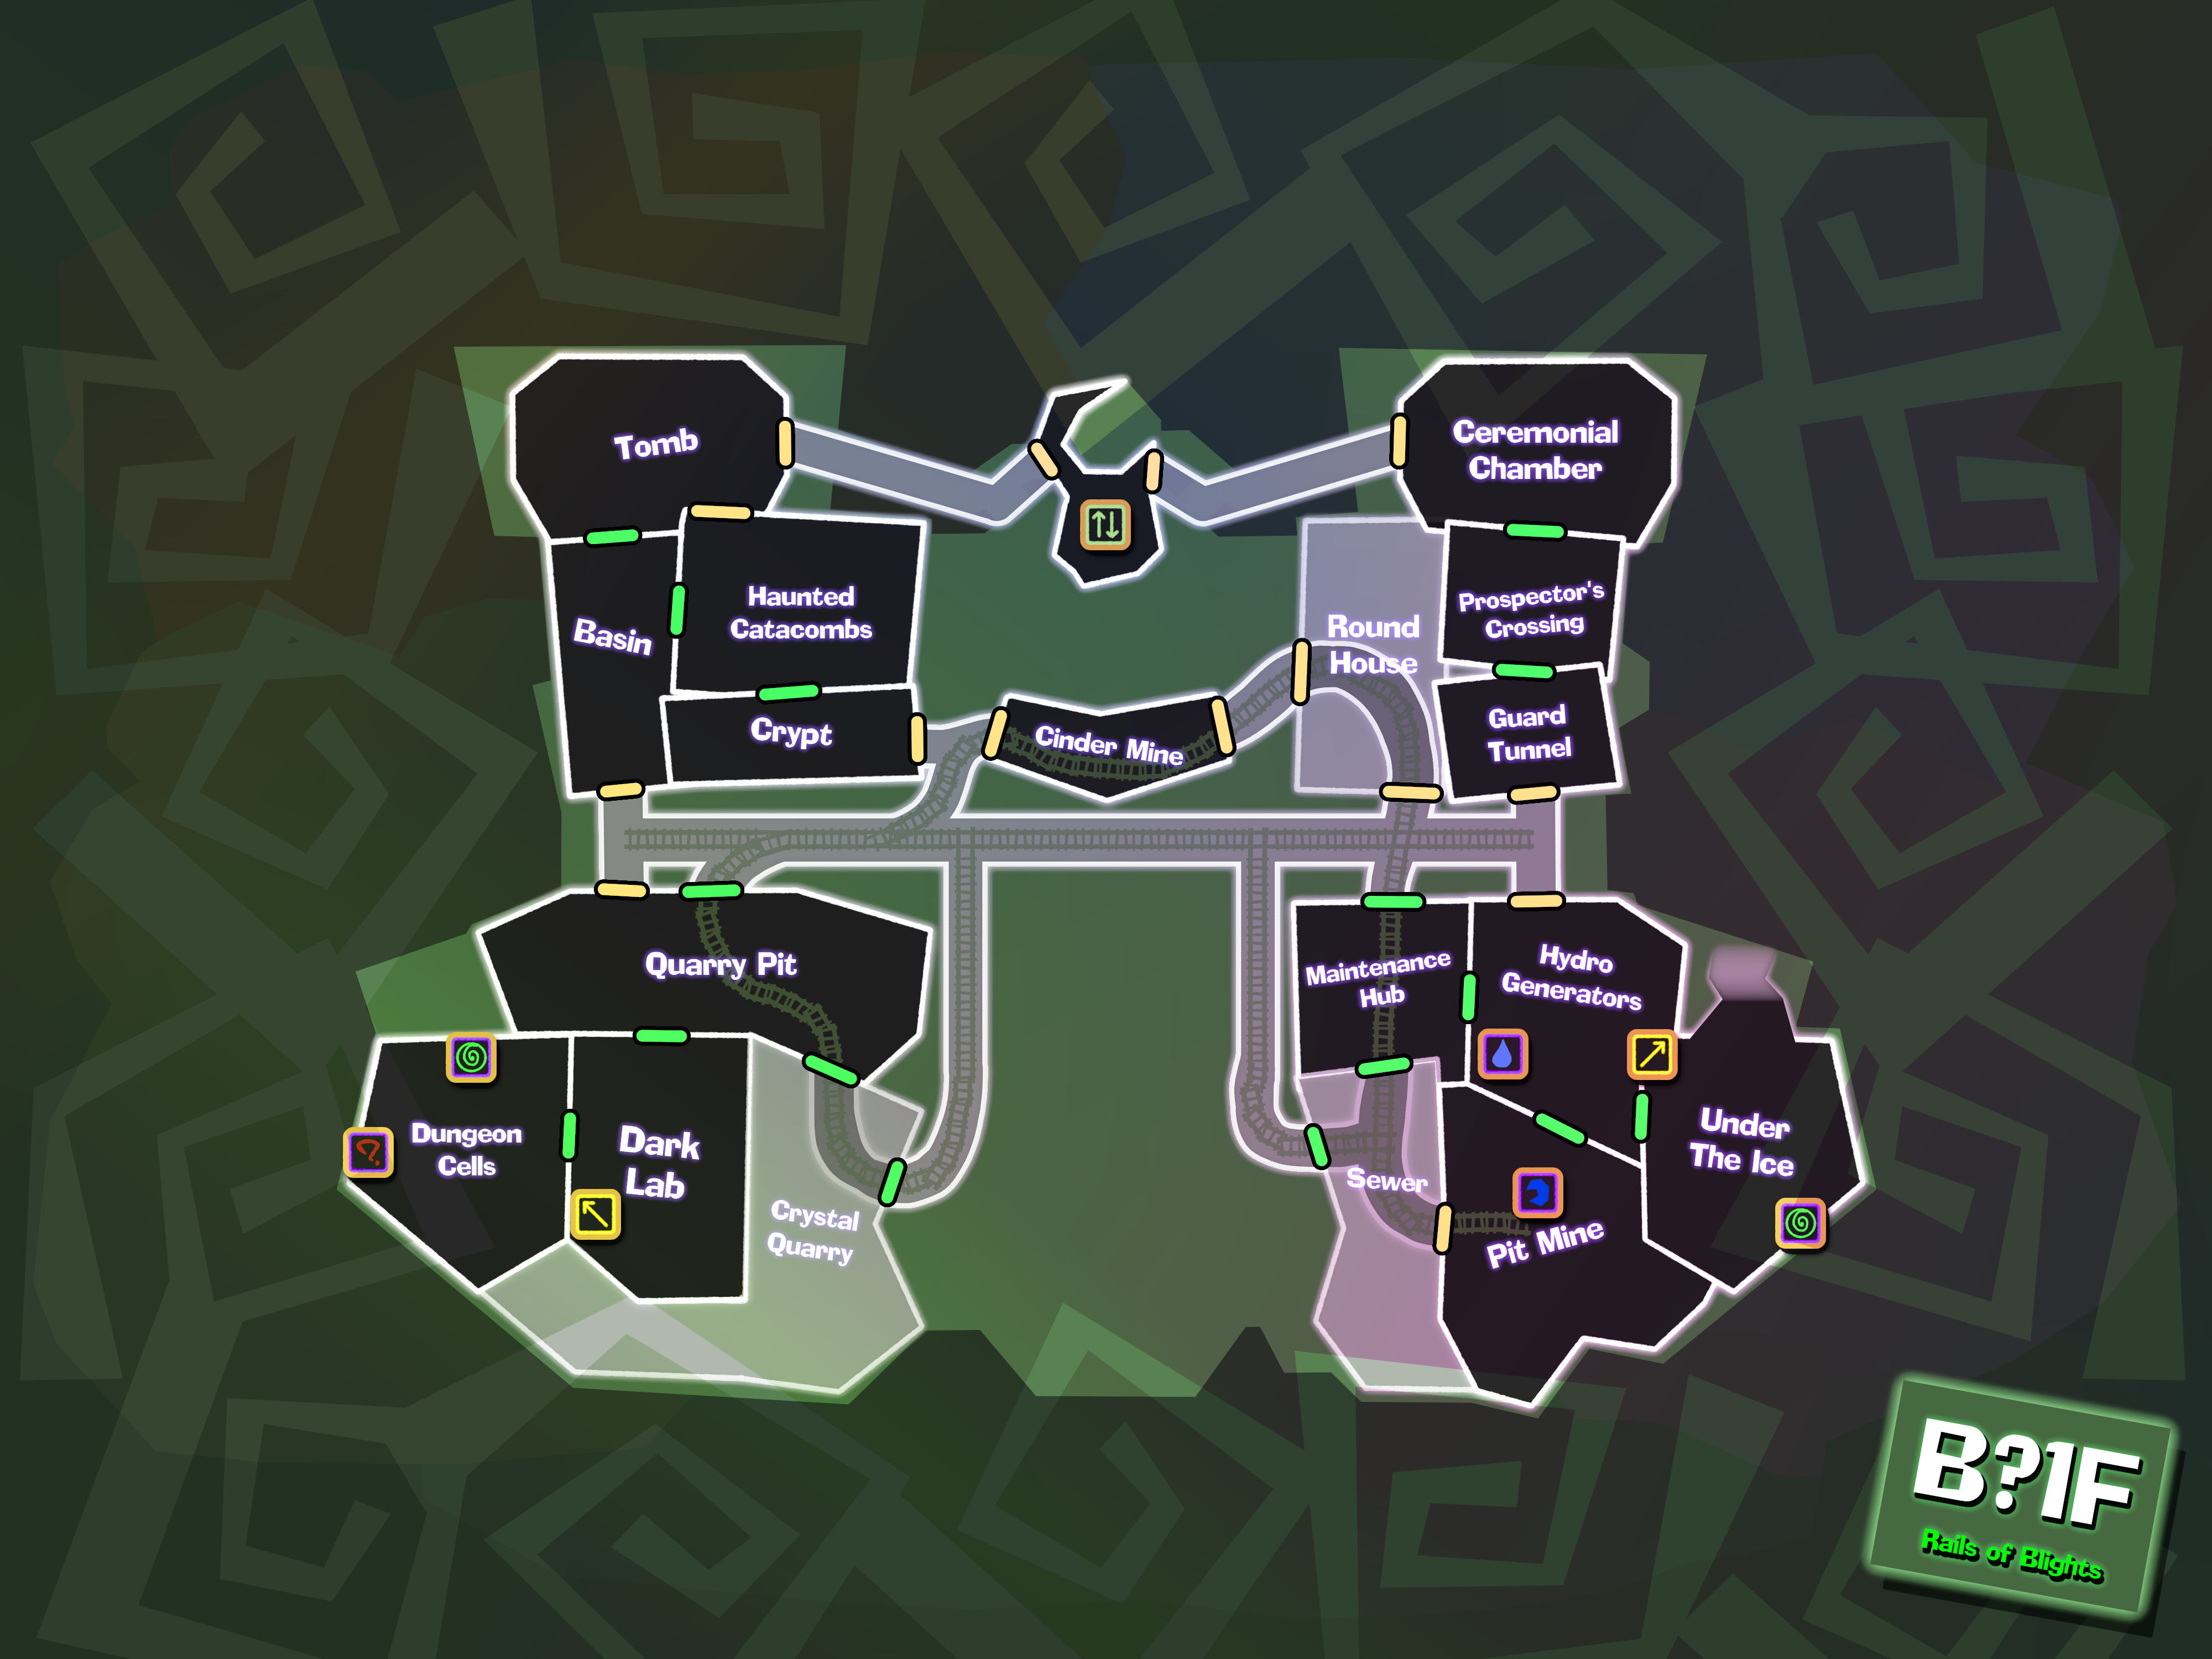
Night 5 GHOST Complex Map

Map Key:
🟥⛔ - Door is locked, pathway cannot be used.
🟨👻 - Door is paranormal exclusive, cannot be used on the normal map.
🟩✅ - Door is unlocked.
🛗 - Elevator, connects all three floors.
↖️↗️ - Staircase or passage to floor above.
↙️↘️ - Staircase of passage to floor below.
💡 - Room is always lit by Darklight.
⚠️ - Hazard, varies by location.
🌙 - Dark Moon Shard (Claimed)
📹 - Pixelator, allows transport between two specific rooms.
🌀 - Z-Gate - allows living players access to/from the Paranormal Dimension.
💧🧊🔥🧪- Elementals - Harmless ghosts imparting elemental energy gather here.

FIRST FLOOR - Valley of Darklights


1F Emerald Wing
  • Foyer: The large central foyer that one enters the Complex through. Besides a grand entrance and chandelier, there's even an aquarium with tropical fish. A huge mess from the great fight on Night 1 remains in the lobby. The chandelier has been smashed. A vault with a rusted-over lock has been uncovered behind a mysterious painting.
  • Archives: This room contains several boxes of densely-written documents, and a large computer server plugged into the wall.
  • ↕️ Clock Tower: A huge clock tower that extends through all three floors and the roof of the Complex. Inside the tower is a staircase extending both up and down, and a huge pendulum swinging behind frosted glass. The clock can be seen while standing outside at the front of the Complex. The clock tower has stopped entirely.
  • Studio: A small room full of art supplies and blank canvases, as well as a nearly depleted amount of paint
  • ↕️ Hollow Tree: A large tree that extends through the entire Complex. Inside the tree is a beanstalk, which shoots through the center of the tree. You'll need to climb it to get higher or lower.

1F Topaz Wing
  • Study: A room full of books on the four exhibits in the back of the Complex. The Laptop remains missing.
  • 💡Garage: Contains a single car parked in the middle of the garage, a large garage door exiting to the outside, and various car tools lying around the interior. The car is outside, and exploded. NO fuel or motor oil remains in here.
  • 💡Metal Laboratory: A high-end laboratory with all sorts of high-end technological equipment lying around in various stages of repair and examination. [Gaddget Roles have a special affinity for this room.]
  • Drafting Office: An office for drafting designs, full of blueprints and other writing supplies.
  • 🟦🛗 Shaft: A three-floor mining elevator now integrated into the main Complex.

1F Amethyst Wing
  • Plant Nursery: A room full of exotic plants that require special growth conditions. It's been carefully arranged to provide said plants with all the right conditions they could want, but someone has wrecked most of the plants beyond saving.
  • Container Yard: A large room full of various containers, with unknown contents. A big garage-style door leads outside, and handtrucks are available for moving them. The forklift is now a wreckage at the bottom of the cliffside.
  • Coatroom: A burnt mess of a room that once held clothes and costumes.
  • Workshop: A fancy workshop with plenty of tools and supplies, as well as a large workbench.
  • 🟥🛗 Cargo Lift: A moving cargo platform that now serves as an elevator for the three floors of the Complex.

1F Ruby Wing
  • 💡 Gloomy Bedrooms: A large communal dorm room that sleeps nine. It's decorated in a fancy mansion style.
  • Chalet: A comfortable resting area, with a rocking chair, a fancy fireplace, and a big couch. The fireplace is currently lit. The door leading outside is now open.
  • Bathroom: A rather upscale bathroom, with all the essentials - toilet, sink, bathtub, and least of all, soap.
  • ⬆️🌀 Aviation Exhibit: A big museum room about the history of aviation. A couple full-scale airplanes are on display. A back exit leads to the outside. The Z Gate has been activated. The exhibit is in shambles.

1F Sapphire Wing
  • 💡 Old Bedrooms: A large communal dorm room that sleeps nine. It's decorated in a warm bunkhouse style.
  • 💡East Gallery: A fancy art gallery, this one devoted entirely to sculptures and physical displays. Mostly everything's been smashed to bits. The door leading outside is now open.
  • ⬆️ Train Exhibit: A big museum room about the history of railroads. The train has been derailed for good.

Five Grounds: The outer grounds of the mansion. The same forces that created the G.H.O.S.T. Complex have left the land it sits on a patchwork of types - one part well-managed lawn, one part overgrown forest, one part desert sands, one part frozen turf, and one part barren rock.
  • Front Garden: The main feature of the Mansion Grounds. A large, well-manicured garden with plenty of plants and a fancy fountain as the centerpiece. The fountain has been damaged slightly. AURUMDESIRE is missing again.
  • 📹 Graveyard: The main feature of the Forest Grounds. A fully-loaded graveyard with plenty of gravestones, as well as a large mausoleum in the back. The mausoleum has a Pixilator, which connects to the Crypt.
  • Clockworks Court: The main feature of the Sandy Grounds. A fenced approach to the Complex with plenty of clockwork pieces buried in the sand, some of them still turning. The gear mechanism has been solved, and the clock tower was struck with the "key".
  • ⬇️🧊 Icy Lake: The main feature of the Snowy Grounds The lake has been converted to a pile of frozen papery mush, with a tunnel leading to an unsealed hatch. A long ice slide leads from here to Under the Ice. A small fishing hut is adjacent to the now not-lake. An abandoned, frozen-over water pump serves as a spawning ground for Ice Elemental spirits.
  • 📹 Cliffside: The main feature of the Rocky Grounds. The side of the outside sharply drops here rather than sloping down, with plenty of pointy, spiky rocks at the bottom. Spiked into the cliffside is a Pixilator, which connects to the Solarium.Lot of wreckage down there.

SECOND FLOOR - Abridged Heights


2F Emerald Wing
  • Greenhouse: A well-stocked glass-roofed room with plenty of conventional plants. Automated systems manage their care, but someone has dug up most of the plants rather brutally.
  • ⬇️ Clock Tower Heights: A huge clock tower that extends through all three floors and the roof of the Complex. Inside the tower is a staircase extending both up and down, and a huge pendulum stands still behind frosted glass. The clock can be seen while standing outside at the front of the Complex. You can ascend here to the Belfry, where there's plenty of bats and dust.
  • 🔥Parlor: A nice sitting room for lounging around. A phonograph with several records has been moved elsewhere. There's a couple chairs, a grandfather clock, and a lit fireplace as well. The fire is ghostly and eternal, and Fire Elementals make their home here.
  • ⬇️ Hollow Tree Heights: A large tree that extends through the entire Complex. Inside the tree is a beanstalk, which shoots through the center of the tree. You'll need to climb it to get higher or lower. The beanstalk terminates at the Tree Tops, where you find a small treehouse filled with old furniture.
  • Crow's Nest: A thin, rickety bridge that spans the exhibits of the second floor. It's only wide enough for one person to cross at a time. The east bridge has been torched, and is still usable, but could break easily with a good enough impact.

2F Topaz Wing
  • 💡 West Gallery: A fancy art gallery, this one devoted entirely to empty walls and burned paintings and spider gunk.
  • Library: A library well stocked with many, many books, along with a huge globe of the world and a grand piano, which has been smashed.
  • Kiln Room: A room with a large firing kiln, though it's not big enough to fit a person inside. There's also plenty of clay and modeling supplies.
  • Toolshed: The ??? room has been revealed and unlocked. A large toolshed with all sorts of gardening tools and supplies to maintain the many plants within the Complex.
  • 🟦🛗 Shaft: A three-floor mining elevator now integrated into the main Complex.

2F Amethyst Wing
  • Rumpus Room: A playroom with a whole lot of dolls, as well as an oversized dollhouse and huge teddy bear, which has had its eye removed.
  • 📹 Solarium: A room with huge glass windows to sit and view the outside with, along with some nice plants to add atmosphere. The still life paintings of plants are here, along with an activated Pixilator, which connects to the Cliffside.
  • 💡Horology Studio: A bedroom once used by a clockmaker. In testament to that, the room has a bed and many broken clocks in various stages of repair.
  • 🧪🌀Restroom: A utilitarian restroom with several stalls for privacy. The Z-Gate toilet has been activated. Slime elementals gather here behind a cracked mirror.
  • 🟥🛗 Cargo Lift: A moving cargo platform that now serves as an elevator for the three floors of the Complex.

2F Ruby Wing
  • Dining Room: A massive table dominates this dining room, enough to seat everyone in the G.H.O.S.T Complex. There's plenty of chairs and some beautiful centerpieces.
  • Kitchen: What used to be a functional kitchen has thoroughly flooded. All ovens and stovetops are unusable. Officially the most dangerous room in the facility. It seems the slimy beast has escaped the dumbwaiter.
  • Smokehouse: A small room equipped to smoke meat for long-term effect. A flue in the ceiling ensures it won't fill up with smoke.
  • ⬇️ 💡Space Exhibit: An exhibit on the history of space travel. The exhibit is in shambles.

2F Sapphire Wing
  • Armory: Several fancy suits of armor from various countries have been placed on display here... along with all their weapons.
  • ⬇️⚠️ Terminal: A room with several computer screens showing various aspects of the mansion, as well as a set of high wires that you can ride down to the exterior first floor. You can't ride them back up, though! Not using the wires to descend would be ill-advised.
  • Rafters: An attic-style storage room. Plenty of junk lies abandoned and unsorted here.
  • ⬇️ Nautical Exhibit: Half of this room is shaped like a large dock, with the rest designed to look like the inside of a ship. The exhibit is in shambles.

BASEMENT - Mining Sites


B1F Emerald Wing
  • ⬆️ Clockworks: The central machinery that powers the Clock Tower and keeps it on time. The gears are behind a strong transparent barrier, though a lock is visible at one side.
  • Cellar: A large storage cellar tucked away in the basement. All sorts of nonperishable food supplies can be found down here.
  • Smuggler's Hideout: A small room with plenty of treasure, currently frozen inside blocks of ice. All of the fanciest treasure chests have been raided.
  • Cinder Mine: A room with surprisingly hot rock exposed in several places. Heatproof gear hangs by one of the entrances.
  • ⬆️ Tree Roots: The roots of the Hollow Tree. The staircase ends here, and the roots have invaded the floor of the room. A smashed one-of-a-kind faberge clock lays tossed to one side, and a hole has been dug in the center of the room.

B1F Topaz Wing
  • Quarry Pit: A deep pit that was once an active quarry. Now it's just a big hole in the ground, though you can circle around it via the outside.
  • 💡Darkness Laboratory: A humming laboratory with dim lightning. Odd devices sit around the room, and strange globs of energy are visible within sealed containers. [Ghost Roles have a special affinity for this room.]
  • Crystal Quarry: A large room with several small crystals placed around a single huge one in the center. The huge crystal is opaque. A large, icy plant has been planted here. It hums softly. Its roots spread across the mansion, touching each room from the same origin as this one.
  • 💡🌀 Dungeon Cells: Multiple cages made of brick, mortar, and cast iron bars span the walls, with chains and moss aplenty laying around. A Z-Gate sits in one of the dungeon cells, and a spiky plant with multiple eye shaped red flowers is blossoming in another. On the furthest wall, locked behind a cell of its own... A lone, faded portrait. The apparent person within is unrecognizable.
  • 🟦🛗 Shaft: A three-floor mining elevator now integrated into the main Complex.

B1F Amethyst Wing
  • Sewer: A room with water channels in two directions - one flows into a storage tank for the building to use, and the other moves wastewater out of the Complex.
  • Maintenance Hub: A room that holds a handcart, as well as various supplies for maintenance such as hammers, nails, or janitorial supplies.
  • Pit Mine: A room filled with coal and coal veins, as well as minecarts full of coal. One of the minecarts has been pushed through a high pressurized pit to produce a hidden Dark Moon Shard, which has been claimed.
  • 💡💧Hydro Generators: The power room for the entire Complex. A series of powerful hydroelectric generators use water connected to the Sewer's tanks and create electric power for the building. A reservoir where Water Elementals reside is present.
  • 🟥🛗 Cargo Lift: A moving cargo platform that now serves as an elevator for the three floors of the Complex.
  • 💡🌀 Under the Ice - A secret bunker entered via a long ice slide from under the Icy Lake. Contains emergency survival supplies, long term rations, and firearms. The Z-Gate has been powered, allowing access to the Paranormal Dimension from this room. A dead slimy carcass that reeks of fish is here. The puzzle solving RPG has been shot.

B1F Ruby Wing
  • 📹 Crypt: An underground crypt. Some sealed coffins lie in state within the room. All of the coffins have been opened. One of the skulls has a Pixilator, which connects to the mausoleum in the Graveyard.
  • Basin: A room with a completely frozen floor. The ice here is polished to a mirror finish.
  • Haunted Catacombs: A maze-like room with more passages than should be possible. It's very easy to get lost here.
  • Tomb: An ancient tomb of unknown make. A single massive sarcophagus sits in the middle of the room, with mysterious markings all over the walls. The door of the sarcophagus has been gnawed at.

B1F Sapphire Wing
  • Roundhouse: The central hub of the minecart tracks that run throughout the Basement. Several minecarts can be found here, as well as various minecart and track controls.
  • Guard Tunnel: A linear tunnel flanked by suits of armor on both sides. Approaching them causes them to automatically force you back.
  • Prospector's Crossing: A small, frozen room. The ice that covers the entire middle of the room looks... concerningly precarious.
  • Ceremonial Chamber: A huge throne sits in the center of this room, radiating power and authority. A banner with an unknown symbol hangs on the wall behind it.

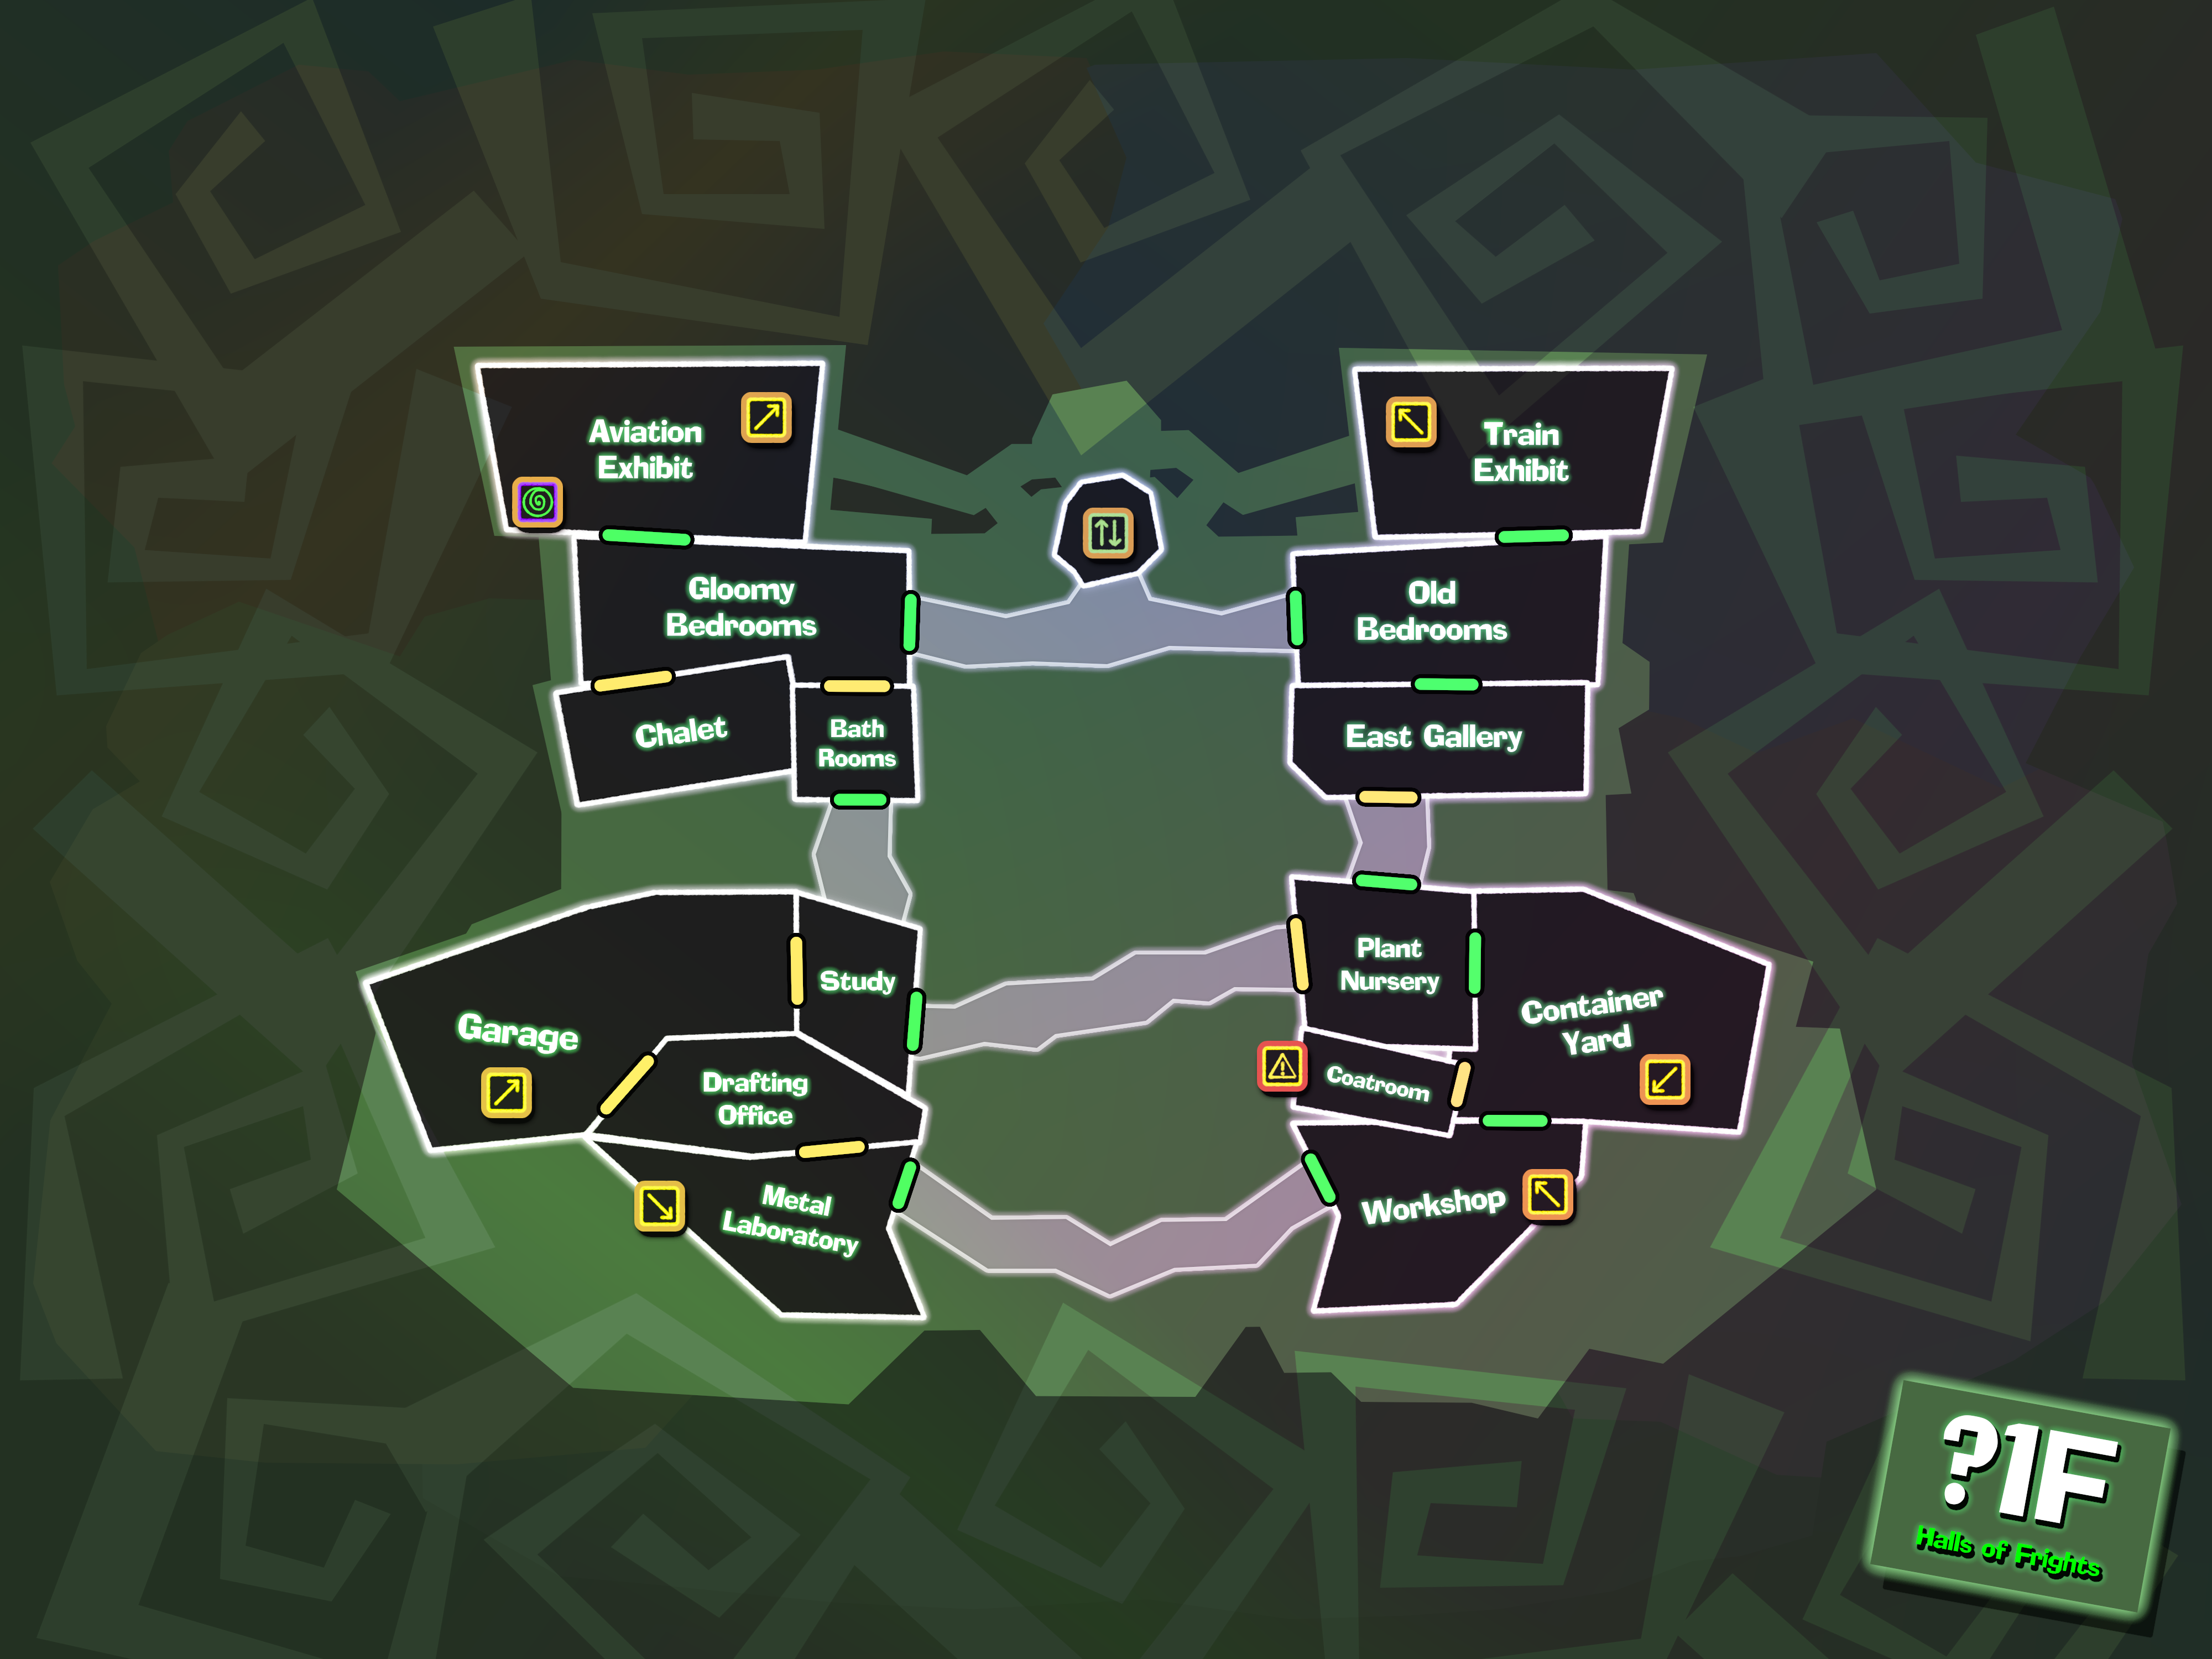
Click each image to toggle it to its Paranormal Dimension counterpart.
 
Last edited:
vigil_intense_neutral.png


...The RePossessors. Morally bankrupt, tax-collecting laypeople who wish to bankrupt Gadd and stop his operations at the Complex, subsuming his immense wealth and collection of objects through any means necessary.
​


64016


"Immoral"? Really? You're defending an irresponsible man whose "genius" was nothing but a safety hazard. He's the cause of this whole mess. His experiments, this facility, they're all so dangerous that one of his closest workers needed to have a revival protocol in place for if she died. We RePosessors don't have one of those!

Your captor and his want for a Killing Game is clearly the result of his actions. And you're calling me immoral?

...I should've known a direct invite from Gadd was too good to be true, and this was all a big trick. But at least the blockhead finally let me in to do my job. I won't say sorry for that.

64991


Anyway, there's still a few hours before the helicopter arrives, so let's consider this a last act of good grace for everyone. How's one more damage report sound? You all really exceeded expectations for our fourth night together.​

  • There is an absolute wreckage at the bottom of the Cliffs. This includes a rolling cart, tools, and a tarp, courtesy of yours truly. However, the greatest expense is undoubtedly the large forklift, likely worth 50000 G.
  • The horrid fish slime... thing has finally been put to rest, which will come at its own cost due to Gadd's investments into creating it. The destruction of any of the Gaddgets would result in an insurance payout.
  • Both the train in the Train Exhibit and the plane in the Aviation Exhibit were loosened from their tracks and caused an anticipatory amount of damage to their respective rooms. Reconstruction efforts would total in the hundreds of thousands.
  • Despite fixing the hole in the 2F West Hallway, a new one has been made in the East Hallway. Takes me back to our first night together, when I pointed out how you should avoid it as an occupational hazard. Now that the curtain's been lifted... would anyone want to test the fall height?
  • The power surge and subsequent outage from the lightning strike will have caused damage to the electrical infrastructure of the whole facility. Though it is currently running fine, I would expect greater problems to make themselves known this upcoming night. For now, only the Clock Tower is truly affected.
  • The Coatroom has been burnt to a crisp, including several expensive costumes and pieces of threaded memorabilia therein. Professional designers would have to be hired to adequately replace everything that was lost.
  • Not only are both Galleries still wrecked, but the priceless portrait within has been broken, meaning that there's another million dollar deficit on the artwork in this place. The broken portrait has been left outside, rather unceremoniously.
  • The West Wall of the Dark Lab is now blasted open, revealing the Dungeons behind it. Still, stone and mortar like that costs a pretty penny to install in the first place.
  • And though this doesn't apply to those within the walls of the facility... With her "removal", Knightley's assets are now entirely up for grabs. We'll keep this in mind during our next field assignments.

1790020756880.png


That about covers it. Whatever happens to this place is in your hands now. Promise you'll make it look extra pretty? Personally, I think this building would look best razed flat.

Oh, but... I'll give you a last nugget of info I learned recently. According to our insurance payouts... the Sun Stone is worthless. If you want out of here in one piece, don't be fooled and gather the Shards instead.

Or do get fooled. I just need someone alive to give me a line and let me know what I should mark on the final incident report.​
 
DrGhouligrab_shard.png

Haha, finally, a shard of the Dark Moon itself... This "king" of ours had better watch his back! And to think, these people almost gave it away to a- a zombie! Shameful... Do they not understand the implications here? I- I really think they don't.

Hm... It's too bad I can't keep this for myself, it would be a fascinating research piece! But for now, I have more important matters to contend with.

HandsomeExpertPunchesOutIDIOTGhost.png

DrGhouligrab_confident.png

Yes... Perfect...
 
vigil_intense_neutral.png


Alas, the dawn breaks. My hunt... was unsuccessful. Sir Thanos, I commend your efforts in attempting to stop them, but it seems they were just too... what's the term... loaded.

kb_smug.png


Brings a tear to my eye, it really does. But they weren't the only ones who've gone missing tonight.

kb_tongue.png


This one's gonna be REAL interesting, and I can't wait to see you fail to figure it out!

vigil_intense_neutral.png


...? The bell tolls, but no body remains. What... is this...?

Attention all Test Subjects of the Grand Experiment! Something has happened! A body hasn't been discovered!

Lee Chaolan
has been... well, uh. He's gone. We don't know what happened, but we know he's dead. His role was CODE: ALLCITY, the Ultimate Graffiti Artist!
​

Code: ALLCITY
📠 Ultimate Graffiti Artist
While your name may be whispered in circles in distant lands, you've heard the GHOST Complex features some of the most complicated and dangerous stunt areas in the world, and believe it would be awesome to perform tricks off its wacky layout. Perhaps you could even leave your artistic mark in its halls, which are mostly covered with dusty paintings and lack your Bodacious Style. Fortunately, the researchers of the complex have captured and studied plenty of speedy spirits, and have developed the perfect Gaddget for you to test on their behalf. Just... don't wipe out, okay?

Abilities:
  • While your graffiti skills are otherworldly, your Gaddget is designed to help you with reaching new heights for fantastic shots, and achieving swift getaways after a successful mark. It manifests as two components: a pair of glowing inline skates, and boost pack attached to your back. You can equip and unequip these at will.
  • Your supernatural skates are usable on all kinds of surfaces in and around the complex. The major exceptions are snow, and sand, which is coarse and rough and gets everywhere.
  • You can use your skates to perform two combos per night. A combo is a string of movement-based skating tricks from the following list:
  • While using your ghostly skates, if you build up sufficient speed by skating, you can perform a wallride by jumping at any wall on the map. This trick will make you ride parallel to the ground along its entire length, gaining slight altitude as you do. Your skates will maintain your traction, keeping you moving along the wall until you voluntarily kick off.
  • You can keep the wallride going by jumping to another wall (walljumping). You can only walljump twice per combo before you have to dismount. You can walljump roughly the width of one of the complex's hallways.
  • You can railgrind on any handrail, wire, rope, pipe, or other long narrow object in the complex, which will let you traverse from one end to the other swiftly. The exception is if this object is at a steep angle.
  • You can perform a manual by sliding on the ground with your skates, which will let you conserve your speed, but slide under players to dodge head-on attacks, and move through low clearings with ease. You can only hold a manual for a few seconds.
  • You can use a combo like any other KG action or reaction, provided you are going fast enough. While performing a combo, you will dodge obstacles unless you somehow lose focus mid-combo, or the wall or room you are attempting to traverse has lots of clutter.
  • Once per night, you can activate your boost pack, which will grant you immense forward momentum and speed from nothing for a few seconds. You can use this to perform a boost trick from the list below, or start a combo immediately without having to build up speed.
    • A boosted wallride will let you walljump four times before you have to dismount, instead of two.
    • A boosted railgrind will let you traverse one steep-angled grind, even completely vertical poles.
    • A boosted manual will let you break objects and furniture with your skates as you move.
  • Lastly, you start with two cans of spray paint. One of these cans is paint that is only visible under darklight. You can whip up simple messages or complex designs in mere seconds while your skates are equipped.
  • Ghostly interactions:
    • Your skates will flash a cool ghostly green while in use. Under darklight, you will leave behind small ghostly trails of light that will allow players to see the path you took for a brief period of time, before it vanishes. Using a boost will make this path more prominent and linger slightly longer.
  • Forbidden Action: If your skating is interrupted mid-grind, such as through a wall being destroyed, or you colliding with a solid object unexpectedly, you will fail your combo and immediately die of bummer vibes. Ouch!

Module: LEE CHAOLAN has now been applied to your role.
+ You've learned a new trick you can combo into: Violet Martial Arts. You can perform a single strike punch or kick to break objects or damage walls in your path. When boosted, you have additional strength and can perform an additional strike to break a wall entirely, and can then use the new path for tricks. This damage will be reflected on the map in the next day phase.
With your wealth and vanity, if your outfit or vibes are ruined by paint being splashed on yourself, you will not be able to use your role powers unless cleaned off. Being paintsplattered mid-combo will also trigger your FA.


CASE FILES:
- There is no body to recover, at all. Lee Chaolan has completely vanished. His bedroom will be opened for investigation.
- There's a mess in the Armory, and it seems a fire has broken out within.
- The west elevator, the Shaft, has had its ropes cut. It lays in a huge wreckage on B99F.
- The portrait from the Dungeons is missing.
- It appears pumpkins now roam the complex freely. There's pumpkins in many rooms in the basement, in the East Hallway, and in the Foyer.
- There's water and other liquids splashed in heaps of rooms tonight, including the Old Bedrooms, the Maintenance Hub, the Prospector's Crossing, the Kitchen, the Cellar, the Restrooms, and the Sewers.
- The Nautical Exhibit has been, somehow, trashed even further.
- All rooms with blue names now have visible roots poking through the ground and walls.
- Golden coins litter the rooftop and western grounds of the facility.
- All NPCs attempted in some way tonight.
-The Dark Moon Shard of Gloomy Speed has been claimed by Albina. She possesses a new power.
-The Dark Moon Shard of Treacherous Social has been claimed by the wraith Lash. He possesses a new power, and has revived as a full player. He is not the killer, and will be immune to execution today.


Congratulations to @Revin and @Roserade, both RePossessors have escaped the game with 108,000,000G lining their pockets! Details of their exploits will be provided in another post by King Blocky Boo, who witnessed the whole affair.

Luke Atmey has escaped, and won the game! His role was CODE: RWNWPRTMHRW, the Ultimate Ritual Empowerment!

Code: RWNWPRTMHRW
🩻 Ultimate Ritual Empowerment
In this world of spirits, you oddly know exactly the strings to pull to get what you want, and call in favors when you need. You steal the power and influence of others, take what others desire and smash it to pieces, make the living offers they can't refuse, and then beat the dead into submission for good measure. You coerce demonic ghosts into giving you their powers and do your bidding, and you might have even hired a secretary of the underworld at some point.

Of course, this accumulated experience has enlightened you to a few... dark rituals. Rituals that can lend you the powers of mysterious demons you're willing to settle a score with immediately, in order to get you out of this Killing Game in one piece... much unlike the objects you're going to smash to get there.

Abilities - Ultimate Ritual Empowerment
  • Your role relies on the use of self-made ostraca--broken pieces of objects with smooth surfaces, such as clay pots, used for note-taking. You carry a magic carving pen with which you can inscribe one of four empowerment spells onto an ostracon you've created. You create ostraca by smashing an object on the map with a reasonably smooth surface to write on, and then using your pen to inscribe a spell on it. Note-taking and ritual writing on scrap paper is not your style of enchantment, it's just cheap.
  • The empowerment spells are designed to help you achieve a kill more successfully, at the expense of having to expel an associated demonic ghost on the same night as your attempt. These demons are always drawn to the ostraca you create.
  • You may pick one spell from the list below to inscribe each night. Each spell has a required surface, and an associated demon. Once you finish inscribing your ostracon, the empowerment you've chosen is active from that point of the night onwards.
  • At the same time the spell activates, the demonic ghost of your chosen spell shall emerge from the Tomb, possessing a corporeal, shadow-coated body. It will hunt down the ostracon holder, and knows where they are at all times.
  • The spell's empowerment will only apply to the person holding the ostracon. Fortunately, this is enforced by the spell preventing you from letting go of the inscription at all! You cannot discard or destroy the enchanted carving once active, until the end of the next day.
    • The only way it can be transferred is through theft. The allure of the ancient, ghostly sherd you've created will naturally entice all would-be thieves into grabbing it if they mug you. Keep in mind, this also transfers them the power of your spell!
  • You can only have one empowerment and one demonic ghost active at a time. The effect also vanishes at the end of the night its activated, so it must be used on the same night it activates.
  • If you do not provide a suitable countermeasure to your chosen demon in your night actions, you will likely be killed or heavily injured, as it will hunt you throughout the night, ignoring all other players. Some demonic ghosts can be distracted, and your spell list contains weaknesses for a few of them upfront. You may need to piece together the weaknesses of others through research...
    • If you die to any demonic ghost, there is no trial. If someone else dies to a ghost you summoned, you will be their killer.
    • It is possible to receive assistance when killing demonic ghosts. A summoned ghost cannot kill a player that doesn't have the written tablet it desires, but it can injure them or knock them out. When a demonic ghost dies, its body vanishes in a cloud of black smoke.
  • Ghostly interactions:
    • The demonic ghosts you summon only appear as wispy, black shadows to players, unless under dark-light. Their true forms can be seen under dark-light, and anyone in the Paranormal Dimension can see them at all times.
    • Your ghostly ostraca will glow under dark-light while the empowerment is active.
  • Weaknesses: While not a direct weakness, it should be noted that your scribings can be interpreted if the right book or lore document is obtained. The demonic ghosts all have documents on their abilities and weaknesses in the complex. This won't reveal who inscribed the spells, but they will reveal a general "clue" about the spell's true power.
  • Forbidden Action: Don't get demonkilled. Have fun!

Spell List
  • Whispers of Pnww
    • Required tablet: earthenware or pottery shards
    • Empowerment: Less likely to be seen in night action results around the location of murder.
    • Demonic Ghost: Rodentrouble, Ratainer of the Underworld - A small plague of 10 fat but hungry ghost rats, with sharp teeth.
    • Weaknesses: Everything a fat rat would be weak to.
  • Order of Ramses
    • Required tablet: Sandstone, statues, rocks, or thick clay pieces
    • Empowerment: Near-untraceable weapon manifestation. You can choose any simple non-magical weapon and receive a cursed, golden version of it.
    • Demonic Ghost: Rahliman, Blacksmith of the Underworld - A cursed mummy wrapped in bandages dual-wielding the same weapon you requested along with a large cursed claymore.
    • Demonic Ghost Weaknesses: Bad with ranged weapons, obsessed with treasure. Not exceptionally bright, and fooled in much the same way a mummy in Saturday morning cartoons would be fooled.
  • Canto of Enheduanna
    • Required tablet: Bark or wood
    • Empowerment: A piece of incriminating evidence, decided by the hosts, is completely destroyed if the kill goes off.
    • Demonic Ghost: Aracacia, Cryptkeeper of the Underworld - Info incomplete. Known to be cunning and multi-legged, wraps her prey in silken ghost string.
    • Demonic Ghost Weaknesses: Two of the three elements.
  • Proclaimed Edict of The Unnamed Demon King
    • Required tablet: Golden or gold-painted, expensive objects
    • Empowerment: Your murder is guaranteed to occur that night, provided you kill the Demon King on the same night. This enchantment can only be used once.
    • Demonic Ghost: The Demon King of the Underworld - A mysterious shade shrouded in darkness, bearing two horns and glowing red eyes that strike fear into the hearts of mortals. His name must be praised.
    • Demonic Ghost Weaknesses: Unknown.

Coral Glasses has escaped, and won the game! Her role was CODE: LEDGERDEMAIN, the Ultimate Insurance Fraud!

Code: LEDGERDEMAIN
📠 Ultimate Insurance Fraud
"Tax exemption", "Cost of living crisis", "PayGhost me $5", you're sick of it all. You work for a large, technologically-advanced insurance firm, and you've been assigned to audit this mansion, undercover. Everything in the GHOST Complex has been insured at some point, with rumors that the owner would even stuff extra money between the mattress cushions to inflate the rebate price.

However, in this cash poor economy, every claim is now dealt with in numbers and digital currency. An appraisal or two here and there, a handy scan with the "Gaddget" you were able to smuggle in, and you can collect insurance damages in a flash. This is all so you can commit massive insurance fraud and flee the valley and possibly country at large!

Little does your employer know, with this Killing Game nonsense about, you're about to claim the old building "mysteriously collapsed" in a freak ghost accident while taking all of its items with it, and make out with the cash yourself under the owner's name. Given the large cubical ghost calling the shots right now, who knows what happened to him, anyway? Now's your chance to make a killing, as a RePossessor.

Abilities - Ultimate Insurance Fraud
  • You possess two tools, an Appraisal Ledger brought yourself, and a "Claims Box" Gaddget provided by the facility. Your aim is to collect "G", a currency obtained through specific means throughout the game.
  • You can secure an exclusive escape from this game by reaching the minimum goal amount of 70,000,000G. Practically nothing. Anything extra you make over this can fund benefits to help secure your escape.
  • You passively earn income the more the GHOST Complex is damaged and its workers die. You collect "Item Insurance" and "Life Insurance" from these events. A summary of all credits and debits will be provided at the end of your rolecard for convenience. As you are functionally an "independent" with your own win condition, the details of your money-making mechanics are behind the lengthiest spoiler bar in any rolecard, so be sure to read it all carefully! There may be secret bonuses you can earn as well.
Making G
  • Your money is easily tallied at the end of each phase in a spreadsheet maintained by the hosts. You can query your current holdings at any time.
  • Regarding Item insurance, every night, objects will naturally be smashed, property walls will be damaged, rooms will be burned, flooded, or otherwise rendered inaccessible. You will automatically collect +1,500,000G if this occurs at night, but you won't know what exactly happened.
  • Additionally, you collect Life Insurance to the tune of +5,000,000G when players die. This occurs for each death, regardless of execution or nightkill. Double murder nights are hence doubly profitable.
  • From these two income sources, you can leave the game very comfortably on your own terms if you survive until the finale or thereabouts. However, if you put in the effort, you can leave earlier of your own accord by making extra money.
  • You can increase the amount you earn from Item insurance by performing a Damage Inspection during the day. You must provide, in the game thread, a decent summary of any major building damages uncovered during a case, by yourself or other players. You can disguise this however you wish, but the report must be provided either during the wraith vote at the end of the day, or the subsequent night. Doing this will secure you an extra +3,000,000G depending on when your report is written. You cannot submit a report for a previous night after the next night has passed.
  • You can increase the amount you earn through Life Insurance by either accomplicing with a killer, or being the culprit yourself, earning double (+5,000,000G) or triple (+10,000,000G) the life insurance premium, respectively.
  • You also earn a small sum of money (+500,000G) for correctly voting for the killer in cases you have no involvement.
  • There exists 6 "expensive" items on the map, which net you a spare +500,000G if they're destroyed. You will have to examine these either at night or during the day to verify their status. This spare income can assist with shoring up a loss incurred by an incorrect vote.

Spending G
  • All of those payment nuances aside, you do have powers at your disposal, for a price. Using your "Claims Box", you can produce a generic copy of an item that has been damaged or has gone missing, provided you know what the item is by name, it can fit within a 2ft x 2ft box, and you have either a photo of its former appearance OR a fragment of the item.
    • The copy of the item will be spawned as it appeared at the beginning of the game, with no modifications, meaning it won't produce the exact bloodied murder weapon to match a wound you wanted to check, or things like that.
    • You can use this power to produce an item at night, meaning you have access to a nearly untraceable item source for kills, but the item must be explicitly mentioned as missing in a report you've provided, at least once. Doing this also requires you to concentrate for a short while to produce the item, so it can't be used in a pinch.
    • Any time you use this power, it costs -1,500,000g, and you can only fulfill two claims per case (one day and night).
  • Your second power comes in the form of a special "Two-Party Contract".
    • At any point in the game, you can divulge the truth about your independent goal to someone, and in your night actions, get them to physically sign a contract. This person is then entitled to assist you and escape with you, earning money in the same ways as you, but your joint goal increases to 100,000,000G to account for their compensation. You can only enter a single formal partnership.
    • Alternatively, you can have us hosts sign your contract, which grants you an extra life in the game (making yourself the second party), to the tune of 30,000,000g, which also increases your escape goal to 100,000,000G You will be given this choice if we calculate night actions, you are the victim, and haven't used your contract already. You will also be given this choice if you are incorrectly executed during the day. If you've entered a partnership instead, you die, and your partner inherits your goal and your G for themselves alone.

Escaping with All G
  • You only receive G at the end of a phase. Once you surpass your goal, you can trigger your escape condition during the Wraith Vote (so between the day and night phase). The next night's submissions will be extended to account for your departure.
    • It's more likely for you to reach your goal at the end of a day phase. However, if you achieve this at the end of a night phase, you (and your partner, if present) will be immune to execution the next day, but can still participate in the vote and testify.
  • Upon triggering your escape, you (and your partner) must attempt to reach an escape point safely during the next night phase. NPCs and other players can attempt to stop you, but you can spend 2,500,000g to block a player from attempting on you, letting you hit them in the face with a sack of cash because screw the rules, you have money. You can also spend the usual amount to use your claims box without the two-item restriction. You can do either action as many times as you can afford it without going under your goal amount.
  • Provided you survive the night after you trigger your escape, you will win the game alongside your new business partner if you contracted one.
  • Phew. You have earned 500,000G for reading that already.
  • Ghostly interactions:
    • The copies of items you create will always fluoresce under darklight.
    • While you live, players damaging expensive items may see "ghost bills" or "ghost coins" briefly appear, flutter around, and then vanish with a sound effect if they are broken under darklight.
  • Weaknesses: Your eyes will always be drawn to expensive objects in your account, which may make it harder to memcheck or pay attention to details in certain rooms with them present. You could even be caught off guard if there's a significant stack of valuable items present in one location.
  • Forbidden Action: You can't willingly destroy expensive objects or damage the mansion yourself, as your ledger will blare with a false-positive, and terminate you well before you can swindle your employer and take the money yourself. Your partner is not bound to this Forbidden Action, even after inheritance.

Summarised G mechanics:
- 70,000,000G goal
- Player dying: 5,000,000G
- Directly killing: 10,000,000G
- Accomplicing: 5,000,000G
- Mansion damages: 1,500,000G
- Damage Report submitted: 3,000,000G
- Providing a Good/Great/Excellent Damage Report: 1,000,000-3,000,000G
- Correct vote: 500,000G
- Incorrect vote while killer or accomplice: 500,000G
- Expensive item destroyed or absorbed: 500,000G
- Claim an item: -1,500,000g (only twice, but unlimited during the escape until goal amount)
- Pay off an attacker (only during your escape): -2,500,000G, only usable with funds over goal amount
- Partnership Two-Party Contract: -30,000,000G (added to goal amount, increasing it to 100,000,000G)
- OR Death Two-Party contract: -30,000,000G (added to goal amount, increasing it to 100,000,000G)
- Single-Time Longest Spoiler Bar Medical Compensation: +500,000g




Day 5 ends Adjusted Time . Make sure you investigate wisely! Accounts will be sent out over the coming hours.
 
Last edited by a moderator:
View attachment 67415
That's odd... where do we even begin...?

I... guess... I will inspect his room, just in case.
You inspect Lee Chaolan's room. It seems he had a lot of belongings.

There's plenty of empty cans of spray paint, bottles of empty wine and spirits, and an empty shelf labelled "trophies". You fail to recover any sign of his Gaddget, or armor.
 

albina_2nd_closed.png

Then... I'll ask Mister Tanner if there was an accomplice.

albina_2nd_smile.png

I'm happy tonight, even if I didn't get to secure a friend for Fascia. You'll see soon.
 

View attachment 67416
Then... I'll ask Mister Tanner if there was an accomplice.

View attachment 67417
I'm happy tonight, even if I didn't get to secure a friend for Fascia. You'll see soon.

Hmmmnn... nah. This one's solo.

Okay... Ms. Mona, did elemental powers get used for this kill, if you can even tell without a body...
...not that I can tell. Though, this is highly unusual. The body is completely missing... Vigil, you're sure you heard a bell toll tonight, yes?

Aye. The bell doth not lie. I heard it twice tonight, though... one of those was of my own doing. If Sir Chaolan was not on that helicopter, and his body is presently missing, mine ear for the bell only draws one dire conclusion.

Yeah, he's dead dead.
 
Fascia and I will check if there's anything amiss in the Cellar... che bello, to be almost fully in sync once more.
 
Ms Albina mentioned a flash in the Cellar, so I will inspect that room now.

Fascia and I will check if there's anything amiss in the Cellar... che bello, to be almost fully in sync once more.
You examine the Cellar. Lines of barrels on the wall contain corked wine from all kinds of vintages. There's tightly packed shelves of alcohol and barrels which make it easy to hide, and hard to move around quickly. You note that some of the barrels have been chipped, there's a small, overturned casket of whiskey here, and some of the spirits are pooling on the ground. Red paint stains from a previous night are on the ground, and the spilled alcohol is making them wet again.
 
Reflect on my previous interactions with "Lee Chaolan" to determine if he was ever real

I think I might have figured out the key to this case
 
Back