- Pronouns
- He/him
[Part 3/3]
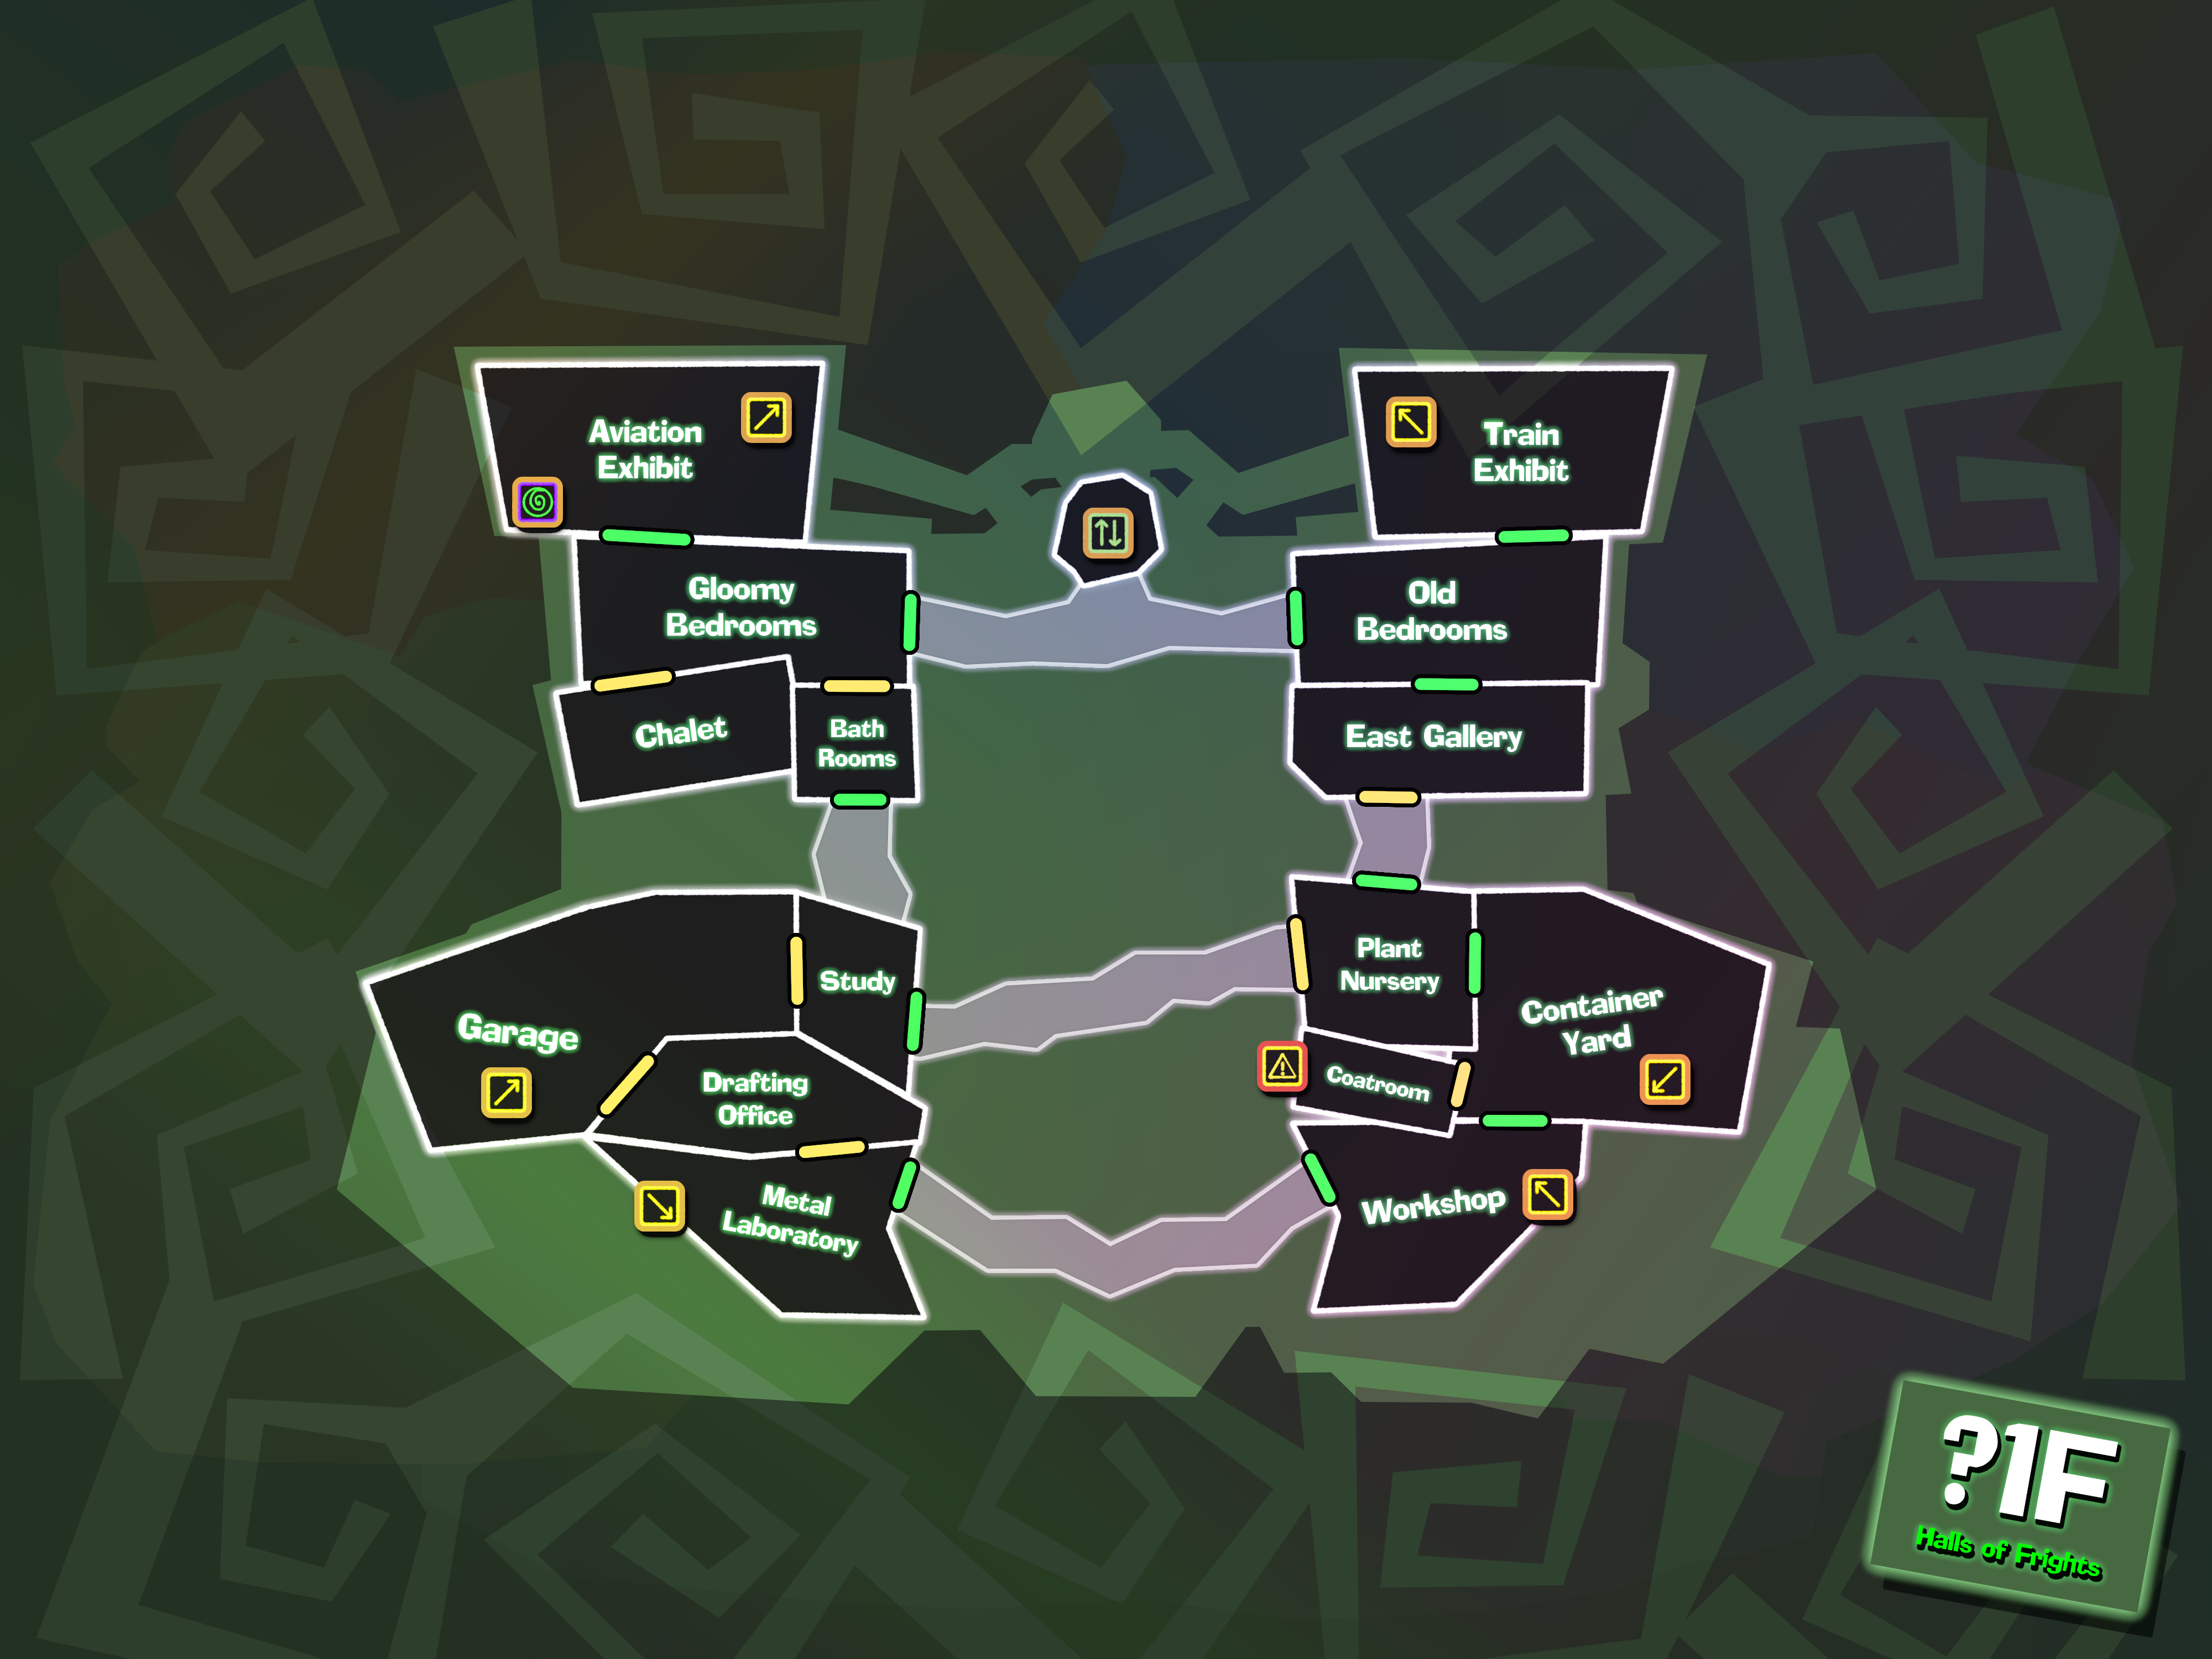
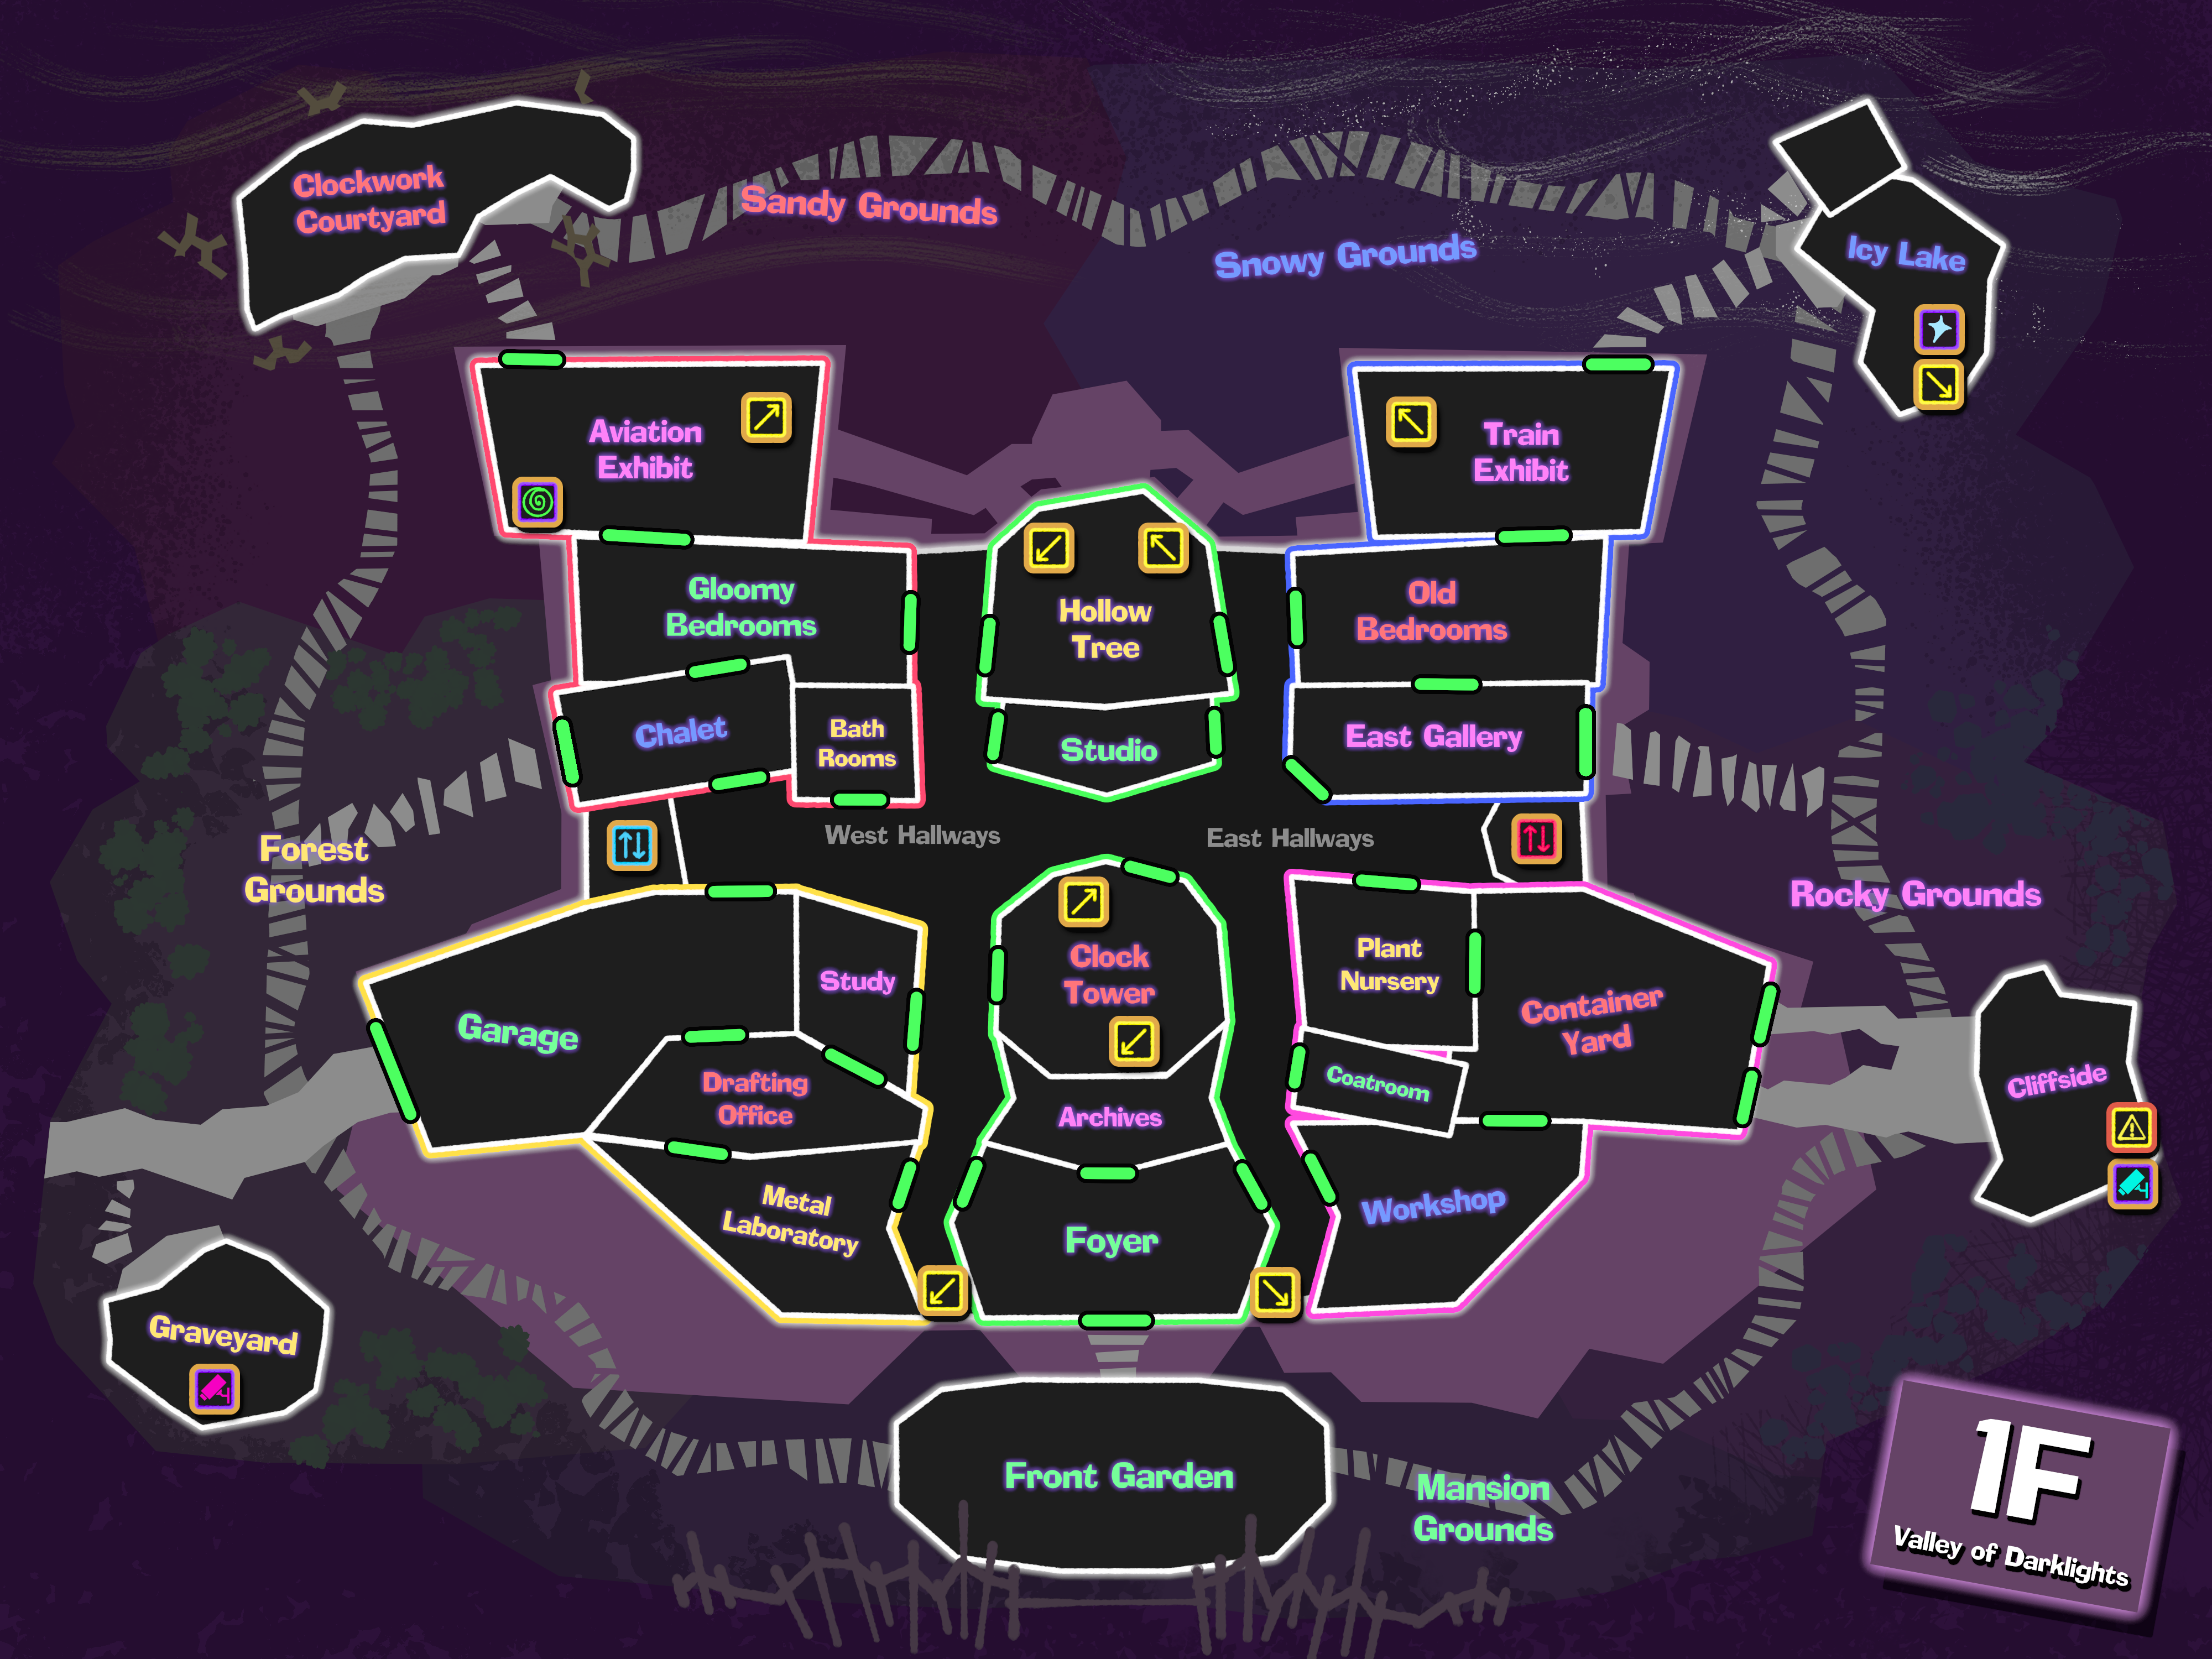
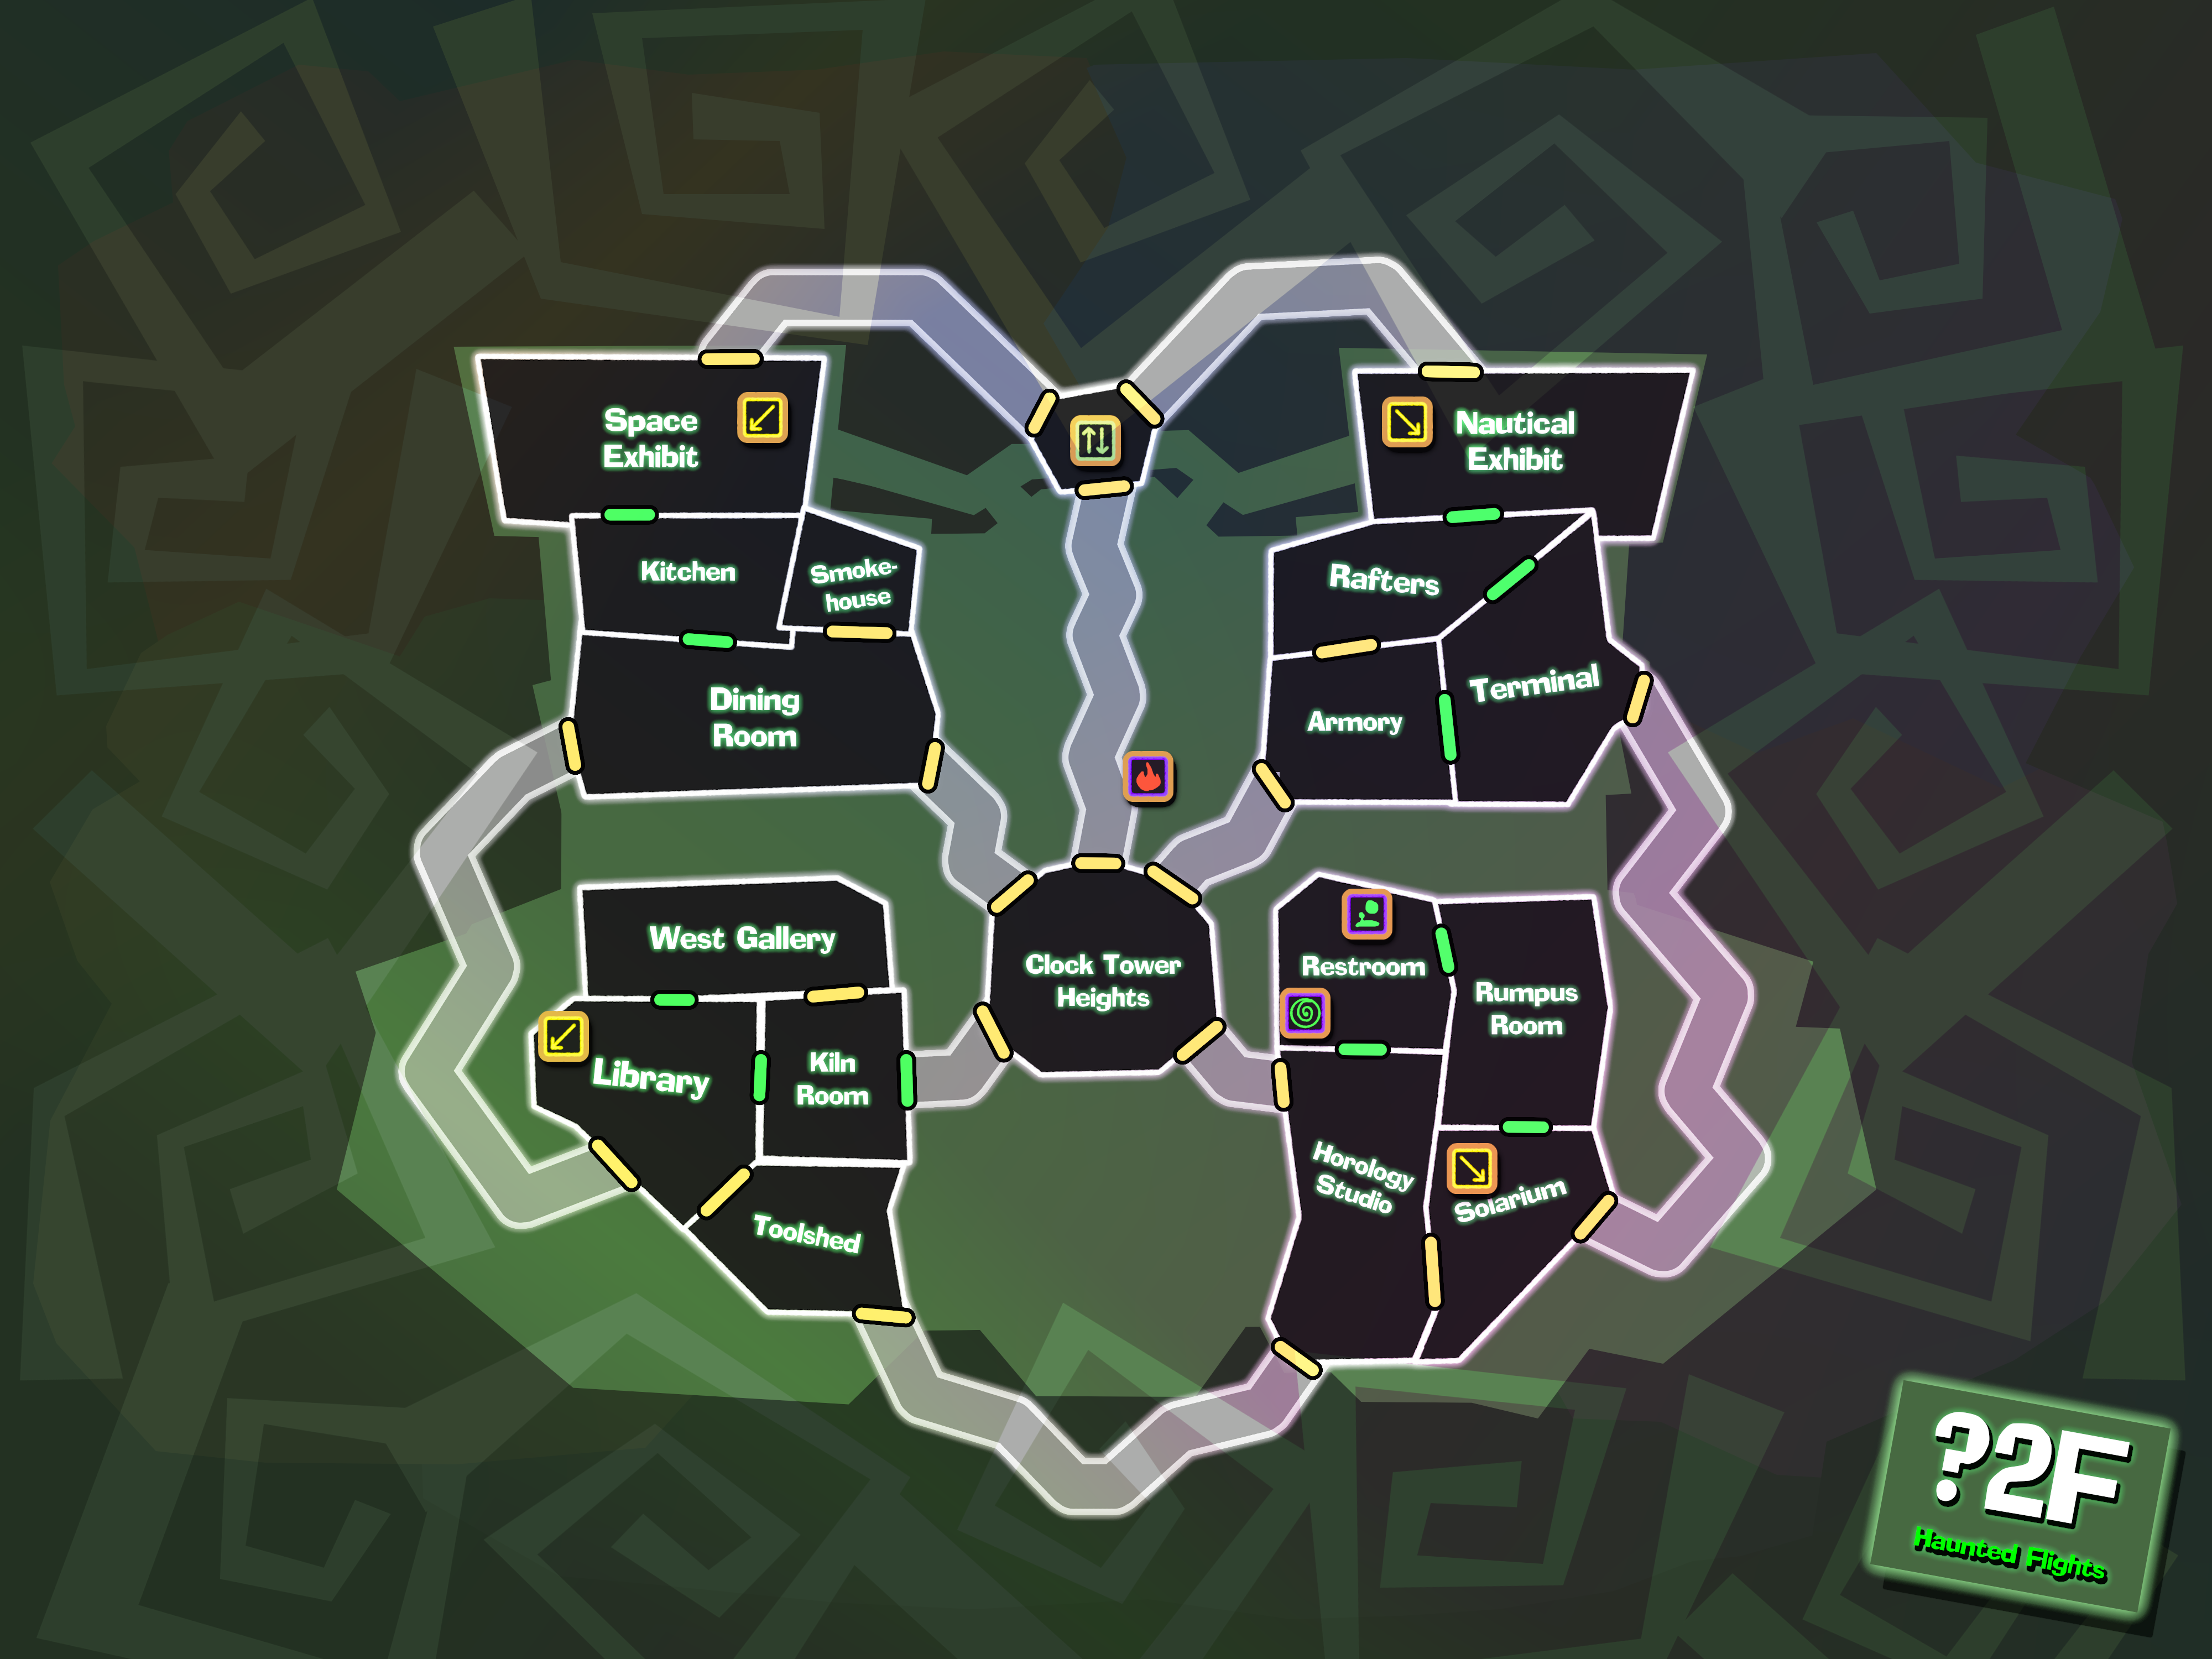
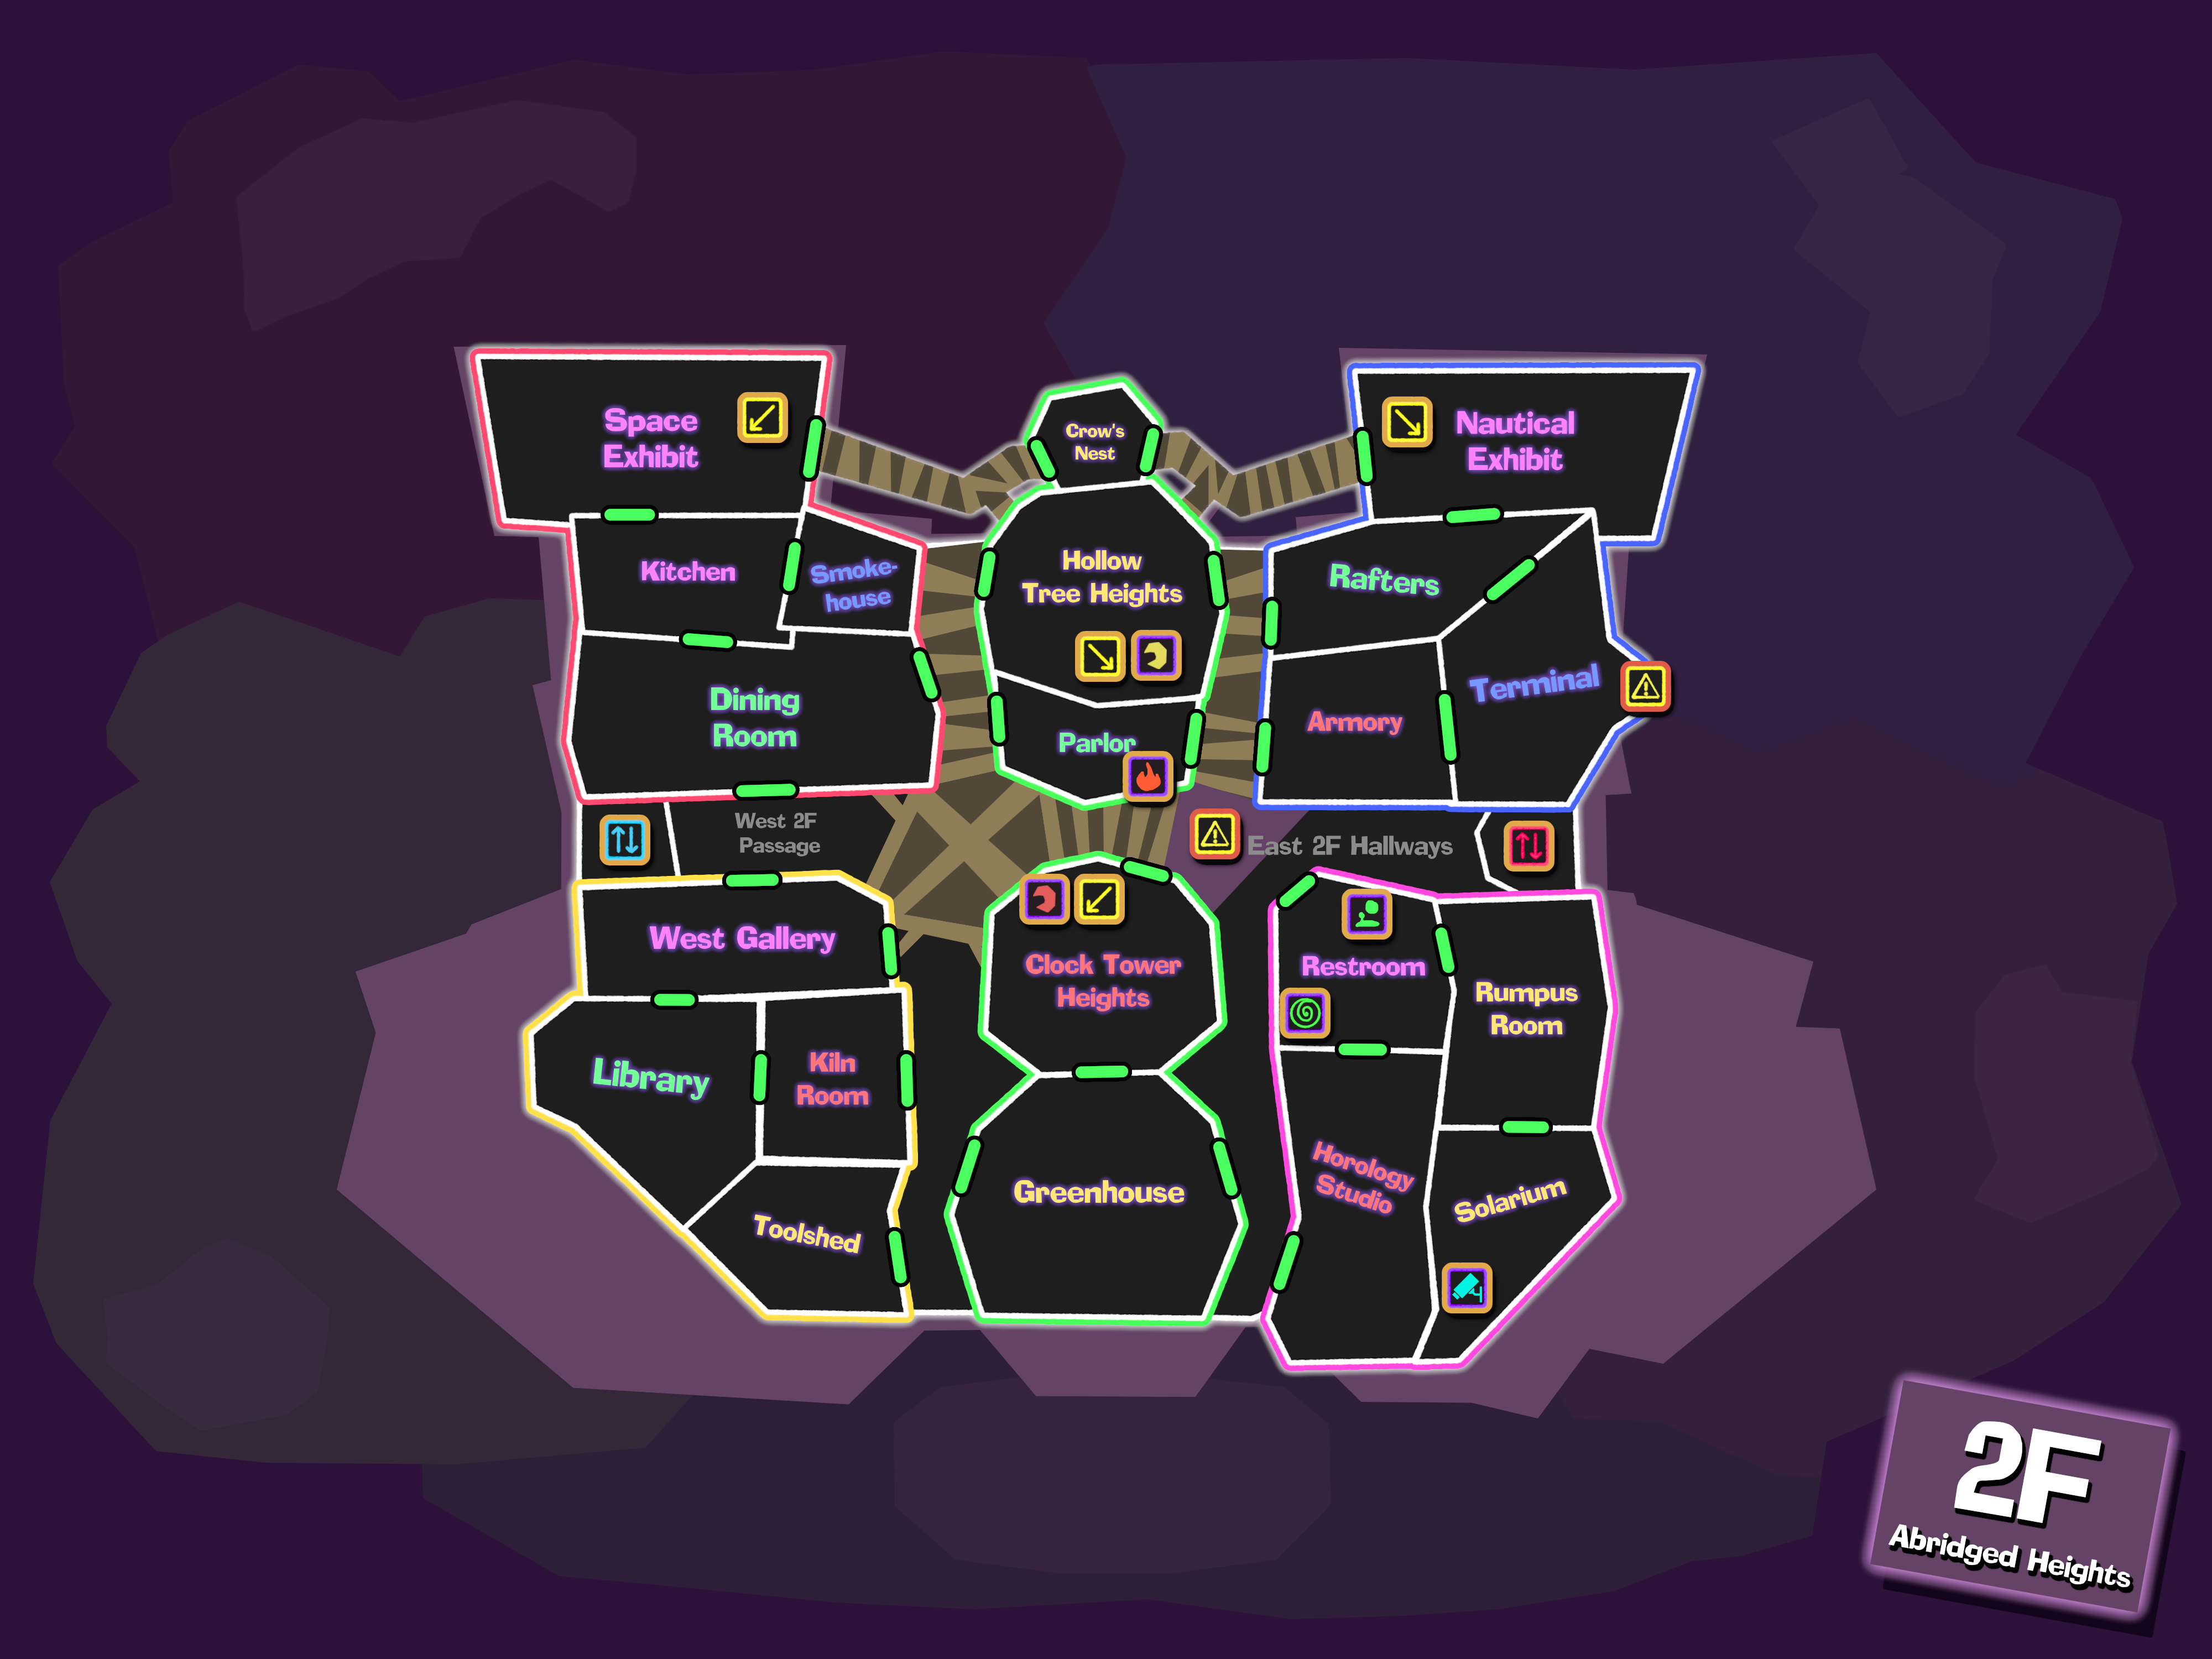
Standing near the crumbled wall of the Restroom, Lulu gestures her gun to tell Atmey to get out of the way. She's positively glowing with excitement at this. Actually, she's literally glowing. It's hard for both of us to keep our eyes away, but yours truly limbers up to give her a beatdown nonetheless. The sound of cracking knuckles fills the empty studio, juxtaposed against the ticking of the clocks, it resembles the noise of an egg timer being wound. Because it's gonna be a quick, and end in something being cracked on the floor, gahahaha!
Atmey meanwhile looks pissed. Something about her glow seemed to overwrite his request. It's almost... antisocial.
A single shot is fired, and I cover the room in darkness, even enough to snuff out Lulu's strange glow. She screams, clearly not serious about fighting me, and flees immediately. Well. Guess I gotta do this thing. Atmey's been a cool guy most of the way through this, and I can hear the groaning of the mummy from the Paranormal stairs near the Solarium, so we quickly move to the tower.
Atmey heads up, and the helicopter grows closer, taking on a golden shine. It's completely noticeable, I'm even surprised how unsubtle it is. Where'd they even get this from?
Well, anyway some people pass through, but Thanos is the only one to actually try and enter the roof to confront the two of them head on. "Nuh-uh buddy, I'm guarding this." I say. He convinces me to let him through since technically he was a killer on Day 1, and yeah man I'm not that committed to doing this anyway.

Luke Atmey and Coral Glasses have both set up camp, swapping armor and waiting around as the helicopter begins its final approach. They immediately jump to arms when Thanos enters with a final offer, which they refuse without even hearing.
The demonic blacksmith mummy suddenly emerges from the Clock Tower behind Thanos, wielding both Lee's katana and the boomerang Atmey requested. Coral loads a round of golden, coin-shaped pellets into her shotgun. Atmey raises a sword.
Alas. It was never going to be peaceful. Good. I wanted a fight. I toss Thanos a gauntlet per his request, and sit back to watch the show.
SHWING! * CLASH * BANG!
Thanos parries Atmey's initial attack with a gauntlet, while Coral tries to get close enough to use her golden coins and pay off their attacker, but Rahliman cuts her off with a thrown boomerang. She cartwheels backwards, as arms sprout from her fashionable ARMISTICE coat. Rahliman charges towards Atmey and it momentarily becomes 2-on-1.... before Thanos tosses a golden headpiece away from Atmey to distract the demonic spirit.
Allured by the actual gold over his painted katana, he drops the weapon and dives for it near the edge of the roof. Atmey tosses his boomerang to knock the headpiece further away, and Coral delivers the coup-de-grace by wheeling over to knock the golden headpiece completely over the roof. Rahliman leaps after it, hanging in mid-air for a few seconds.... before remembering gravity exists. He crashes into the ground, and vanishes into dust.
"I've helped you defeat your adversary, now can you trust me!?" Thanos pleads, half-laughing
"NO" they shout in unison.
The helicopter comes in for a landing, and Atmey gives up fighting to sprint towards it. Coral blasts herself across the rooftop. Thanos remains still, waiting for his moment. The RePossessors leap for the helicopter frame from below, then take a few minutes to pull themselves up, and into the back of the helicopter. The downward force blows Atmey's yellow toupee away, and into the bushes around the western grounds of the Complex. Atmey.... is finally Tigre. The loan shark, and champion of stolen valor. It seems almost natural he'd ally with an auditor in a place like this.
Thanos simply waves, and smiles. He wishes them farewell on their journey... and the helicopter rises. It makes a few dozen meters into the air, when...
Thanos pulls out a podcast microphone and a small speaker, borrowed from MCD's podcast on request. Tigre's eyes widen, and he doesn't hesitate to toss the boomerang right at the threat. Thanos places the speaker on the ground, and takes a deep breath as the streak of gold whizzes through the air.
FALCONS, KILL!
The microphone is knocked out of his hand, but the war call's been made. About six or so ghostly peregrene falcons manifest around the roof, and fly straight for the engine, gaining speeds quickly as they attempt a divebomb for the engine.
BANG!
...with a precisely timed blast, Coral fires her shotgun and scatters golden coins into the air. She thanks them for their service, but they can refer to their tax office for further claims. It seems she's just paid the falcons off with a 2 million dollar blast of falcon pellets. They chase after the shiny coins as they rain down over Thanos, and the roof as a whole.
Thanos sighs, then snaps his fingers, turning the falcons to dust. Their flight is secured. Maybe he should have just killed them when he had th-
 SHING!
Vigil, mounted on his mausoleum, wielding some kind of large sniper rifle, takes a single shot. His coffin is open. A thin, piercing beam of light shoots through the helicopter, and we can faintly make out that it's broken the pilot window. The helicopter begins to dive dramatically as it passes over the Forest Grounds to the west. A body, clearly that of the former pilot, falls from the copter as it drops, but Tigre takes control of the copter himself. A distant yell, but then... it stabilizes.
Coral opens the side door, wearing a headset and providing perfect piloting instructions, riding shotgun in the helicopter. With full shotgun proficiency, she manages to guide the false phoenix to flight, and they take off, gaining altitude, and growing distant.
Coral tosses money down over the Graveyard as a formality, though their attacker only had one bullet to fire, and the attempt failed. Vigil makes a resigned puff of smoke, and then begins dismantling the rifle. The helicopter flies off into the distance.
The RePossessors made a killing, and went who knows where with all the money of the Ghost Complex. I'm so proud.

And that's that! Pretty great account right? They've bled this place dry, and left you all behind. Now, with five dark moon shards, we can really start the Grand Finale of the Grand Experiment!

...
King Blocky Boo goes dead silent. Roots constrict the walls, and Albina grins from ear to ear, but her face falls too. Footsteps approach the Foyer where KBB was about to announce the end of the Killing Game for all.
...hah. This experiment was a total failure. It's time to wrap it up, starting with your demise...

...old friend.
The Grand Finale of the Grand Experiment begins soon.
Lulu Versus SUPREME WRESTLER KING BLOCKY BOO
Standing near the crumbled wall of the Restroom, Lulu gestures her gun to tell Atmey to get out of the way. She's positively glowing with excitement at this. Actually, she's literally glowing. It's hard for both of us to keep our eyes away, but yours truly limbers up to give her a beatdown nonetheless. The sound of cracking knuckles fills the empty studio, juxtaposed against the ticking of the clocks, it resembles the noise of an egg timer being wound. Because it's gonna be a quick, and end in something being cracked on the floor, gahahaha!
Atmey meanwhile looks pissed. Something about her glow seemed to overwrite his request. It's almost... antisocial.
A single shot is fired, and I cover the room in darkness, even enough to snuff out Lulu's strange glow. She screams, clearly not serious about fighting me, and flees immediately. Well. Guess I gotta do this thing. Atmey's been a cool guy most of the way through this, and I can hear the groaning of the mummy from the Paranormal stairs near the Solarium, so we quickly move to the tower.
Atmey heads up, and the helicopter grows closer, taking on a golden shine. It's completely noticeable, I'm even surprised how unsubtle it is. Where'd they even get this from?
Well, anyway some people pass through, but Thanos is the only one to actually try and enter the roof to confront the two of them head on. "Nuh-uh buddy, I'm guarding this." I say. He convinces me to let him through since technically he was a killer on Day 1, and yeah man I'm not that committed to doing this anyway.
The Rooftop Rumble
Luke Atmey and Coral Glasses have both set up camp, swapping armor and waiting around as the helicopter begins its final approach. They immediately jump to arms when Thanos enters with a final offer, which they refuse without even hearing.
The demonic blacksmith mummy suddenly emerges from the Clock Tower behind Thanos, wielding both Lee's katana and the boomerang Atmey requested. Coral loads a round of golden, coin-shaped pellets into her shotgun. Atmey raises a sword.
Alas. It was never going to be peaceful. Good. I wanted a fight. I toss Thanos a gauntlet per his request, and sit back to watch the show.
SHWING! * CLASH * BANG!
Thanos parries Atmey's initial attack with a gauntlet, while Coral tries to get close enough to use her golden coins and pay off their attacker, but Rahliman cuts her off with a thrown boomerang. She cartwheels backwards, as arms sprout from her fashionable ARMISTICE coat. Rahliman charges towards Atmey and it momentarily becomes 2-on-1.... before Thanos tosses a golden headpiece away from Atmey to distract the demonic spirit.
Allured by the actual gold over his painted katana, he drops the weapon and dives for it near the edge of the roof. Atmey tosses his boomerang to knock the headpiece further away, and Coral delivers the coup-de-grace by wheeling over to knock the golden headpiece completely over the roof. Rahliman leaps after it, hanging in mid-air for a few seconds.... before remembering gravity exists. He crashes into the ground, and vanishes into dust.
"I've helped you defeat your adversary, now can you trust me!?" Thanos pleads, half-laughing
"NO" they shout in unison.
The helicopter comes in for a landing, and Atmey gives up fighting to sprint towards it. Coral blasts herself across the rooftop. Thanos remains still, waiting for his moment. The RePossessors leap for the helicopter frame from below, then take a few minutes to pull themselves up, and into the back of the helicopter. The downward force blows Atmey's yellow toupee away, and into the bushes around the western grounds of the Complex. Atmey.... is finally Tigre. The loan shark, and champion of stolen valor. It seems almost natural he'd ally with an auditor in a place like this.
Thanos simply waves, and smiles. He wishes them farewell on their journey... and the helicopter rises. It makes a few dozen meters into the air, when...
Thanos pulls out a podcast microphone and a small speaker, borrowed from MCD's podcast on request. Tigre's eyes widen, and he doesn't hesitate to toss the boomerang right at the threat. Thanos places the speaker on the ground, and takes a deep breath as the streak of gold whizzes through the air.
FALCONS, KILL!
The microphone is knocked out of his hand, but the war call's been made. About six or so ghostly peregrene falcons manifest around the roof, and fly straight for the engine, gaining speeds quickly as they attempt a divebomb for the engine.
BANG!
...with a precisely timed blast, Coral fires her shotgun and scatters golden coins into the air. She thanks them for their service, but they can refer to their tax office for further claims. It seems she's just paid the falcons off with a 2 million dollar blast of falcon pellets. They chase after the shiny coins as they rain down over Thanos, and the roof as a whole.
Thanos sighs, then snaps his fingers, turning the falcons to dust. Their flight is secured. Maybe he should have just killed them when he had th-
Vigil, mounted on his mausoleum, wielding some kind of large sniper rifle, takes a single shot. His coffin is open. A thin, piercing beam of light shoots through the helicopter, and we can faintly make out that it's broken the pilot window. The helicopter begins to dive dramatically as it passes over the Forest Grounds to the west. A body, clearly that of the former pilot, falls from the copter as it drops, but Tigre takes control of the copter himself. A distant yell, but then... it stabilizes.
Coral opens the side door, wearing a headset and providing perfect piloting instructions, riding shotgun in the helicopter. With full shotgun proficiency, she manages to guide the false phoenix to flight, and they take off, gaining altitude, and growing distant.
Coral tosses money down over the Graveyard as a formality, though their attacker only had one bullet to fire, and the attempt failed. Vigil makes a resigned puff of smoke, and then begins dismantling the rifle. The helicopter flies off into the distance.
The RePossessors made a killing, and went who knows where with all the money of the Ghost Complex. I'm so proud.
And that's that! Pretty great account right? They've bled this place dry, and left you all behind. Now, with five dark moon shards, we can really start the Grand Finale of the Grand Experiment!
...
King Blocky Boo goes dead silent. Roots constrict the walls, and Albina grins from ear to ear, but her face falls too. Footsteps approach the Foyer where KBB was about to announce the end of the Killing Game for all.
...hah. This experiment was a total failure. It's time to wrap it up, starting with your demise...
...old friend.
The Grand Finale of the Grand Experiment begins soon.






 - Door is locked, pathway cannot be used.
 - Door is paranormal exclusive, cannot be used on the normal map.
 - Door is unlocked.
 - Elevator, connects all three floors.
 - Staircase or passage to floor above.
 - Staircase of passage to floor below.
 - Room is always lit by Darklight.
 - Hazard, varies by location.
 - Dark Moon Shard (Claimed)
 - Pixelator, allows transport between two specific rooms.
 - Z-Gate - allows living players access to/from the Paranormal Dimension.


 - Elementals - Harmless ghosts imparting elemental energy gather here.