General Discussion

Time Turner said:
Edit: Since I still need to play the DOS version occasionally, I'm running it through a Windows XP virtual machine. For the most part, this works fine, but the surfboarding sections are ridiculously fast for some reason. Otherwise, the rest of the game looks and sounds normal.

Any reason you're not using DOSbox?
 
I misspoke earlier; the version I'm running isn't a DOS game. Trying to run it under DOSBox gives me a message saying, "This program must be run under Microsoft Windows." Trying to run it as-is on Windows 7 gives me an error message saying that it isn't compatible with the current version of windows, thus requiring the virtualization. Not to mention that it also requires the computer to be in 256 color mode. As far as I can tell, there exists both a DOS version of MTM (released in 1993) and a "Deluxe" edition (released in 1996), though there's so little information about it online that I'm not certain this is correct. If it's any help, I can provide a couple of text documents from the game's files, although they don't seem to elaborate on the difference between the two games.

Mario's Time Machine
Manual & Operating Instructions

Introduction
Better check your watch! Bowser's out to turn back the clock.
Not to Daylight Savings. No! To the Dark Ages!

That terrible turtle is using a time machine, called a
Timulator, to loot historical artifacts from the past. His
twisted intent? To fill Bowser's Museum with historic
artifacts, then destroy the time machine. This dastardly plan
will turn time inside out, make the future bend over backwards,
and change the course of history. Forever.

This is no time to let bygones be bygones. Help Mario stop
Bowser before he warps time and puts hiccups in history. If
not, it's back to stone tools and cave dwellings!

This quest is hot. If Mario's too late, it'll be lights out.
Time's up.

To set up Mario's Time Machine on your hard drive:
1. Turn on your PC and your CD-ROM drive.
2. Put the disc in your CD-ROM drive (usually D:).
3. Run windows and open the Program Manager.
4. Open the File menu and choose Run.
5. In the Command Line, type D:\SETUP.EXE, click OK. Note: If
your CD-ROM drive letter is not D:, substitute the drive letter
for D: when you type the command Line shown above. For
example, type E:\SETUP.EXE. and click OK.
6. Follow the onscreen instructions to complete the setup.

To run Mario's Time Machine after setup:
1. Turn on you PC and you CD-ROM drive.
2. Put the disc in your CD-ROM drive.
3. Run Windows and double-click the Mario's Time Machine
Deluxe application icon.

Note: You can also double-click the Library icon to go there
and study historical facts. See Bowser's Library icon to go
there and study historical facts. See Bowser's Library
Browser.

4. Type your name (up to eight characters) in the login screen,
so Mario will know who he's talking to.

Note: If there are saved games, a Saved Game menu appears.
Select a game and choose Load, or choose New to start a new
game.

5. Mario arrives at the Timulator room in Bowser's museum. To
enter a room full of artifacts, point at the left or right side
of the screen until your cursor turns into a door, then click.

Control Panel
Point and click the Control Panel buttons at the bottom of the
screen to use the game features.

Library - Meet Bower's mom in the Library! See Browsing
Bowser's Library. (You can only use this after at least one
time period had been changed.)

Options- Change game options, such as music volume, save or
load games, and set the level of difficulty for the current
game. See Setting Game Options.

Toolbox - Get important information for programming the
Timulator and use the remote control button to travel back to
the present. See Making a Date with Time.

Help - Get a hint on what to do next.

After Mario retrieves a stolen artifact from a Koopa and
travels back in time, the Control Panel expands.


There are two new command buttons on the expanded Control
Panel:

History Book - Open the History Book and fill in the blanks.
You must do this before Mario can return an artifact to its
rightful time and place. See Setting History Right.

M.O.E. - Use Mario's Optical Electro-Recorder (M.O.E.) to
review the discussions you had with the people in an historical
time period. See M.O.E. Notes.

To close an open game feature, simply click the Control Panel
button again. Sometimes the button looks slightly different.
For example, when you are using the History Pages, the button
changes to an open book. Click the Open History Book to
continue game play.


Bowser's Library Browser
There are two ways to get into the Library:

From within the game, click the Library button on the Control
Panel (but only after at least one time period had been
changed).

Double click the Library application icon from Windows.

In the dialog box, select you name or click Visitor ( choose
Cancel to exit without browsing).

In the library, you get to meet Bowser's mother. She's the
librarian.

In the library, you can research an historical period by
clicking on the artifact for that time and place. You can also
press Tab or Shift-Tab then Enter to choose an artifact.

For example, click the staff to go to Cleopatra's time. A
multimedia event about that time appears.

Click the parts button in the lower right corner of the screen
to explore information about that time as follows:

Left Arrow - got to previous page.
L - Go back to Library.
P - Print Page.
Right Arrow - Go to next page.
Red Megaphone - Pause (this grays out); click again to
continue.

You can also press S to turn sound on and off.

To leave the Library and return to the game, click the Library
button again.

If you are returning to Windows, open the Control Menu (little
square in the upper left corner) and choose close, or press Alt
F4.


Setting Game Options
To open the options screen, click the Options command button.

Game Controls
Use the Options as follows:

Save - A dialog appears where you can enter a man for the
fame you want to save. You can save a maximum of ten games.

Load - Load a saved game.

New - Start a new game.

Difficulty - This sets the play level in the Time Surfing and
Dinoland to Easy, Medium, or Hard. If you reset this in a time
period, it resets the location to the beginning and the History
Pages go blank again.

Music - Turn music on and off. If your sound card has the
capability, you can adjust the music volume.

Sound Effects - Turn sound effects on and off. If your sound
card has the capability, you can adjust the volume.

Play - Continue playing the current game.

Credits - Meet the cool people who created Mario's Time
Machine!

Quit - Exit the game and return to Windows.


Browsing Bowser's Museum
Inside his castle, Bowser hoards historical souvenirs in his
personal museum. As that terrible tortoise returns from his
time travels, the stashes loot, slowly destroying time and
space. Once the museum is complete, Bowser plans to destroy
his time machine and alter the course of known history. This
could mean lights out!

Game Controls
Mario enters the museum in the Timulator room.

To go to a room full of stolen artifacts, point to the left or
right door. The cursor changes to a little open door, click to
enter that room.

Mario walks into a room where a Koopa lurks.

Each level involves five stolen time pieces. Some artifacts
are displayed on stands and the Koopa is holding one of them.
Mario can snatch one artifact during each visit. After five
items are returned in time, another secret door opens in the
Timulator room altogether there are five rooms.

Help Mario snatch artifacts from under Bowser's nose by jumping
Koopas. To jump a Koopa, right click.


The Plumbers Toolbox
Once Mario snags something, use the Toolbox command button to
find out where and when it belongs.

Game Controls

Click the Toolbox command button to get a bird's eye view of
the plumber's tools.

The artifact appears in the top left box. The time and place
that artifact belongs are also shown, which are critical clues
for programming the Timulator.

To whisk Mario directly to the Timulator room, use the
Timulator Remote Control (click the orange button). Or, Mario
can walk to the Timulator room.

Click the open Toolbox command button to close the Plumber's
tools.

Note: During his visits to the past, people often want to
trade information for things that Mario finds. Those items
appear in the four right-hand boxes in Inventory. To select
something, click it.

Hint: Be sure to have the artifact selected when the time
comes. Isaac Newton is not interested in an orange.


Making A Date With Time
Bowser may be bad but he's good enough to build a time machine,
which he calls the Timulator. This awesome contraption can be
programmed to return to any time or place that Bowser burgled.
The trick is to help Mario snag an artifact.

Hint: Open the toolbox to figure out where and when the object
fits in history.

Game Controls
Once you know where and when Mario needs to go, help him
program the Timulator:

Location - to select the city name where Mario needs to go,
click the onscreen arrows t scroll through an alphabetical
list.

Year - These four buttons set the year that Mario needs. Click
a number button, then click the onscreen arrows to set each
number from 0 to 9.

BC/AD - Know whether Mario wants 1000 BC or 1000 AD. It makes
a BIG difference. Click BC or AD to set this.

Go Button - Whoa! Use this button last. Click Go and Mario
starts Time Surfing.

Note: Program the wrong city or time here on the Timulator, and
Mario Time Surfs into prehistory. Help him jump over Bullets
and collect Pterodactyl eggs to return to the present!

To help Mario leave a city and automatically return to the
present, open the Toolbox and choose the orange button
(Timulator Remote Control).


Time Surfing
Time Surfing is cool. Click the Go button on the Timulator to
start Mario on this part of his time travels.

Help Mario avoid sharks and floating mines and collect
mushrooms. Mushrooms are necessary to reach the correct time
period. Each time a mine hits Mario you lose one mushroom.
Each shark hit loses all the mushrooms. Some mines can track
Mario. Sharks can deflect mines and mushrooms. As soon as
Mario collects enough mushrooms, he dives into a time tunnel.
And, wow, there he is - somewhere else in history!

Note: The number of mushrooms required depends on whether
Options are set to Easy, medium, or Hard. See Setting Game
Options.

Game Controls
Time Surfing requires a fine sense of balance and timing.
Click the left or right mouse button to turn Mario left or
right; release the mouse to stop Mario.


Time Before Time
Yikes! Did Mario end up in prehistory? Well, help him out of
here. Back at the museum, check the Toolbox then reprogram the
Timulator for the correct date and place.

But before he can try again - hurry and help Mario jump over
Bullets and catch Pterodactyl eggs. Mario must collect eggs
until the Bullets stop and the Pterodactyl stops dropping them.
If a Bullet hits him, Mario drops an egg. As soon as Mario
returns the egg's to the bird's nest, Yoshi finds him and takes
him back to Bowser's Museum.

Game Controls
Mario must jump Bullets, catch eggs and return them. Click to
help Mario run left. Right click and he runs right. Mario
jumps automatically if he is moving in the opposite direction
of a bullet.

Note: The number of falling eggs depends on whether Options
are set to Easy, Medium, or Hard. See Setting Game Options


Timely Traveling Tips
There's really on one way to get all the History Pages done and
return an artifact - Mario's got to talk to everyone in each
time period. help him walk around and look for doors, or
tents, or wherever a speech balloon appears. Mario can go in
there and talk to people.

Game Controls
Mario needs to hear what people have to say in every time and
complete his History Pages and return the artifact to solve a
location.

To talk to people, click a door then click a question. When
Mario is done asking questions, click on the street scene so he
goes somewhere else.

Note: After Mario talks to everyone, review the tape recorded
Notes. And, don't forget to finish the History Pages. Mario
can only return an artifact after getting history straight.
See M.O.E. Notes and Setting History Right.

Sometimes people give Mario very complicated answer to
questions. Many difficult or strange words in answers appear
in the Glossary in this manual.

Some people need stuff that Mario finds. Open the Toolbox and
click the Inventory button that matches the picture of the
item. Mario can get back to Bowser's Museum anytime using the
orange button in the Toolbox (Timulator Remote Control). But
he needs to return the artifact tot he proper person to
complete a time period. See The Plumber's Toolbox.


M.O.E. Notes
Wow! How's a Plumber to remember? Luckily, Mario has a
Notebook where he tape records every conversation for future
reference.

Game Controls
You can open the Notes and study them with Mario in any time
period, but not when he's Time Surfing, in the museum, or in
Dinoland.

Click the record icon to view the tape recorded Notes.

To review a conversation, click the picture of the person; then
click the VCR control buttons to step through the conversation
with that person.

To exit the Notes, click the command button again.


Setting History Right
For starters, open Mario's History Page each time he snatches
an artifact in Bowser's museum. Read over the page, and try to
figure out what kind of information Mario needs to discover on
his time travels.

As Mario travels around in time, he chats with people and
discovers cool stuff about history. Use what you learn with
Mario to fill in the blanks on each History Page.

Note: The History Pages must be completely correct, before
Mario can return an artifact!

Game Controls
You can open History Pages and study them with Mario in any
time period, but not when he's Time Surfing, in the museum, or
in Dinoland

Click the History Book command button to view the History
Pages.

To turn the page forward and back, click the square in the
upper left or right corner.

Point to select a blank field. To open a list of answers,
click the blank. To close the answer list, click the pencil
which is in the center.

There are two ways to find an answer: click the curled corner
of the page to turn it or type the first letter of the word.
To fill in the blank, click the answer.

If you forget what the question was, just click the pencil in
the spiral rings to return to the History Page.

Click highlighted words in History Pages to read to Dictionary
definition for that word. Click the Dictionary to make it
disappear. To close open History Pages, click the Open History
Book command button.

WELCOME TO THE SOFTWARE TOOLWORKS

Dear Valued Customer,

Thank you for purchasing a product from The Software Toolworks, Inc.

To make sure you are completely satisfied with your purchase, this file
explains how you can get Customer Service and Technical Support.

****************

CUSTOMER SERVICE_____CUSTOMER SERVICE_____CUSTOMER SERVICE_____CUSTOMER SERVICE

If you want to purchase a product upgrade, a different platform, a new
version, or a replacement part (such as manuals or other documentation),
please contact the Customer Service Department. You are welcome to use
the method easiest for you, including mail, telephone 800 number, or FAX:

The Software Toolworks
60 Leveroni Ct.
Novato, CA 94949
ATTN: Customer Service

Telephone: 1 (800) 234-3088 At the recording, press 2
Monday-Friday, 8:00 AM to 5:00 PM Pacific Time

FAX: (415) 883-0367
ATTN: Customer Service

****************

TECHNICAL SUPPORT_____TECHNICAL SUPPORT_____TECHNICAL SUPPORT_____TECHNICAL SUPPORT

If you have technical difficulty installing our software, are missing
an item in a new software package, need a replacement disk, or have a
question about operating the software, please contact the Technical Support
Department. You are welcome to use the method easiest for you, including
mail, telephone, FAX, BBS, America Online, or send us electronic mail
through the Internet.

The Software Toolworks
60 Leveroni Ct.
Novato, CA 94949
ATTN: Technical Support

Telephone: (415) 883-5157
Monday-Friday, 8:30 AM to 5:00 PM Pacific Time

FAX: (415) 883-0367
ATTN: Technical Support

BBS: (415) 883-7145 8 data, 1 stop, No parity

America Online keyword: TOOLWORKS

CompuServe: GO TOOLWORKS

Internet address: SFTWXTEK@AOL.COM

When contacting the Technical Support Department for technical assistance,
you will receive faster service if you provide certain information. The
following sections explain what Hardware, DOS, Windows, and/or CD-ROM based
information you should organize in advance of your telephone call. Thanks.

****************

HARDWARE_____HARDWARE_____HARDWARE_____HARDWARE_____HARDWARE_____HARDWARE

Please try to get as much hardware information ready as you can before you
call.

* YOUR PC:
-Have it running near your telephone with the problem software loaded.
-Determine the make, model number, and processor speed, such as
IBM PS/1, 486/66 MHz.
-Find the brand and version of the DISK OPERATING SYSTEM that runs your
computer, such as MS-DOS, PC-DOS, or DR-DOS. To find this, at the DOS prompt
type VER and press ENTER.

* MONITOR
Is it Color or Monochrome?

* PRINTER:
The brand name and model helps.

* CD-ROM DRIVE:
Please get the brand name, driver name and version number, and
transfer rate, such as 150 KB/sec.

* MOUSE:
If you are using a mouse, what is the brand and version of your
mouse driver software?

* OTHER PERIPHERALS:
List anything else directly related to your problem, such as a
modem or joystick.

* VIDEO CARD:
-What is the make and model of your video card?
-If you have WINDOWS, go to the DOS prompt, type MSD and press ENTER.
Type V (for Video). A readout on your video graphics card appears.
-If you do NOT have Windows, look at the box your video card came in
or check with the company that sold you the system.

FOR FURTHER INFORMATION call the manufacturer of your video card:

VIDEO CARD TELEPHONE TECHNICAL SUPPORT

Ahead Systems (510) 623-0900 (510) 623-0900
ATI Technologies (905) 882-2600 (905) 882-2626
Boca Research (407) 997-6227 (407) 241-8088
Diamond (408) 736-2000 (408) 736-2000
Headlands* 49-8151-266-0 49-8151-266-240
Hercules (510) 623-6030 (510) 623-6030
d National Design (512) 794-8533 (800) 688-7466
Orchid Technology (510) 683-0300 (510) 683-0323
Trident Microsystems (415) 691-9211 (415) 691-9211
Tseng Labs (215) 968-0502 (215) 968-0502
Video7* 49-8151-266-0 49-8151-266-240
Western Digital (800) 832-4778 (800) 832-4778

*Purchased by Spea Software; calls go to Starnberg, Germany.

* SOUND CARD:
-Because the audio from a CD usually comes through the sound card,
not from the CD-ROM drive, make sure your external speakers or
earphones are connected to the output jack of your sound card.
-Make sure your sound card has the proper sound driver software
assigned to it under Windows. Refer to the documentation that came
with your sound card.
-Try to get the sound card brand name and its DMA, IRQ, and
BASE ADDRESS settings. Usually, a sound card driver includes a
test program that tells you this.

FOR FURTHER INFORMATION call the manufacturer of your sound card:

SOUND CARD TELEPHONE TECHNICAL SUPPORT

Creative Labs (408) 428-6600 (405) 742-6622
Media Vision (510) 770-8600 (800) 638-2807
Roland (213) 685-5141 (213) 685-5141
Turtle Beach (717) 767-0200 (717) 767-0200

****************

DOS_____DOS_____DOS_____DOS_____DOS_____DOS_____DOS_____DOS_____DOS_____DOS

* MEM COMMAND:
Type MEM and press ENTER. This commands shows what kinds of memory you
have, total of each kind of memory, amount used, and amount free.

* CHKDSK COMMAND:
Type CHKDSK and press ENTER. This command shows total disk space,
bytes used, and bytes available.

* EDIT COMMAND:
To use the DOS Editor, make sure you are in your Root Directory (C:\).
-Type EDIT AUTOEXEC.BAT and press ENTER. You can read your
AUTOEXEC.BAT file or print it out for reference.
-Type EDIT CONFIG.SYS and press ENTER. You can read your
CONFIG.SYS file or print it out for reference.

* SNAP.EXE:
Most of The Software Toolworks CD-ROM products ship with the SNAP.EXE
utility. You will find SNAP.EXE in the same subdirectory as this text
file on your hard disk. Type SNAP and press ENTER. The information
below will appear. (press a key to Page Down as needed):

-System Information
-Software Information
-Drive Information
-AUTOEXEC.BAT file
-CONFIG.SYS file
-Memory Map
-Device Drivers

****************

WINDOWS 3.1_____WINDOWS 3.1_____WINDOWS 3.1_____WINDOWS 3.1_____WINDOWS 3.1_____

* MICROSOFT DIAGNOSTICS:
At the DOS prompt, type MSD and press ENTER. Press a hot key to see
system specifics, such as P for Computer, or use the menu bar.
For example, open the File Menu and choose WIN. INI or SYSTEM. INI.
These files along with your AUTOEXEC.BAT and CONFIG.SYS files
are very helpful. You may want to print out this information.

* ABOUT PROGRAM MANAGER:
Run Windows, open the Program Manager "Help" menu, and choose
About Program Manager. This information appears:
-Windows Version Number
-Whether you are running in STANDARD or 386 ENHANCED mode
-Amount of available Windows memory
-Percentage of currently available Windows System Resources

* WINDOWS BACKGROUND TASKS:
Run Windows, then press CTRL and ESC to open the TASK LIST.
This shows which Background Tasks you are running, if any.
You may want to shut down everything except Program Manager.
To shut down a task, click it then click the END TASK button.

v1.0.1
db

edit: do not call the customer service number, as it has apparently been taken over by a scamming organization
 
Definitely not trying to open up a discussion of gender on the wiki as per birdo or vivian, I just honestly want to know if there's a reason the crystal minibosses from Wario World are given female pronouns

https://www.mariowiki.com/index.php?title=Gem-Bodied_Creature

edit: I'm guessing it was called a she in the players guide?
 
The article cites page 38 of the player's guide for the female pronouns. For the record, the Prima guide uses "it" at multiple points, although the player's guide takes precedence over it.
 
Searchlight Sneak is the one that uses the correct template. We usually use that distinguish template against identically named articles, not similarly named ones.
 
That's decent news! Thanks for keeping us in the know.
 
well about time too
 
https://www.mariowiki.com/Talk:Yume_K%C5%8Dj%C5%8D_%2787
 
You will get no argument from me.
 
The galaxies table on the Super Mario Galaxy (Super Mario Galaxy#Galaxies) page looked terrible and disorganized to me. So I completely rearranged it (User:Alex95/Sandbox).

I aligned the table into columns of eight rather than four and I separated the domes by color (tried to correspond to the interior of the dome) to make it easier to read and find where domes end and begin. What do you think, should I go ahead and replace the current one with this or is there something more I could do?
 
Needs images :D
 
Reset the table and readded the colors (User:Alex95/Sandbox) (no pictures though, couldn't get them to look right). Colors are an easy way to see where the table splits between domes, but I'm not sure how accepted it'll be by other users.

So, I guess, rainbow colors or one color for all of them?
 
Hey I know how to add pics to tables to make them look fine (I've worked with Mario Party Star Rush and Mario Sports Superstars, you can draw inspiration from them ;)). It's just the galaxies themselves that need images, not the levels. I already have something to format in my head.
 
Oh, I see what you mean (I think). Something like the Boards table (Mario Party: Star Rush#Boards), right? Hm, I can probably come up with something. I'll have to completely restructure the galaxies table, but it could work. Though I'd like to see what you have in mind, as well. :)
 
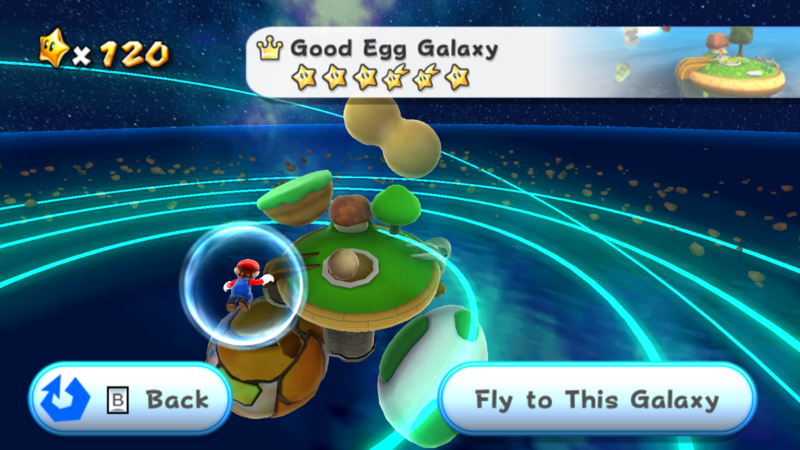
I could suggest simply adding a screenshot directly under the Galaxy name. I'd add another cell though, and make the picture of the galaxy maybe 100px or whatever fits the table without widening the width.
 
Yeah, except, also add screenshots like these

800px-Good_Egg_Galaxy.png


Not sure what you can do for the smaller galaxies like the Boo Boneyard one.
 
Oh, I wasn't planning on adding pics of the galaxies. I was just trying to separate the domes, make it clearer where the split between them was. Adding too many pictures would just make it look cluttered (unless I'm not envisioning this right).
 
Sometimes, yes, adding too many pictures will make it cluttered. However, do it right, and your readers can easily tell the different galaxies by looking at what they generally look like rather than possibly guessing and trying to find the galaxy they want through blue links.
 
Back