- Pronouns
- She/her He/him
This thread is written for people that want to know how to fix up your models before you render them and upload their images to MarioWiki. This thread covers data-ripped models only (ie, models in bind-pose, usually T-pose for bipeds).
Commonly Used Programs
IMPORTANT: You require the dump of the game's ISO in order to dump models to begin with. Other programs such as 3D Ripper DX require emulation in order to obtain these models, and often points, these rippers will rip the models in a non-bind pose.
This isn't a comprehensive list: this mostly lists programs I'm familiar with and had used.
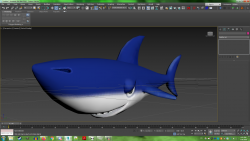
Many times, editors on MarioWiki will simply use the thumbnail from Models Resource as their image submission, but frankly, I find that sub-optimal, and sometimes, character angles are not illustrative of a character due to bad silhouettes. I will be using Sushi's model from Mario Party 9 has a example.
Whenever you download a model from the Model's Resource, you will be downloading a ZIP file. These are easily openable with an extractor tool. Windows 10 comes with its own extractor, but should you lack it, there are plenty of open-source, readily available extractor tools out there, such as IZarc and 7-zip.

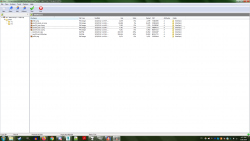
Open the ZIP with your archive extractor of choice, and you will be greeted with a plethora of files.

Depending on what you downloaded, you will have a bunch of files. All of these are necessary, but here's a brief run-down on the common file formats you will be greeted with should you venture in downloading from the Model's Resource:
Extract the files to a location where you can find them easily.
As said earlier, this tutorial will cover 3DS Max but much of these instructions do apply to most other programs, including Blender. They may have different steps on how to achieve the same results, however.
This guide also assumes you have some basic knowledge on how to navigate 3DS Max's UI, such as using the view cube to change your view, how to expand your main viewport, how to zoom in and out, and how to pan your view. If you need assistance, contact me and I'll help you out.
In your 3D modeling programs, in order to open models you downloaded off Models Resource or extracted, you have to Import them in, rather than open them.

This will open up a window, in which you need to navigate to your extracted model file in order to find it. Here, I'll import the .dae of the Sushi model I've imported from the Model's Resource

The default settings is what I usually stick with, though you should certainly enable Animation and Skins, as that will make your model poseable, if you want. However, I typically make the Units have a Scale of 1.0, if you scroll further down the dialog box, underneath "Advanced Options", as this will typically make your model a more manageable size for render purposes.

Anyway, at this point is where this thread is primarily focused in. A lot of the times, the import process is not perfect, and you will come across a variety of quirks and render weirdness that may compromise the quality of your render. Here's a rundown of the common problems you may face in the importing process before you decide to go render them and upload to MarioWiki.
Applying Textures To Your Model
In 3DS Max, this is as simple as clicking and dragging your texture into it.

(yes, the model I have does have UV quirks that I will address)
Another way to apply them is to press M.

This will make a Material Editor window pop up.
Click on the eyedropper tool, and then click on a model in the program, this will immediately pop up your model's material.


If you scroll down once you picked your material and expand "Maps", this is where you can apply all sorts of special maps you may encounter. More modern models (from the Wii U era onward) come frequently with specular and bump-maps, and the Material Editor here can help you apply them to really make your model pop as intended! Specular maps control model shininess, used for metallic surfaces, and they're typically grayscale, while normal or bumpmaps are light blue, and they control normal lighting....they are typically used to introduce bumps, cracks, holes, and topology without altering the polycount of the model, giving the illusion of depth. This is pretty advanced for the scope of this tutorial, but I had applied the proper maps for this render and they pop out.
Normals
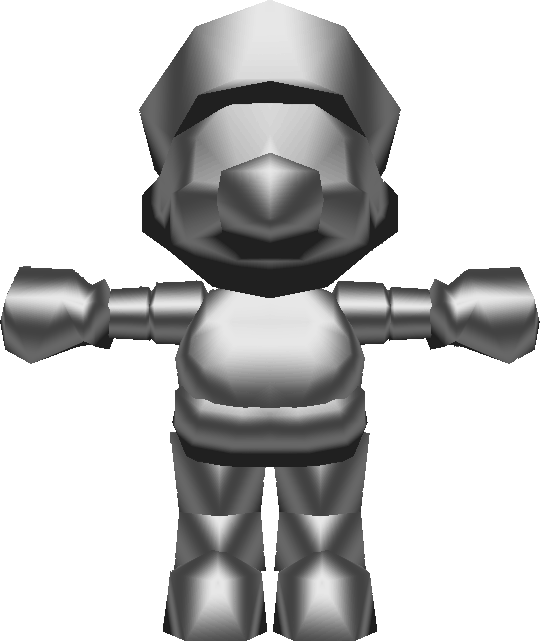
By far the biggest issue I see with your average models on MarioWiki. These lend the model a highly faceted look, and it makes edges very sharp. A lot of the times, it's caused by split separate UV shells or if the model is split into separate parts for use (commonly around the eyes, usually used for texture animation). There are several fixes for this problem.
Vertex Welding
Welding vertices together can help smooth the way your model looks, if your model is separated by a bunch of different parts (a term used for model "parts" is "Element", in most 3D modeling programs, you can select by element). In 3DS Max, this is applied by applying a modifier on the right stack, while you are under the rainbow-like "Modify" tab.


The Threshold on the right side should be a very small value, such as 0.01 or 0.001. This will weld any overlapping vertices together, potentially fixing your model display.
Smoothing
Sometimes, a simple modifier can solve your models smoothing issues. This is applied by the Smooth modifier.

Selecting "1" on the smoothing group most likely does the job.
Edit Normals
If neither of the above solutions work, Edit Normals is your last resort modifier that will fix your hard edges.

Activating "Edit Normals" will create pincushion-like lines on your model. You have several options on the right tab. Whenever you have that modifier active, you can CTRL + A to select all. This will cause all of the "pins" to turn red to indicate they have been selected.
Unify: This usually helps weld normals together, especially if they had been recently been edited or split.
Average: If Unify doesn't work, the window below "Unify" can help.

For the settings I use under "Average", I typically average with a very small value (0.001) and make sure "Use Threshold" is checked. Click on "Selected" and this will weld your verts together. Beware that this may cause normals issues elsewhere on the model, but generally, this will do its best to hide any obvious seams from the model.
UVs
Sometimes, character models don't render properly because of flipped UVs or other UV issues. This part of will cover that.
The Sushi model I've downloaded comes with a fixed UV version, but let's assume the provider has not given a fixed model for the Sushi. In order to edit UVs with 3DS Max, you have to add "Unwrap UVs" in your stack.


If you click on the tab that has "Open UV editor" below, this will open up a window that will display the UVs.

If you want textures to show up while you are UV editing, the drop-down on the upper right hand corner of the Edit UVWs window can display your textures.


However, one thing I'd like to note is that every model can have its own set of UV issues. For this particular model, it's because the UVs are mirrored vertically. How to fix this is to CTRL + A in the window (select all), which will select your shells, and then click on "Mirror Vertically" in the Tools tab.


However, in some cases, especially New Super Mario Bros. Wii and Mario Kart Wii models, your model will look like this with applied textures.


This is caused by a mirrored UVs tileset. A manual method involves manually mirroring the textures and then editing the UVs to accommodate for this, which can be time-consuming, especially if this is your first time engaging in UV editing from Unwrap UVs modifier (another method involves creating an edge and then mirroing only that portion of the UVs, also time-consuming). Fortunately, 3DS Max has an easy fix for such models for rendering purposes.
In order to fix this, hit "M" again, which will bring up your Material Editor Window.

Click on the dropper tool next to the "Material Name" drop down, and click on the model that needs to be repaired in the scene. Once you've done that, expand the "Maps" drop down below, and select on your texture that needs fixing (in this case, bbluigi_eye.0.png)


Click on that will reveal another window.

Under "Coordinates", next to the "Offset" and "Tiling" boxes, there is a checkbox labeled "Mirror". Check the topmost one and that will solve Baby Luigi's issue.

Rendering
Before you go out and render your image for MarioWiki, there are several things to consider.
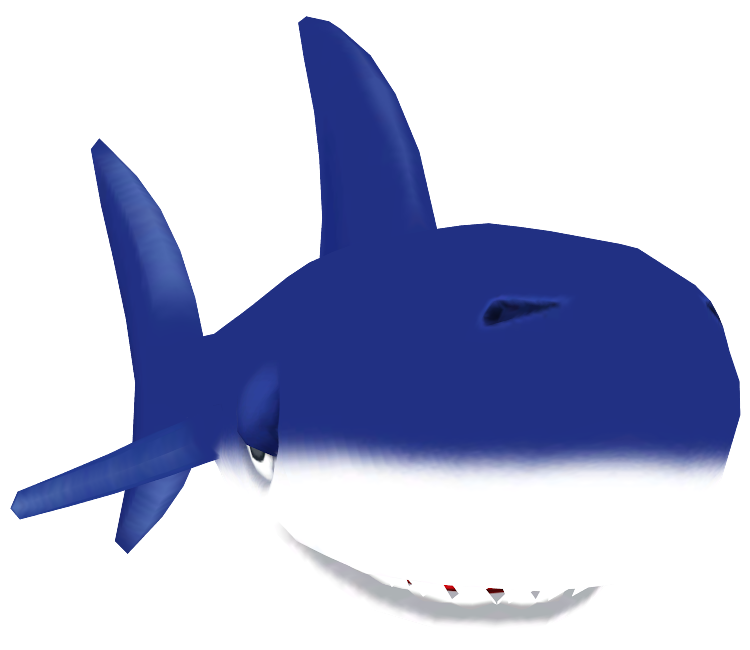
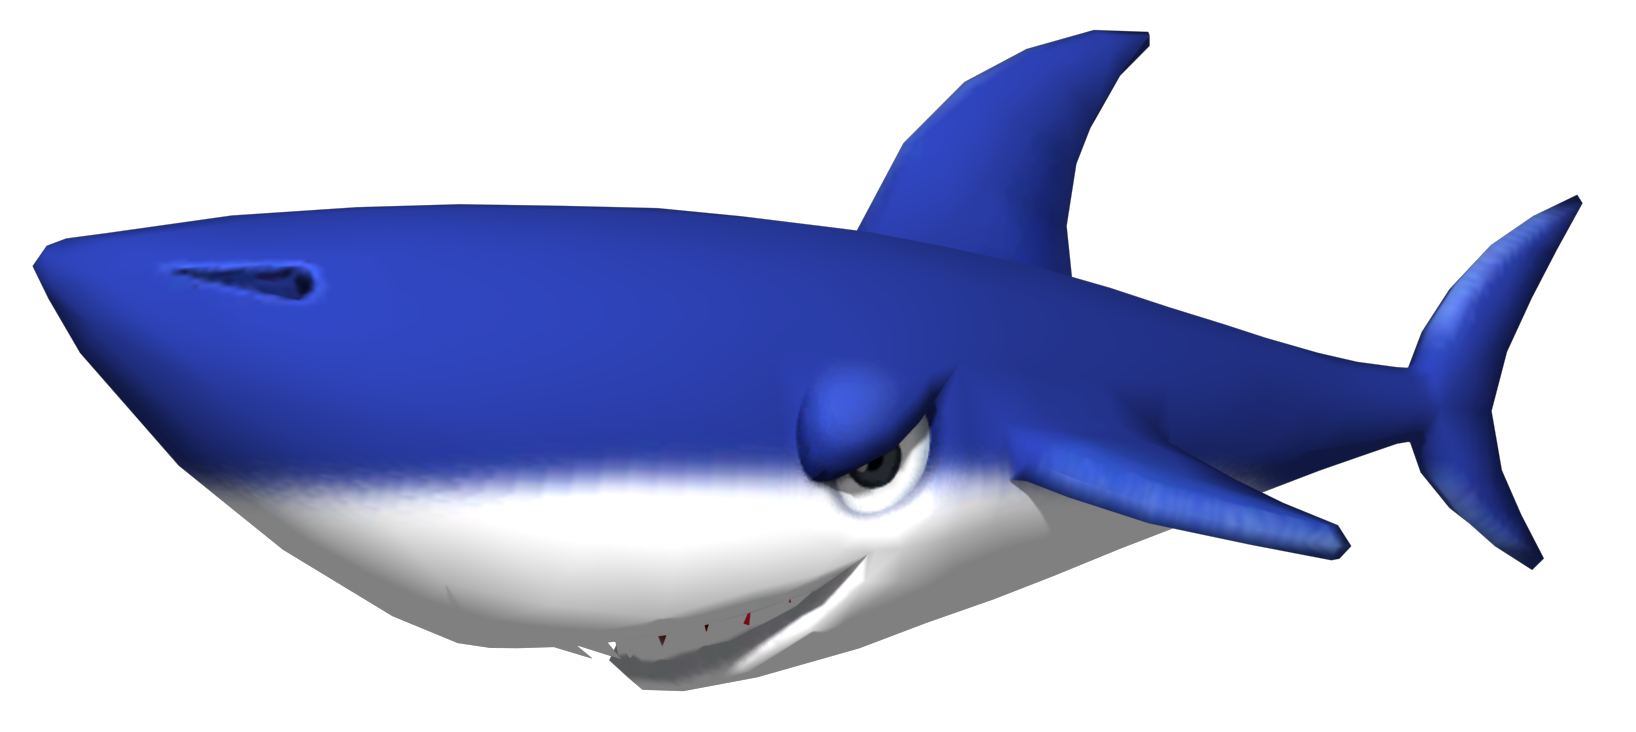
Character silhouette is hugely important. Which one of the Sushi models conveys the best information?


The lattermost one is the most desirable angle, as it showcases the most major parts of the character, such as the fin, tail, and shape of the dorsal fin. A large amount of characters can get around with a frontal view, though in some characters, like Sushi's case, require another view to convey more information about the character.
Additionally, you should render your characters with an orthographic perspective rather than the default perspective you get. This reduces the amount of distortion and foreshortening whenever you close up on the model for maximum render efficiency. To change the view, click on the "Perspective" part in the upper left corner of the viewport and select "Orthographic".


If you don't like the sihlouette, you can always adjust the camera on the upper-right hand corner to suit the information being conveyed.
Under the render "Window", this will generate an image for your character, with transparency and all.


There are a lot of parameters you can adjust while you are in this process. The tab "Render Setup" is the tool I tinker around with to get the best render results for use in MarioWiki.

You can also access the "Render Setup" tool through the tab or F10

I'm not going to go into too much detail here as it gets pretty advanced, but this is the part where you can play around with all sorts of different types of rendering you can do.
Another point of interest is the "Environment" tab.


This is where you can control some of the dark, murky look of your render, especially if you adjust the ambient lighting. You can play around with these settings to try to find a result you like. For example, if I turn the black "Ambient" up, the model will look brighter and have less dark shadows. The "Tint" segment controls how bright your model is.

Anyway, once you found a render you like, there is an icon with "save" next to it, in which you can then save your render for wiki uploading.


On the dropdown below, make sure you select "PNG". Additionally, I also recommend using an image editing program to crop out unnecessary transparent areas, such as GIMP's autocrop/crop to content tool to make the most out of your image.
Anyway, I hope this guide will help any sort of inquiries people may have when it comes to uploading models to MarioWiki. I know that it's a lot more complex than uploading sprites (animation is another beast entirely that I had uploaded myself, and it does follow similar principles to what I outlined above, though there are different steps on how to generate an animated gif for your 3D animation. 3D animation is hard to get by as it requires your model to have animation files. Games like Dr. Mario World come in FBX and have embedded animations, but those are a rarity and they can also be difficult to manipulate as they may come with vertex animation) and that the programs I've listed can be very difficult to get into with navigation and UI at first, but I will be happy to assist anyone who is interested in contributing uploading 3D renders of models to the wiki.
If there any concerns with any currently uploaded 3D images on the wiki, this is a good thread to ask about them (not cropped from screenshots, but from users rendering the models). If there is any fixes that editors ran across that I may have missed, I will look into it and update the thread for fixes.
Commonly Used Programs
- 3DS Max: This is my program of choice and the one showcased in this tutorial. However, a lot of the terminology I will use in this thread will apply to the other programs, other programs use similar names to the problems you may find whenever you decide to import a model into the program.
- Maya: Industry standard. I also know how to use this to clean up models, but not in the same extent as I know 3DS Max.
- Blender: Open source 3D program that is the most accessible (the above two cost money but you can get student licenses to get them for free), but unfortunately is the 3D modeling program I have the least experience in. Still, a simple google search on how I outline the steps above can lead you to your results.
- Models Resource: This is the biggest and best place to import your 3D model that you want to render for MarioWiki.
- Deviantart: Some artists provide files for their ripped models, but it's not as reliable as the Models Resource.
- Discord servers pertaining to specific games such as Dr. Mario World, Mario Kart Tour, Mario Kart 8 Deluxe, etc can help you mod games on top of getting information you need in order to start dumping.
IMPORTANT: You require the dump of the game's ISO in order to dump models to begin with. Other programs such as 3D Ripper DX require emulation in order to obtain these models, and often points, these rippers will rip the models in a non-bind pose.
This isn't a comprehensive list: this mostly lists programs I'm familiar with and had used.
- Brawl Box: The best all-around tools, used for ripping models from Wii games. Most Mario games in the Wii have common files openable with Brawl Box, with a few exceptions.
- Switch Toolbox: Still a relatively new tool that can rip models from a variety of Switch games and even includes titles from the Wii U library such as Mario Kart 8 Deluxe. This can open most Mario Switch games at the moment, including Super Mario Odyssey, Mario Kart 8 Deluxe, New Super Mario Bros. U Deluxe, Super Smash Bros. Ultimate, and potentially more.
- GoldenEye Setup Editor: N64 tool that can rip models from Diddy Kong Racing.
- 3D Ripper DX / Ninja Ripper: Screencap programs that can capture models displayed on a screen, similar to a print-screen editor. Beware that using this can distort your models and they will not be in bind pose when you rip them.
Many times, editors on MarioWiki will simply use the thumbnail from Models Resource as their image submission, but frankly, I find that sub-optimal, and sometimes, character angles are not illustrative of a character due to bad silhouettes. I will be using Sushi's model from Mario Party 9 has a example.
Whenever you download a model from the Model's Resource, you will be downloading a ZIP file. These are easily openable with an extractor tool. Windows 10 comes with its own extractor, but should you lack it, there are plenty of open-source, readily available extractor tools out there, such as IZarc and 7-zip.
Open the ZIP with your archive extractor of choice, and you will be greeted with a plethora of files.
Depending on what you downloaded, you will have a bunch of files. All of these are necessary, but here's a brief run-down on the common file formats you will be greeted with should you venture in downloading from the Model's Resource:
- .dae - A format that supports bone and rig information (in other words, you can animate and pose the model). However, dae files come in all sorts of varieties, Collada dae and 3DS Max dae, which may run into compatibility issues depending on the program you use.
- .obj and .mtl - A format that does not support bone and rig information, but can be readily imported into all 3D modeling programs. .obj is the model file, while .mtl is the material file that comes with it.
- .smd - Source Model file. This is a Valve format that requires you obtain an SMD Importer plugin for your program in order to read it. Some zips in Model's Resource contain this format.
- .fbx - 3DS Max format that supports bone and rig information. Blender and Maya should be able to read it fine but it could come with compatibility issues.
Extract the files to a location where you can find them easily.
As said earlier, this tutorial will cover 3DS Max but much of these instructions do apply to most other programs, including Blender. They may have different steps on how to achieve the same results, however.
This guide also assumes you have some basic knowledge on how to navigate 3DS Max's UI, such as using the view cube to change your view, how to expand your main viewport, how to zoom in and out, and how to pan your view. If you need assistance, contact me and I'll help you out.
In your 3D modeling programs, in order to open models you downloaded off Models Resource or extracted, you have to Import them in, rather than open them.
This will open up a window, in which you need to navigate to your extracted model file in order to find it. Here, I'll import the .dae of the Sushi model I've imported from the Model's Resource
The default settings is what I usually stick with, though you should certainly enable Animation and Skins, as that will make your model poseable, if you want. However, I typically make the Units have a Scale of 1.0, if you scroll further down the dialog box, underneath "Advanced Options", as this will typically make your model a more manageable size for render purposes.
Anyway, at this point is where this thread is primarily focused in. A lot of the times, the import process is not perfect, and you will come across a variety of quirks and render weirdness that may compromise the quality of your render. Here's a rundown of the common problems you may face in the importing process before you decide to go render them and upload to MarioWiki.
Applying Textures To Your Model
In 3DS Max, this is as simple as clicking and dragging your texture into it.
(yes, the model I have does have UV quirks that I will address)
Another way to apply them is to press M.
This will make a Material Editor window pop up.
Click on the eyedropper tool, and then click on a model in the program, this will immediately pop up your model's material.
If you scroll down once you picked your material and expand "Maps", this is where you can apply all sorts of special maps you may encounter. More modern models (from the Wii U era onward) come frequently with specular and bump-maps, and the Material Editor here can help you apply them to really make your model pop as intended! Specular maps control model shininess, used for metallic surfaces, and they're typically grayscale, while normal or bumpmaps are light blue, and they control normal lighting....they are typically used to introduce bumps, cracks, holes, and topology without altering the polycount of the model, giving the illusion of depth. This is pretty advanced for the scope of this tutorial, but I had applied the proper maps for this render and they pop out.
Normals
By far the biggest issue I see with your average models on MarioWiki. These lend the model a highly faceted look, and it makes edges very sharp. A lot of the times, it's caused by split separate UV shells or if the model is split into separate parts for use (commonly around the eyes, usually used for texture animation). There are several fixes for this problem.
Vertex Welding
Welding vertices together can help smooth the way your model looks, if your model is separated by a bunch of different parts (a term used for model "parts" is "Element", in most 3D modeling programs, you can select by element). In 3DS Max, this is applied by applying a modifier on the right stack, while you are under the rainbow-like "Modify" tab.
The Threshold on the right side should be a very small value, such as 0.01 or 0.001. This will weld any overlapping vertices together, potentially fixing your model display.
Smoothing
Sometimes, a simple modifier can solve your models smoothing issues. This is applied by the Smooth modifier.
Selecting "1" on the smoothing group most likely does the job.
Edit Normals
If neither of the above solutions work, Edit Normals is your last resort modifier that will fix your hard edges.
Activating "Edit Normals" will create pincushion-like lines on your model. You have several options on the right tab. Whenever you have that modifier active, you can CTRL + A to select all. This will cause all of the "pins" to turn red to indicate they have been selected.
Unify: This usually helps weld normals together, especially if they had been recently been edited or split.
Average: If Unify doesn't work, the window below "Unify" can help.
For the settings I use under "Average", I typically average with a very small value (0.001) and make sure "Use Threshold" is checked. Click on "Selected" and this will weld your verts together. Beware that this may cause normals issues elsewhere on the model, but generally, this will do its best to hide any obvious seams from the model.
UVs
Sometimes, character models don't render properly because of flipped UVs or other UV issues. This part of will cover that.
The Sushi model I've downloaded comes with a fixed UV version, but let's assume the provider has not given a fixed model for the Sushi. In order to edit UVs with 3DS Max, you have to add "Unwrap UVs" in your stack.
If you click on the tab that has "Open UV editor" below, this will open up a window that will display the UVs.
If you want textures to show up while you are UV editing, the drop-down on the upper right hand corner of the Edit UVWs window can display your textures.
However, one thing I'd like to note is that every model can have its own set of UV issues. For this particular model, it's because the UVs are mirrored vertically. How to fix this is to CTRL + A in the window (select all), which will select your shells, and then click on "Mirror Vertically" in the Tools tab.
However, in some cases, especially New Super Mario Bros. Wii and Mario Kart Wii models, your model will look like this with applied textures.
This is caused by a mirrored UVs tileset. A manual method involves manually mirroring the textures and then editing the UVs to accommodate for this, which can be time-consuming, especially if this is your first time engaging in UV editing from Unwrap UVs modifier (another method involves creating an edge and then mirroing only that portion of the UVs, also time-consuming). Fortunately, 3DS Max has an easy fix for such models for rendering purposes.
In order to fix this, hit "M" again, which will bring up your Material Editor Window.
Click on the dropper tool next to the "Material Name" drop down, and click on the model that needs to be repaired in the scene. Once you've done that, expand the "Maps" drop down below, and select on your texture that needs fixing (in this case, bbluigi_eye.0.png)
Click on that will reveal another window.
Under "Coordinates", next to the "Offset" and "Tiling" boxes, there is a checkbox labeled "Mirror". Check the topmost one and that will solve Baby Luigi's issue.
Rendering
Before you go out and render your image for MarioWiki, there are several things to consider.
Character silhouette is hugely important. Which one of the Sushi models conveys the best information?
The lattermost one is the most desirable angle, as it showcases the most major parts of the character, such as the fin, tail, and shape of the dorsal fin. A large amount of characters can get around with a frontal view, though in some characters, like Sushi's case, require another view to convey more information about the character.
Additionally, you should render your characters with an orthographic perspective rather than the default perspective you get. This reduces the amount of distortion and foreshortening whenever you close up on the model for maximum render efficiency. To change the view, click on the "Perspective" part in the upper left corner of the viewport and select "Orthographic".
If you don't like the sihlouette, you can always adjust the camera on the upper-right hand corner to suit the information being conveyed.
Under the render "Window", this will generate an image for your character, with transparency and all.
There are a lot of parameters you can adjust while you are in this process. The tab "Render Setup" is the tool I tinker around with to get the best render results for use in MarioWiki.
You can also access the "Render Setup" tool through the tab or F10
I'm not going to go into too much detail here as it gets pretty advanced, but this is the part where you can play around with all sorts of different types of rendering you can do.
Another point of interest is the "Environment" tab.
This is where you can control some of the dark, murky look of your render, especially if you adjust the ambient lighting. You can play around with these settings to try to find a result you like. For example, if I turn the black "Ambient" up, the model will look brighter and have less dark shadows. The "Tint" segment controls how bright your model is.
Anyway, once you found a render you like, there is an icon with "save" next to it, in which you can then save your render for wiki uploading.
On the dropdown below, make sure you select "PNG". Additionally, I also recommend using an image editing program to crop out unnecessary transparent areas, such as GIMP's autocrop/crop to content tool to make the most out of your image.
Anyway, I hope this guide will help any sort of inquiries people may have when it comes to uploading models to MarioWiki. I know that it's a lot more complex than uploading sprites (animation is another beast entirely that I had uploaded myself, and it does follow similar principles to what I outlined above, though there are different steps on how to generate an animated gif for your 3D animation. 3D animation is hard to get by as it requires your model to have animation files. Games like Dr. Mario World come in FBX and have embedded animations, but those are a rarity and they can also be difficult to manipulate as they may come with vertex animation) and that the programs I've listed can be very difficult to get into with navigation and UI at first, but I will be happy to assist anyone who is interested in contributing uploading 3D renders of models to the wiki.
If there any concerns with any currently uploaded 3D images on the wiki, this is a good thread to ask about them (not cropped from screenshots, but from users rendering the models). If there is any fixes that editors ran across that I may have missed, I will look into it and update the thread for fixes.
Attachments

Last edited: